Everyone has the opportunity to build a dream home, and if you do everything with your own hands, you will be able to create a special, unique atmosphere, avoiding standard and hackneyed approaches. And even though it may be just a small house on a summer cottage, it will be filled with happiness and warmth.
1. The Hut on Chicken Legs in Strathmore


This fairytale home was created by a team of architects from Broadhurst Architects for clients who had a plot of land in Maryland. The nearly 25 square feet of this lovely little home includes a kitchen, living room with gas fireplace, bedroom, bathroom and a pretty deck. It is made from previously used materials and is equipped with a rainwater collection system, solar panels, and a modern security system against bears, rodents and other uninvited guests.

This cute A-frame house will only take a day to assemble and will cost you $1,200. It was designed by Derek Didriksen of Relax Shacks and built by Joe Everson of Tennessee Tiny Homes. The roof and walls are made of polycarbonate material, which is lightweight and easy to handle. If you want to add space, from 6 to 9 square meters, you just need to raise the wall. The house has two beds that can also be used as shelves, a small kitchen with a sink and a mini-fridge.

Owned by designer Mac Loyd of Creative Cottages, this stunning little cottage features a kitchen, living room, bathroom, two bedrooms, gas fireplace, laundry area and terrace. According to Mack, his home demonstrates the ergonomics of space, thanks to which an entire family can live in it. Assembly of the house will take only a week.


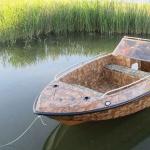
Foy and Louise, a Maine couple, spent about 10 years creating the cabin as a rental property. When the project was ready, we decided to live in it ourselves. The house, with an area of just over 20 square meters, stands on a plastic pallet and pontoon. It was first assembled on land and then launched into the water. Unfortunately, it may suddenly flood. Louise spends hours carrying water into a 55-litre water tank to keep the shower and kitchen running, and there is also a rainwater collection system for watering the plants. The house has a bedroom, living room and equipped kitchen. In the evening and at night it is illuminated by candles and gas lamps and thanks to the energy of solar panels.


This is probably the largest of the houses presented in the review, since its area is almost 40 square meters. This little house can easily be moved on a trailer. The spacious bedroom has a large bed and multifunctional shelves that are placed in different places. In the kitchen area there is also a dining area, and outside there is a 9 square meter veranda where you can barbecue or enjoy the sun and fresh air.


A couple of extreme skiing enthusiasts, Molly Baker and Zach Giffin, are constantly traveling from place to place, and so they decided to buy a mobile home so they could be at home everywhere. In a two-story house, the ground floor contains a living and dining room with a kitchen with a small stove. The guest bedroom and storage area are accessed via an unusual staircase. The cost of the house is $25,000.

Nestled in a majestic forest, the modern lodge was built to replace a 60s building that had stood there for decades. Inside, the house has a modern, elegant design, but it itself seems to be sandwiched between two large stones - one serves as a support, and the other as the basis for the terrace. The house is spacious, as its area is more than 30 square meters, and the windows are quite large.
8. Secluded cottage


The 35 m2 house is built from natural materials and equipped with energy-saving technologies, a vaulted ceiling and large floor-to-ceiling windows. In addition, there is a glassed-in terrace that can be used as a dining room or an additional bedroom. The house has a fireplace and a kitchen.
9. Carrie and Shane's Little House


The couple recently completed three months of construction and furnishing of a cute 18 square meter house. The basis for the mobile home was a trailer. The house itself is equipped with a water heater, dry closet, solar battery, and large windows provide better lighting.
10. Tiny House by Richardson Architects


The small house has a bright exterior and interior. The area is 25 square meters and it is equipped with a rustic-style terrace. Interestingly, on the terrace there is a board on which the menu is indicated every day, and comfortable wooden chairs made from previously used materials. Inside there are two bathrooms and double bedrooms, a kitchenette and a dining room. Stainless steel materials and painted plywood sheets were also used during construction. The house is located in a picturesque corner of the Californian coast.
11. Tom's Tree House

Tree houses never fail to amaze. Many people would like to stay overnight at Camp Wandawega, located in Elkhorn, Wisconsin. The three-story structure is located on an elm tree. The spacious terrace allows you to relax in a hammock or have lunch during the day. On the second floor there is a library and a bedroom.
12. House on Orcas Island


The house is hidden in a thicket of elms and cedars on Oscar Island, Washington. This is an ideal place for those who want to retire and get closer to nature. On a total area of just over 35 square meters there is a living room, a bathroom, and a bedroom on the second floor. Since outside temperatures can drop significantly in winter, the house is equipped with energy-saving windows and insulating materials.
13. Box of matches
Gingerbread Cottage.
Houses in the American town of Oak Bluffs are striking examples of how cozy and beautiful a small home can be. Many are decorated with Victorian-style designs and painted in a range of colours, as well as quaint terraces and lofts where the bedrooms are located. Renting such a house per week will cost $1,800.

This shabby but chic cottage is built with 95% reused materials from 25 other houses that are 200 years old or more. This 7 square meter home from Texas Tiny Houses features arched windows and stained glass windows. The stairs leading to the second floor lead to the sleeping area. The house, whose interior is designed in a rustic style, has a kitchen, living room and dining room.
But these examples are not all that people can do in order to have a separate home, because everyone has their own little childhood dream, the fulfillment of which our review offers:.


Nowadays it is not at all necessary to chase after prestigious houses when building a palace, because it is difficult to surprise with this now. It’s much more interesting to create a small but cozy and atmospheric house that you won’t want to leave. Having carefully worked on the creation and design of a country house, you can build a place for physical and mental relaxation. Having built a country house with your own hands, you can make all your dreams and childhood fantasies of creating an ideal vacation spot come true.


Choosing the optimal location
If you start building a house on a plot of land, you must follow generally accepted construction rules, so you should not rush to dig a foundation pit ahead of time. According to legal acts, the house must be located in accordance with the following location requirements:
- no closer than five meters from the street;
- at least three meters from the roadway;
- the distance to the neighboring building is 3 meters or more.


Now we need to roughly see what happens, since this should be carefully monitored. If the construction site is in a low-lying area, then you need to look for an alternative option, since it is impossible to build a house in a hole. By placing a house in a low-lying area, you can doom it to constant flooding from melt and rainwater. Ideally, you need to find a place on a hill, preferably on the northwestern side of the land. If the terrain is flat, you will have to build a drainage system.


Options for successful projects
You can build a small house, but this does not mean that it will not be comfortable. Having a small area at your disposal, you can be able to properly manage it so that all the necessary rooms are present in the building. A veranda is one of the obligatory attributes of a country house, because the family will spend all their gatherings there.


The most popular option for a country house is a one-story building with an attic. This option has long been time-tested and has further development prospects. With the help of an attic, you can avoid building additional outbuildings. Houses of this type often have open terraces attached, where you can have a great time in the summer, arranging them as outdoor dining areas.
By building an attic, you can increase the usable area of the house, without the need to build a second floor; it will be enough that the roof is modified and raised slightly. In this case, it is best to place the bedrooms on the second floor, and leave the first floor for the kitchen and living room.


Also, the best option would be a house in a high-tech style. The topic of twin houses also remains relevant. Two houses are built on the plot of land, one of which is a smaller copy of the second. Such houses are especially popular for those who like to relax with a large group, because you can give a smaller part to guests, without embarrassing each other.
Country house made of timber
An excellent option for building a country house, as it is economically beneficial, and in addition, the construction of such a structure will not require global finishing work. In addition, it will be environmentally friendly, which means it will always be comfortable inside. However, despite this, there is a significant drawback - the complexity of construction. That is why it is unlikely that you will be able to build it yourself; you will have to resort to the help of professional builders.


Stone country house
A country house built of stone is an unaffordable luxury. Naturally, this is the most durable and durable option, but it is also the most expensive. Whether it is worth it or not is up to those who want to start building a personal country house for a holiday with the whole family to decide. The material can be used:
- brick;
- gas and foam concrete blocks;
- shell;
- natural stone.
It is almost impossible to build such a house on your own and quickly. If you don’t delay construction for decades, leaving an incomprehensible structure on the site, then you should turn to specialists (masons) who will do the work for the owner many times faster.


Prefabricated structure
Recently, these houses have ceased to be unattractive and boring, because now manufacturers offer original architectural buildings on one or two floors with an improved layout. Building such a house is a pleasure. In fact, this is an original and large construction set, which is easy to assemble and does not require special skills and knowledge.
On the plus side, communication systems are already in place, including:
- electrical wiring;
- ventilation and air conditioning systems;
- water pipes.


Thanks to this, the beginner avoids various mistakes that would be possible and will be able to build a house with his own hands. There are also built-in ones:
- kitchen;
- bathroom;
- rest room.
Due to the fact that there is electricity and heating, the house can be used even in winter. Having filled the house with the necessary plumbing and furniture, you can safely move into it and live at any convenient time or on a permanent basis.
Frame house
Frame country houses are a low-budget option that you can build yourself. The construction technology is simple, which means you can do it yourself. Although, sometimes you still have to use a couple more free hands, but for this you do not need to hire specialists, just ask 1-2 friends for help. If you get involved in construction headlong, then in 2-3 weeks the house will be completely ready.


Building a frame house with your own hands
Foundation
If it was flooded by the previous owners, then you are lucky and all that remains is to adjust the required perimeter using columnar technology. The old foundation needs to be protected; to do this, you need to dig a trench half a meter deep around it and apply a waterproofing compound to the foundation walls, and then cover it with hydroglass insulation.
If the foundation is laid from scratch, then it is necessary to clear the construction site of fertile soil, moving it to the city in order to use it in a rational way. Instead of soil, you need to fill it with sand, after which you can dig a ditch, filling it with the necessary material. The frozen foundation must be waterproofed and covered with hydroglass insulation. For the basement floor, vents are made in the foundation for anchors with studs (9-12 pieces). The base must be made of brick, its height is 1 meter.
After the foundation stage has been completed, it is necessary to start assembling the basement floor; it is best to do this according to the “platform” scheme, which is made from beams or wooden beams.
Walls and their output
The walls are assembled on the surface of the finished floor; the modules must be fixed to the bottom of the timber frame. Frame walls are quite large, so it is better not to install them yourself, but to ask the help of your friends to do it collectively. The total installation time for all walls of the house is 1 week. The main thing here is to correctly connect the corner zones with the transverse strappings and secure them securely with spikes or staples. After the walls have been erected, it is necessary to start strengthening the frame with the help of braces and struts, which plays an important role.
Roof
The roof structure of a frame house consists of a rafter system and a roofing part, the second part includes:
- rough coating;
- layers of vapor and waterproofing;
- decorative coating.
The rafter system must be assembled according to a carefully developed project, the height of the attic is 1.5 meters. The optimal roof shape is 4-slope; roof installation time is 5-7 days.
Wall cladding
The frame of the house must be covered with inch boards. In order to give the structure additional reliability, part of the skin is attached at an angle. A more expensive option is to use cement particle boards instead of boards. Cladding work should begin with the facade, continue with the side walls and end with the back of the house.
This is followed by the final work on the exterior of the country house, which includes:
- roofing;
- removal of pipes and chimneys;
- installation of a ridge aerator;
- wall cladding and decor;
- fixation of facing panels.
If you set a goal for yourself and quickly move towards it, then in 3-4 weeks you will be able to admire your finished work in the form of your own country house, built with your own hands. Now you can do the interior work and fill the interior to your taste. Here you can realize all your ideas and desires by filling the house with original furniture, stylish decorative items and other things that seem necessary.
Tags: https://www..jpg 662 991 Nuke https://www..pngNuke 2017-11-19 15:58:11 2017-11-19 15:59:46 DIY country houseThe need to build a compact house may arise for various reasons. For example, such a small structure is perfect for placement on a summer cottage that is not used for permanent residence. In a small house you can conveniently change clothes, put your things and spend the night.
Of course, ready-made cabins are sold on the market, but the quality of their execution often leaves much to be desired, and the cost is definitely overpriced. For the same money you can put together a great little house on your own.

There is nothing complicated about building a compact structure yourself. Follow the guide and everything will definitely work out.
Any construction must begin with planning, without which construction will take much more time, money and effort. There is a possibility that the finished structure, built without a plan, will not meet your needs and expectations.

For a small house it is not necessary to draw up detailed documentation with many drawings. Even a simple sketch indicating the main dimensions, communications and other design features will be sufficient.
Preliminarily think through the order of the internal organization of the future small house. Will it have only one room, or will there be enough space for a small kitchen and a small bathroom? At this point, focus on your personal preferences and capabilities.
For example, many prudent owners use a very interesting technique: they raise the ceiling and arrange a sleeping area in the attic. This solution allows you to significantly save useful space.

It is recommended to pay special attention to the experience of the Japanese. Even on a few square meters they manage to place everything necessary to create a comfortable and cozy environment, because even a mini house is still a house in which it is definitely more comfortable than on the street.

The following guide will give instructions on how to build a fairly simple small house. Approximately 75% of the space will be occupied by living quarters, and the remaining space will be used to accommodate a storage room and dry closet.


If things are very difficult with free space, you can make separate entrances to the mentioned premises from the street. If there are no such problems with free space, and you don’t want to constantly go outside, arrange an entrance to the technical room from the living room.
If desired, make your own changes to the plan. For example, instead of a pantry, you can arrange a mini-kitchen with a table, a couple of folding chairs or small stools and a compact stove.

After approval of the plan, proceed directly to construction activities. Start by laying out the foundation.
Foundation
For the construction of a small house, a simple foundation made of blocks is perfect. Western private developers came up with a very interesting solution. They create a foundation block with four channels. A reinforcing bar is inserted into each of these channels. The rods themselves are driven into the ground. As a result, the block is securely attached to the ground.


In the project under consideration, the foundation will consist of six such blocks. You will place four blocks in the corners of the future building, the remaining two - under the internal partition.
You can make the blocks yourself from concrete or buy them ready-made.
Dig a hole 200 mm deep with sides corresponding to the dimensions of the blocks.
Fill the hole with a 20 cm layer of sand and gravel mixture. Pack the pillow thoroughly.
Install blocks and introduce reinforcement in accordance with the previously given recommendations.

Cover the blocks with a layer of roofing felt.
Make sure that the blocks are installed evenly and proceed to further planned activities.
Floor installation

First step
Mount the bottom trim. Make it from timber with a cross-section of 15x15 cm. To connect the strapping beams, use a convenient fastening option. You can, for example, connect them using the tongue-and-groove method with additional reinforcement with glue and bolts.
Second step
Place a platform pre-assembled from a 15x5 cm board on top of the frame.
Third step
Cover the platform with plywood.

Fourth step
Turn the resulting box over and place insulation inside it.
Fifth step
Sew the insulation with a double layer of plywood. Lay plywood 1.2 cm thick along the box, and 0.9 cm thick across it. As a result, the floor will have a thickness of 2.1 cm. Use PVA glue to fasten the layers of plywood.
Sixth step
Sew the platform with roofing felt on all sides.
At this point the floor is ready. If you wish, you can additionally decorate it with other material to your taste.
Linoleum is perfect for finishing the floor.

First step
Treat timber and boards intended for wall construction with an antiseptic.

Second step
Assemble the frame of the planned dimensions.

Third step
Arrange the top harness.
Fourth step
Cover the entire structure with plywood.

Fifth step
Attach windproof film to the outside of the walls. At the same time, this material will perform waterproofing functions.
During the construction of walls, do not forget to leave openings for installing doors and double-glazed windows.
Arrangement of the roof structure

The roof structure must be such that in the future, when opening the door, the roof overhang will not be affected. To comply with this rule, the slope of the roof slope must be 25 degrees.
First step
Install the rafters. To do this, use 10x5 cm boards. To fasten the boards, use corners and screws.

Second step
Mount the roof ridge. To make it, use a 15x5 cm board.
Third step
Additionally, fasten the roof rafters with ties 10x2.5 cm.
Fourth step
Attach 0.9 cm thick plywood to the rafters.

Fifth step
Lay your preferred roofing material over the finished base. Flexible tiles work well. This is a relatively lightweight material with good performance properties. At the same time, the roof of a small house will have a small area, so you won’t spend a lot of money on finishing material.

Doors and double glazed windows
To create a healthy microclimate in a room, even if it is very small, you need to install windows. It is better to provide places for placing double-glazed windows at the stage of assembling the frame.
To determine the optimal total window area, divide the floor area of your small house by 5. Divide the resulting value by the number of windows you need.

If you are planning to equip your small house with a bathroom and kitchen, think in advance about the order of furniture placement so that the windows do not interfere with the normal use of the house in the future, but are a useful addition.
If possible, windows should be placed in a south-east direction, since there is very little sunlight on the north side, and low western sun rays are bad for the eyes.
You can buy doors ready-made or make them yourself. It is enough to assemble the frame, fill the voids with thermal insulation (mineral wool is perfect), cover the frame with plywood and upholster it with the desired material.

Wall decoration

External
Proceed with the exterior wall decoration.


Internal
Proceed with interior decoration.
- Secure a layer of thermal insulation material.
- Cover the insulation with a layer of vapor barrier.
- Cover the walls with clapboard.
At this point the wall decoration is ready. After this, it is recommended to start arranging the ceiling and making a porch to your taste. It is better to carry out these activities before the construction of the roof structure begins.
Furnish and technical equipment of a small house according to your taste.


Ceiling finishing
- Cover the ceiling with a vapor barrier material.
- Secure the insulation material.
- Cover the ceiling with insulating layers with clapboard.
You can lay boards in the attic. At this point, focus on the specifics of your situation, taking into account exactly how you will use your attic.
Necessary communications
If necessary, install electrical wiring, sewerage and water supply into the house.

For heating a small house, both an electric heater and a gas convector are well suited. Such gas convectors use liquefied gas as fuel. To ensure the most efficient heat distribution, the system should be equipped with a galvanized steel reflector.


A gas convector must be equipped with a smoke exhaust pipe. The chimney is carefully insulated to prevent fires. To protect the chimney from snow, rain and various debris, install a special protective canopy on its street end.
This completes the small country house. You did an excellent job without involving third-party specialists, which allowed you to save a significant amount of money, and you were convinced that there is nothing complicated in the construction of such structures - you just need to follow the manual in everything and adhere to the advice of professional builders. You can start using the house you built yourself.


Good luck!
Video - DIY small house
We will send the material to you by e-mail
Many residents of megacities dream of purchasing a plot of land and a comfortable house outside the city, albeit a small one. In some cases, it is easier and cheaper to build a house yourself than to buy a ready-made one. Projects of country houses for 6 acres will help you make the right choice, photos of which are presented in large numbers in our review. It is believed that building a house is very difficult. But some projects of country houses are distinguished by their extraordinary simplicity.
Comfortable small-sized country house
Country house projects for 6 acres: photos, options and construction requirements
To create a good-quality and durable building, you need to select a high-quality design for a country house for 6 acres. Photos of the best options can be seen in the interior. Before choosing, you should decide on the materials and a convenient place for the future structure.
First of all, you need to decide whether the building will be intended only for summer living or whether it will be a capital country house with your own hands. Projects, photos and recommendations for choosing a suitable structure can be found in this material.
A functional and comfortable home must meet certain requirements:
- Construction is carried out in a short period of time, since until the house is built, there is nowhere even to hide from the rain.
- The structure must be erected taking into account all the rules of manufacturability of the process.
- For such a construction, you should not spend a lot of money and purchase expensive materials.
- Construction is carried out in such a way that it remains possible to add additional premises.
- If the house is intended for temporary residence, then in the future it can be converted into a bathhouse or structure into a summer kitchen.
- The building must be durable. Even with a shorter service life than permanent housing, the house should last at least 25-35 years.

What building materials are used during construction?
A wide range of different materials can be used for the construction of country houses. The most commonly used options are:
- The most popular is. Such buildings are erected over a season and are distinguished by simple technology. The frame system is assembled from timber, which is sheathed with special plywood or clapboard. Refers to the best options in terms of quality and price. This material is also characterized by a long service life.

- Some buildings are made from profiled timber. The construction of the structure takes several months. Also, about six months are allotted for shrinkage. Such structures do not require exterior finishing.

- Stone buildings are made from and cinder blocks. Such structures require long construction times, since a powerful foundation is used and the walls are built in rows. Before construction work, it is necessary to prepare a detailed project. Houses made of stone and brick are characterized by increased strength and reliability.

Helpful information! The choice of building material is influenced by its cost in a particular region, personal preferences and the type of foundation. Frame buildings and timber structures are mounted on screw or columnar bases.
Video: small houses for a plot of 6 acres
How to build a turnkey country house inexpensively: prices
For those who do not want to spend a lot of time on construction work, the best option may be an inexpensive turnkey country house. Prices for structures can be seen in a special catalog of the selected construction organization. A suitable option can be selected to suit any budget. The cost of the structure is influenced by the type of structure, material and dimensions of the structure.

A house measuring 5*5 m made of clapboard and timber will cost about 100 thousand rubles. A structure with a porch and a canopy or veranda will require an investment of a larger amount, more than 200 thousand rubles.
Related article:
Features of installing a house with your own hands
Features of installation work depend on the choice of specific material. A timber structure has many positive qualities. Such material is treated with stain and various protective compounds. A lightweight version of the foundation can be used for the structure. In this case, the roof can be gable.

How to make a foundation?
Due to the optimal weight of timber structures, the bases can be used uncomplicated and light.

The following options are worth considering:
- Columnar is created from brick supports, which are dug in at 30-50 cm.

- A strip foundation is a reinforced concrete strip laid to a certain depth.

- The pile foundation is mounted on screw piles. A similar structure can be erected on unstable soils. Pile and columnar foundations require a grillage. In this case, a certain timber is used.

It is laid between the wood and the foundation. You can apply a layer of roofing felt. Then the floor beams or joists are installed.

Expert's point of view
Dmitry Kholodok
Technical director of the repair and construction company "ILASSTROY"
Ask a Question“If the dimensions of the building are more than 6*6 meters, then additional support will be required for the floor beams. In this case, the foundation is supplied not only under the external walls, but also under columns and partitions, which bear a large load.”
Related article:
Methods of constructing walls and roofs
The timber is laid in a certain way. In the corner parts, the ends should be installed in a checkerboard pattern. During installation, jute is used, which ensures a tight fit of the joints. Installation of timber on dowels is used. These are vertical rods that connect 2-3 crowns. The dowels are driven into pre-drilled holes. These elements are made from steel rods or wood.

Ceiling beams are mounted on the upper crowns. After installing the ceiling beams, special wooden gables can be installed. The following types of roofing are often used for timber houses:
- Straight gable.
- Broken.

An unedged board is used as a sheathing structure under the roof. The main material used is tile material or ondulin. A waterproofing layer is installed under the roof.
Helpful information! The best material to protect against drafts is profiled timber. Grooves and ridges provide a reliable seal.
The dacha building is divided into two parts. More than 70% goes to living space, and the remaining area contains a bathroom and storage room.

To insulate the building, mineral wool and vapor barrier are used. Linoleum can be used as flooring, and lining or plasterboard can be used for interior decoration. When using plasterboard for cladding, it is worth making a stronger foundation. When living in a house for a year, you need to take care of heating. The water heating system and design with.


Save time: selected articles delivered to your inbox every week
The pleasure of owning your own country plot is tripled if there is a country house on it. Indeed, in this case, you can not limit yourself to only seasonal work and cooking barbecue outdoors during the warm season. Today, the construction of dachas is gaining momentum. Moreover, “dacha construction” houses are built from a variety of materials: from stone to timber frames and panels made of chipboard and fiberboard. And in our material we will look at how to build a country house with your own hands and at the same time complete all the work with maximum productivity and economic benefit.
Choosing building material
Construction of dachas is a task no less important than the construction of a permanent residential building. After all, the durability and strength of the building will depend on how well the installation is done (even if it is frame technology). Let's look at some types of materials that are most often used for the installation of country houses, and we will understand what is best used to build a temporary shed in the country:
- Timber. An excellent material for those who do not know what to build a country house from. Moreover, you can use both the cheapest option - planed lumber, and the more expensive one - profiled or glued. A house made of timber will have an attractive appearance and also create an optimal indoor microclimate.
- Brick or any blocks. A house made from such materials will be more solid, but its cost will not be justified if you plan to use the building only seasonally. Although brick (or blocks) have no worse thermal conductivity than timber. Stone dacha construction will be reliable and strong.
- Frames and shields. Your own house, built using this technology, is considered the most acceptable option for a budget and seasonal building. And if the house is also additionally insulated, then it will be possible to spend the night in such a building even in winter. Using the example of frame-panel technology, we will analyze how to build a summer house with your own hands. And for clarity, we will attach photos and videos.
A few rules for quality construction

In order to facilitate the construction of a country house without later bringing unpleasant surprises, it is necessary to follow some requirements and recommendations regarding the installation of the house. So, we build a dacha with our own hands, taking into account the following rules/recommendations:
- First of all, we are designing a building for a summer house, the construction of which has started. For a seasonal house that will not be used all year round, the optimal parameters are 6x4 m or 6x6 m. A larger cottage will already be a capital building, which will require a greater investment of money and effort.
- In gardening associations, you can install a house with your own hands only if you step back 3 meters from your neighbor’s fence or from the boundaries of your neighbor’s property.
- A house must be built at least 5 meters from the front fence into the plot.
- All wooden buildings (including frame ones) should be located at a distance of 15 meters from each other. That is, if a neighbor also has a wooden house on the property, then you need to remove your building as much as possible for fire safety purposes.
Important: for a country house with your own hands, it is better to choose the highest point on the site. Thus, melt and rainwater will not cause trouble for the new dacha we are building. But if the plot is very small, and you want to build a good house, then in this case they give preference to a two-story house with bedrooms located in the upper part. A kitchen and living room are installed on the ground floor.
To simplify the construction process as much as possible, we recommend building a one-story country house with a gable roof and a small veranda. And below are step-by-step instructions for completing the work.
Advice: if you don’t want to bother with construction at all, then a novice craftsman can simply order a ready-made modular house, which is simply assembled on the site using a prepared foundation.
Building a dacha: stages of installation

For those who do not know how to build a summer house, our step-by-step instructions with a detailed description of all the points will be useful. It will start with preparing the foundation. But first, we will prepare all the necessary materials for the construction of the dacha. So, we will need:
- Cement and sand with crushed stone;
- Steel rods for reinforcement;
- Boards or panels for formwork;
- Concrete blocks or bricks;
- Ruberoid or bitumen mastic;
- Expanded clay;
- Beam with a section of 100x100 mm;
- Metal corners, studs and screws;
- Chipboard or fiberboard panels;
- Vapor barrier;
- Insulation;
- Roofing material (ondulin or corrugated sheeting).
So, in the recommendation “where to start building a summer house,” the first point is the installation of the foundation. A lightweight type of base - columnar - is suitable for a frame house. This option for constructing a foundation will not only significantly save your money, but will also serve as a reliable support for the building.
- Installation of support pillars begins with marking the ground. According to the project, pigeon holes of 50-70 cm are dug in all corners of the house and at the intersections of walls. It is advisable to expand the cross-section of the holes downwards.
- Then the soil in the pits is well compacted and covered with a 10 cm layer of sand. Medium-fraction expanded clay is poured on top. Everything is sealed well.
- Now formwork is installed in the pits (possibly permanent) and covered with waterproofing on the bottom and sides.
- Also in the pits you need to install 4 steel rods, connected by transverse rods with a pitch of 15 cm.
- The finished concrete solution is poured into the pits so that the reinforcement sinks 2-3 cm into the concrete. The poured pillars are left to dry for 3-4 weeks.
Important: the strip foundation is installed using the same technology, only in this case you need to dig not holes, but a trench around the perimeter of the dacha house which we are constructing.
Frame installation

As soon as the foundation pillars are dry, you can begin constructing the frame of the house. Namely, its lower platform. This will be the starting point for the walls and roof. Therefore, for the platform you can take a beam of a larger cross-section - 100x150 mm.
Important: when doing work at the dacha with your own hands, do not forget to treat the wood with antiseptics and fire retardants. This will increase the wood's resistance to burning or rotting. It will also repel rodents.
- So, along all the foundation pillars without exception, we lay timber frames. We mount it on roofing felt. All elements are securely fastened together. In addition to the strapping, we install floor crossbars - joists. We attach the lower crown of the house with anchors to each pillar.
- Now we cut vertical support beams into the lower frame in increments of 60-70 cm. They can also be secured using metal fasteners and jibs.
- Now we assemble the frames for the walls, taking into account the door and window openings.
- Following the assembled frame of the dacha, we construct the walls of which we carry out the upper frame of the racks from timber. Here you can use timber with a section of 100x100 mm. And floor beams are attached or embedded onto the installed frame. Thus we have a ready-made box at home.
- The next stage in the construction of a country house is covering the frame with chipboard or fiberboard panels. They are mounted on self-tapping screws, fitting tightly to each other.
- The floor and ceiling are covered with third grade boards. In the future, the floors can be insulated with mineral wool along the joists and sheathed with tongue and groove boards.
- And lastly, we lay hydro- and vapor barriers on the cladding of the country house, and insulation between them. Siding can be used as exterior finishing.
Roof of a frame house

- Hanging system. Here, the rafters are mounted only on load-bearing walls and no longer have other types of supports. To make the system monolithic, such rafters are secured by tightening.
- The rafter system is layered. It is arranged if the house has internal partitions that will serve as additional support. When installing a layered rafter system, the load on the load-bearing walls of the house is reduced.
- It is better to assemble trusses on the ground, and then lift them to the top frame and install them there. All trusses are fastened together with a ridge beam and fixed to the mauerlat, the role of which is played by the upper beam frame.
- A film is laid over the rafter system, making overlapping joints. Then the film is additionally fixed with thin slats, placing them parallel to the rafters. Such a counter-lattice will create an additional ventilation gap for the entire roof.
Important: the overlap width of the film must be at least 20 cm.
- Now a finishing sheathing is installed perpendicular to the counter-lattice, onto which we will subsequently install the roofing material. The spacing of the boards/slats is made in accordance with the width of the sheets of roofing material.
- Roofing material begins to be laid from the bottom of the roof, moving in rows from right to left or vice versa.
- The roof overhangs are covered with plastic or wooden lining. The gable sides of the rafters are also decorated with plastic or wooden lining.
Final finishing of the house

All that remains is to install the windows and doors into the completed house. They are installed on special wooden supports, adjusting and controlling the level of the blocks. All gaps between the frame and frames are foamed with polyurethane foam. A day later, the excess foam is cut off, and the remaining space is sheathed with plasterboard or any other building material for subsequent finishing.
Important: it is best to install doors completely with frame and leaves. In this way, it will be possible to align the load-bearing opening for the block as much as possible.
The interior decoration of the house can be done using plasterboard and then covering it with wallpaper. GCR can also be used for plastering, painting or cladding. And water supplied to the house will make staying in it even more comfortable. It will be pleasant and convenient to be here at any time of the year. A house built using this technology will last for 30 years or more. Now all that remains is to announce to your family and friends about the invitation to a fragrant barbecue.
By the way, if you don’t know how much it costs to build a frame house, then we hasten to inform you that such a building, taking into account the purchase of all materials, will cost about 10 thousand. If you don’t know what to build from and want to make a house from scrap materials that are left on the site, then such a house will cost 1.5 times less.