Contemplation is the way to restore your inner strength and distance yourself from the hustle and bustle. Admiring nature in any of its manifestations - be it a leaf, a blade of grass or even a small pebble, we fall into a kind of trance, delving into our “I” without reference to current events. This is probably why there is a massive “flight” of city dwellers away from noisy habitats, closer to Mother Nature, where on their own, even a very tiny piece of land, they can relax and rest their souls. How to create a relaxing atmosphere in your garden? Nothing could be easier! Instead of a couple of beds with potatoes and tomatoes, create a small pond at your dacha - now you will have more time to relax and contemplate the surface of the water - and this, as you know, is the best cure for stress and loss of strength. Do you think that such a complex hydraulic design is beyond your capabilities? With our recommendations, you will be “knee-deep in the sea,” not to mention a small pond, which you will be able to manage on your own.
So, you realized that your life is no longer conceivable without a lovely lake designed to please your eyes and calm your nerves. How to create a pond at your dacha with your own hands so that it harmoniously complements the garden landscape and lasts long enough, rather than becoming a problem area that requires tireless care?

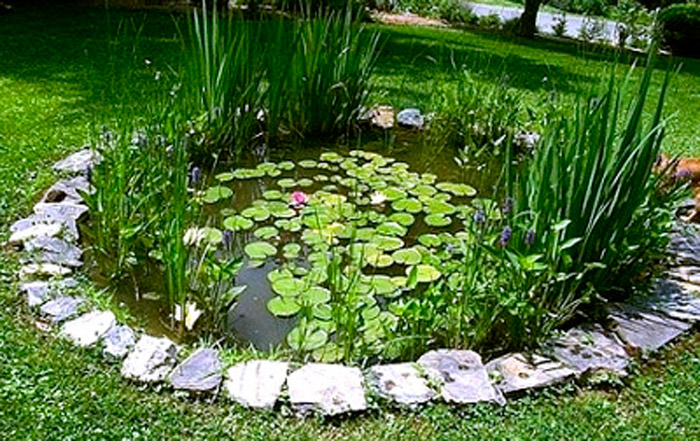
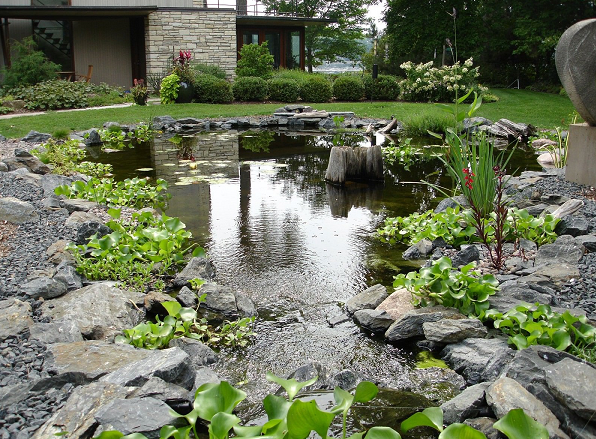
An original feature of a small pond decorated with boulders can be an unusual path made of flat stones
Let's start by choosing a pond style and choosing a location to plant it. Then, we will tell you how to make a pond technologically correctly and equip it. Chosen in the right style and laid with all the subtleties, an artificial pond will become a real pearl of your garden and great place for peace.
A short excursion into history
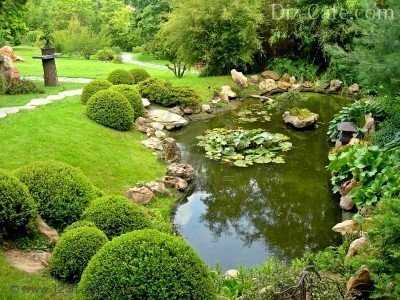
The landscape pond is given a special charm by its smooth outlines and decorative vegetation decorating the water surface.
A landscape pond with natural contours will always be appropriate in the depths of the garden next to the gazebo or not far from the terrace of the house - after all, you should be able to sit comfortably to watch the surface of the water.
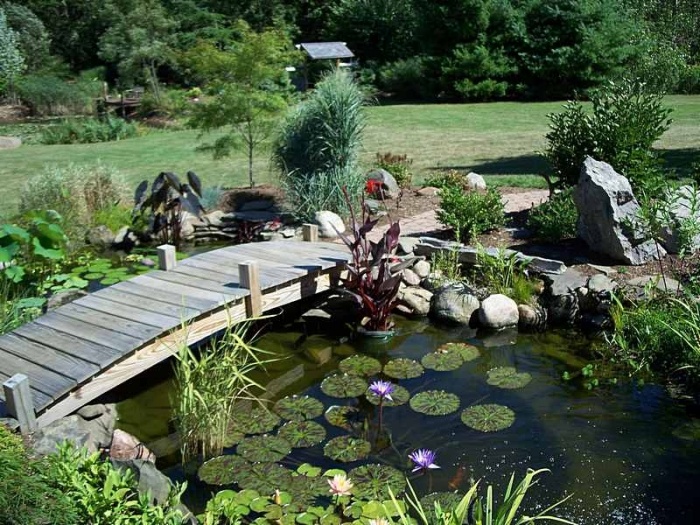
The design of the reservoir can be more restrained according to the Japanese principle - boulders various sizes, conifers, lack of multi-colored herbs. Or in the Chinese style - more lush and bright, with the obligatory accent in the form of a tree with variegated foliage and a curved bridge. A landscape pond can also be created in the “nature garden” style, which involves planting only local plants characteristic of a given region and the absence of any exotic plants.

The most laconic shape is a formal pond with rectangular outlines.
A formal pond with a geometric shape - a square or rectangular configuration - looks good next to the house, emphasizing its vertical and horizontal lines. Such a pond goes well with a courtyard or patio, especially if there are straight flower beds or linear paths nearby.

An unusual coloring of a pond can be given by a path passing over its surface - either in the form of a bridge, or with individual stones or slabs
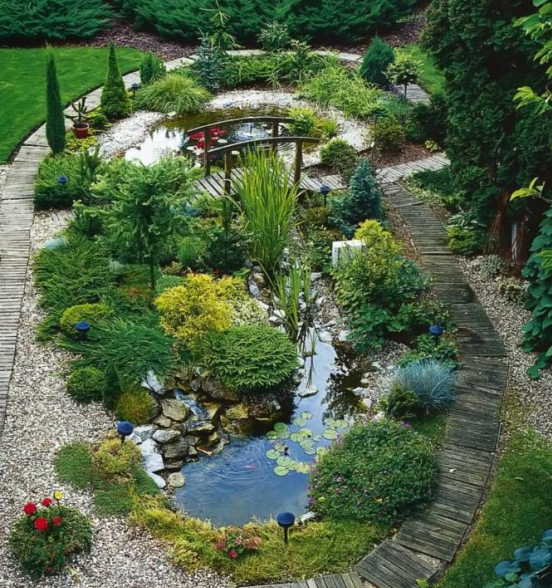
An interesting technique that is widely used in modern landscape design is the laying of paths laid out terrace board and thrown in the form of a bridge across a body of broken geometric shape. A similar path across a pond could also look like concrete path or individual square slabs, as if floating above the water. Cascades of small ponds of different sizes, where water flows from one bowl to another through small waterfalls, look original.

A system of cascading ponds at the dacha will not only add unusualness to its landscape, but will also fill the garden with a pleasant murmur

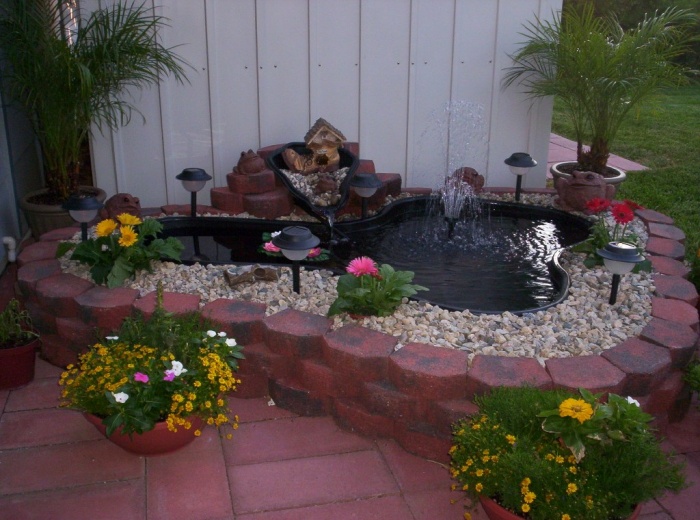
Formal round ponds will decorate the patio or front group of your summer cottage
Round ponds, along with rectangular shapes, also belong to formal ponds and can decorate a lawn or open lawn, stylistically complement a garden area with a pergola, or be located near a picturesque group of trees. Round-shaped mini ponds in the garden can be made with your own hands much easier than any other configuration by using ready-made concrete rings, wooden tubs, plastic containers and even car tires.
Select location, size, material
A correctly chosen location for a reservoir will be the key to its long-term functioning without seasonal “blooming” in spring and summer, when green algae are activated under the influence of ultraviolet radiation. The pond must be in the shade for a certain period of daylight, so that algae do not multiply so intensively. On the other hand, placing a reservoir in a completely shady area will delay the development of ornamental plants. It is important to maintain a golden mean here.

By placing a recreation area with a barbecue in close proximity to the pond, you can always admire the beauty of the water surface
It is important to know that the pond should be illuminated by the sun for about 5 hours a day and be open from the southwest. It is undesirable to place a pond under shady trees - falling autumn leaves will pollute it.
As for the size of the pond, ideally the pond should occupy 3% of the area of the site. When the garden is small - with standard area 6 acres, not every summer resident is ready to allocate 18 m2 for a pond. Of course, the smaller the dimensions, the easier it is to make a pond with your own hands - not so many materials will be required, and labor costs will be minimal. Therefore, when deciding on the width and length of an artificial reservoir, take into account your physical capabilities and the harmonious perception of the pond as a compositional spot on your site - that is, how its dimensions are combined with other elements of the dacha landscape.

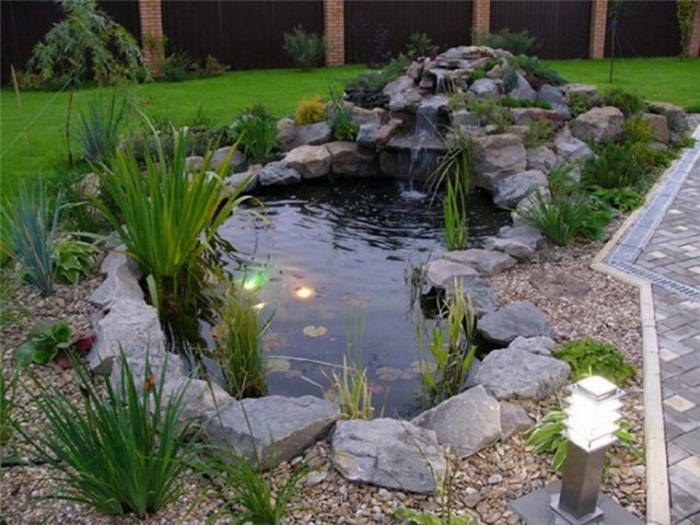
An ascetic solution in the design of a reservoir using only stones is specific feature Celtic style pond

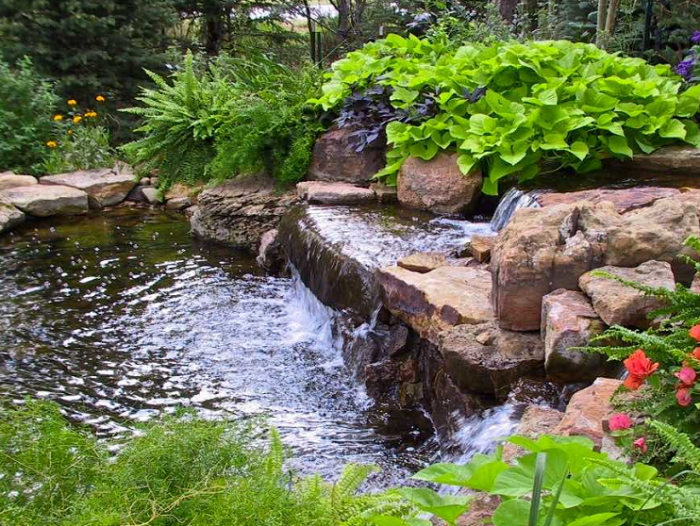
The design of a pond with a waterfall flowing from a small wall made of beige sandstone will fit perfectly into the landscape style of the garden.
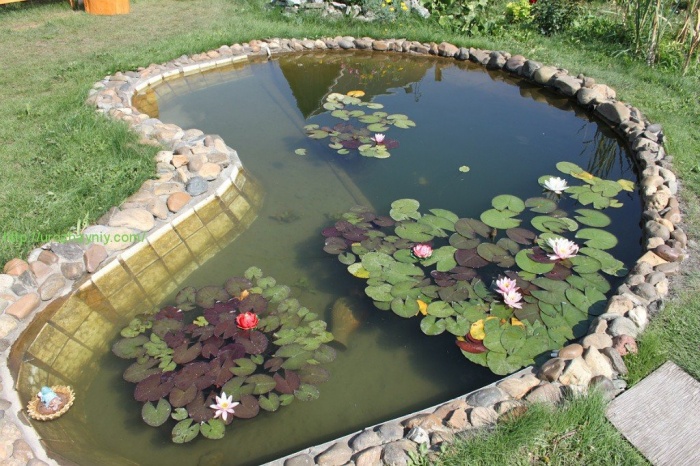
In terms of depth, it is recommended to divide the pond into three stages: a zone for coastal plants, a shallow zone for the queen of the pond, Nymphea - winter-hardy water lilies, and a deeper zone for wintering fish - if you plan to breed them.
You shouldn’t make the pond too deep, just dig a winter fish hole about 150-180 cm deep (below the freezing mark of the soil) so that it takes up about 1/5 of the pond’s area.

A cute rectangular pond can be arranged on a small summer cottage, and the edging made of terrace boards will make the pond unusual.

The highlight of an avant-garde pond can be an extravagant installation made of wood, reminiscent of an exotic animal or plant

A continuous supply of water to the pond can be equipped with an old column or group glass bottles bright color
When you have decided on the location and approximate dimensions of the pond, it’s time to think about what materials to use to make the pond as simple and quick as possible. The most capital and expensive option for arranging a pond is a concrete foundation, which requires the construction of formwork and reinforcement. A less expensive way to lay a reservoir is to use a ready-made plastic container.

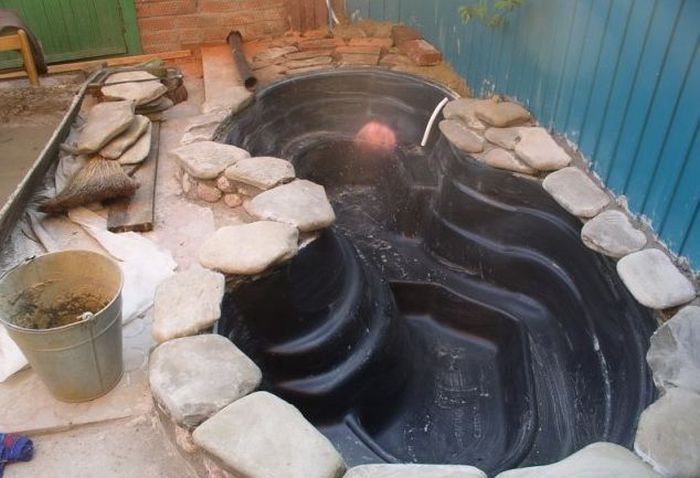
The pit for the pond is formed by characteristic ledges - curtains for planting plants

To ensure water circulation in the pond, a pump is installed at its bottom, from which water flows to the purification filter and returns back to the pond
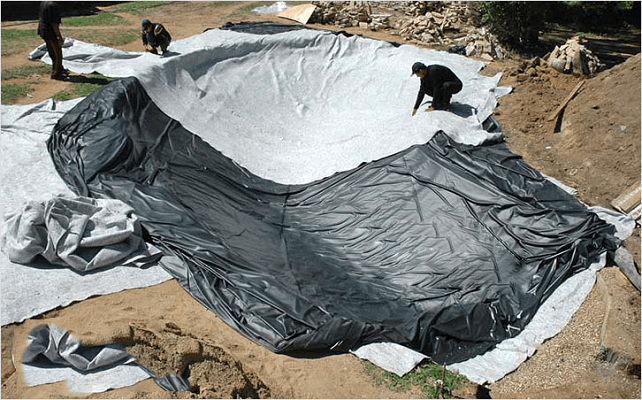
And finally, the most convenient and budget method in order to make an artificial pond with your own hands, use a special moisture-resistant film to line the bowl of the pond. This method We took the foundations of the pond as the basis for a detailed description.
Step-by-step technology for creating a pond using film
1. Initially, you need to sketch out a plan for the future artificial pond on a scale indicating the depth and width of the curtains (shelves for planting plants), and it is also advisable to draw a rough sketch of the decoration of the reservoir. This approach will help to avoid various alterations during the construction of the pond and at the stage of planting. On at this stage think about what will serve as an accent in the composition of your lake - it could be an original stone, wood or sculpture.

Before you start laying a pond on your summer cottage, draw a plan of the reservoir indicating the depths and placement of the main elements of arrangement
2. Using a regular water hose or scattering sand along the perimeter of the pond in the form of a line, outline the expected contour of the pond. Be sure to check that the shores of your future lake are at the same level.

Having marked the outline of the pond with a hose, dig a pit according to the drawn plan
Periodically measure the level of the banks of the pond during the formation of the pit. If you do not have a water level of the required length, you can adapt a regular long board and install a small 50 cm level on it.
3. We begin excavation work - we dig a pit to the depth of the coastal tier and mark a line from which the pond is deepened to the next mark. Having received the second tier, we lay a line for digging the deepest part of the pond and take out the last portion of the earth.
The process of digging a pond is quite difficult, so it is better to resort to the services of professional excavation workers accompanied by a mini excavator. However, if you still decide to do this labor-intensive part yourself, be prepared for the fact that water may accumulate at the bottom of the hole and you will have to fiddle around in the dirty slurry. A pump specially designed for pumping water with impurities and solids will help you remove water from the bottom of the pit. You can dig a auxiliary hole nearby and dump water into it.
4. After the pit is completely dug, using a cord we measure its dimensions taking into account the depth, adding allowances of about 50 cm on the sides of the bowl - this is necessary to purchase the film of the required size.
The problem you will inevitably encounter during the process earthworks- where to put the earth taken out of the pit for the pond? Not a bad option The solution to this problem is to raise the level of the site, evenly distributing the soil throughout the garden. You can also use the soil of the pit as an embankment for a stream or as a foundation for an alpine hill.
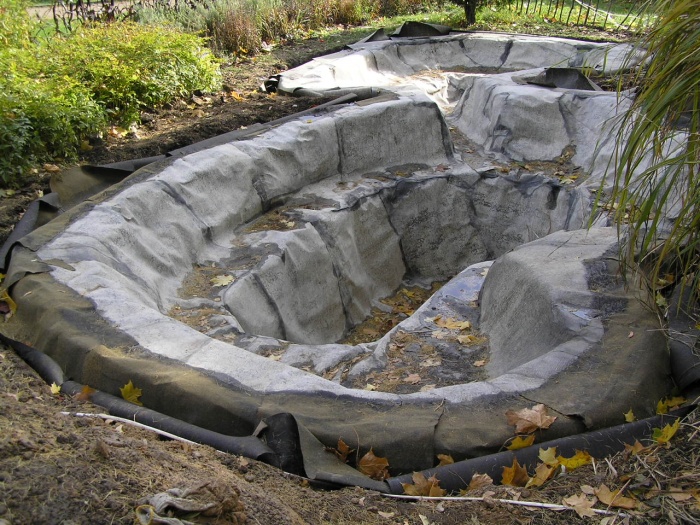
5. The pond bowl is lined with durable moisture-resistant film. As a rule, in order to protect the main film from damage by stones and plant roots, an additional layer of geotextile is laid under it. Also suitable for this purpose old linoleum or roofing felt, or you can simply fill the hole with sand and compact it.

When the pit is formed, lay a layer of geotextiles, and then the film, tucking the edges of the panels into a specially dug trench around the perimeter of the reservoir
To make the pond film more elastic, it is better to choose a sunny day for laying it - then it will heat up a little and will stretch better, easily going around all the ledges of the pit.
6. To arrange the edge of the pond, an auxiliary trench is dug along its perimeter to tuck and secure the film. Having laid the edges of the film in the trench, sprinkle it with crushed stone - this way it will be securely fixed.
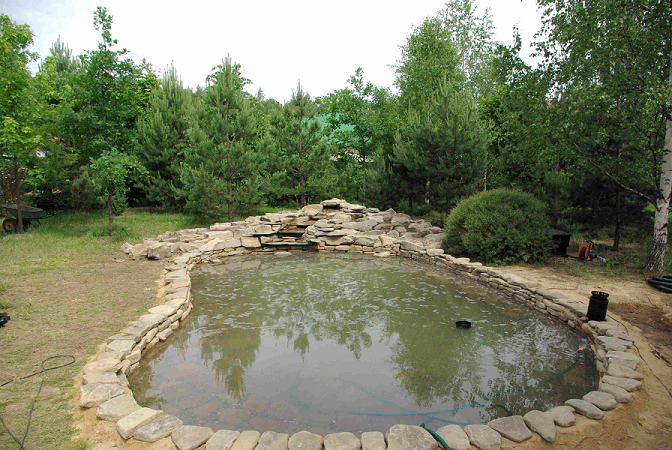
7. Reinforce the edge of the pond with stone blocks or plastic pipes, nailed to pegs - this will prevent the soil from falling from the coastal zone into the bowl of the pond. Lay out the edge natural stone and decorate with a beautiful single boulder or group of boulders.
8. Place the prepared plants in special plastic containers and arrange them on curtains, line the bottom of the pond with stones and gravel.
9. Now you can pour water into the reservoir. To make it easier to choose in the future pumping equipment and volumes of hydrochemicals for pond care, do not be lazy to take water meter readings before and after filling the reservoir.
10. To prevent the water in the pond from stagnating, it is better to equip the reservoir with a stream - it will ensure constant circulation of water. To do this, the source of the stream is raised above the level of the pond, and water will be supplied to it from the bowl of the pond using a submersible pump. Be sure to think about how to decorate the mouth of the stream - use stones, plantings, clay or glass containers.

Fill the pond with water, arrange a stream, install and connect a pump with a filter, plant aquatic plants
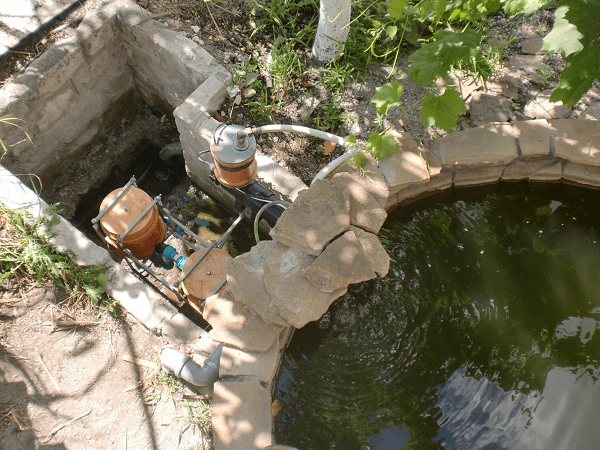
11. Install at the bottom of the pond submersible pump, extend the pipes to the source of the stream and connect them to a filter for water purification. It is better to take a pressure filter (with a reverse cleaning system) as a cleaning filter - it is more effective than a flow filter.
Material about the construction of an artificial stream in a country house will also be useful:
Your pond is ready, now you just need to carefully care for it - clean it of contaminants, sometimes use preventive agents to revitalize the water and prevent the spread of algae, and take the plants into the basement of the house for the winter.
The main mistakes when arranging ponds
When creating something with your own hands, it is not easy to avoid some mistakes, especially such as compositional ones, so in order to make your pond correctly, consider some standard mistakes inherent in our gardeners:
- Decorating the banks of the pond with pellets of the same diameter, which makes the pond look somewhat boring. It is better to combine large stones with smaller ones, but do not fill the entire coastal zone of the reservoir with them.
- The ponds are dug very deep, have steep walls and resemble a kind of stone bag. A little research showed that it is profitable for excavation companies to dig deep ponds, since they are paid by the number of cubic meters of earth removed. Pay attention to the depth of your pond - you should not make it too deep, especially if you are not planning to breed fish.
- A craving for container gardening, which interferes with the normal development of plants, and a fear of filling the pond with soil for planting. On the one hand, container planting allows you to quickly change the plant design of the pond by rearranging and rearranging plants. Gardeners are probably also afraid of the prospect of a dirty looking pond after filling the soil, but there is nothing to be afraid of - soil for aquatic plants is heavy mixture with a high content of clay, which is not washed away by water, and over time will be strengthened by the root system of plants.
When you plan to create a pond with your own hands, do not forget that it is not easy - practice first by forming a miniature pond at home.

If the dimensions of your site do not allow you to arrange a pond in your dacha, create a miniature pond in a very ordinary cup
If it works out, feel free to start a large-scale project of laying a full-fledged pond on your summer cottage. We are sure you can do it!
A pond should begin with choosing a suitable location and determining the size of the future pond. It is best to place the site at the lowest point, but make sure that it is well lit by the sun throughout the day. It is important that it is not near widely developed crowns. Otherwise, they will constantly fall into the water, and large roots can seriously disrupt the waterproofing of the reservoir.
The size of the pond depends on the scale of the entire site and the intentions of its owner. A pond with a diameter of about 3.5 m and a depth of about 100-120 cm is considered classic. But if the area is small, you can make a pond about a meter in size and no more than 50 cm deep. It is important to remember that if you plan to breed some aquatic plants, the depth should be a little larger - about 100 cm.
The next step in pond construction is preparing the pit. In essence, it is just a hole of a certain depth with a relatively flat bottom and walls. The shape of the pit can be made almost any way. If it is subsequently intended to use a ready-made purchased form for waterproofing, then the foundation pit must follow its lines. If there is no rigid shape, you can give the future pond the contours of a circle, oval, figure eight, etc. The walls of the finished pit are cleared of protruding roots and sharp stones, and the bottom is covered with a thick layer of sand, which is well compacted.
Creating good waterproofing is very important stage in the arrangement of the pond. If the choice is made on a purchased rigid form, it is important to ensure that it is made from quality material. Cheap plastic will quickly crack and crumble when exposed to sunlight and temperature changes. Homemade waterproofing is usually made either from concrete, pouring it into the bottom and walls of pits, or from film laid in several layers. For flexible waterproofing, you should choose PVC film or, if your budget allows, butyl rubber. Such material can last from 15 to 30 years. The bottom and walls of the pit are lined with film, leaving small allowances at the edges for fixation.
The finished pond is decorated around the edges with natural materials: large cobblestones, plants, and lined with turf. To replenish fresh water, it is good to draw an artificial stream to the pond, the edges of which can also be lined with natural stone. The bottom can be decorated with a variety of stones (necessarily with blunt edges) and aquatic plants planted in baskets or small permeable containers. Most matching colors are water lilies (nymphs), beautifully covering the surface of the water.
In the summer we all want to have a good rest by the water, but not everyone has the opportunity to go to the sea. Someone spends their summer holiday on own dacha, but even in a small area you can create a comfortable relaxation area for yourself using an artificial pond made by yourself.
Pond for a summer residence - where to start
So that the issue of constructing a reservoir does not seem so complicated, it is necessary to break the entire process into several stages and carry them out sequentially.

First, decide on the location for the future artificial pond and its size on your summer cottage.
How to choose the most suitable site for a pond in your country house:
Important! It is easier to build a pond of a small area. If you are confused by the amount of work or the financial side of the issue, start with a small lake.

Perhaps, later, having experience and skills, you will create a fairly large version of the reservoir at your dacha with your own hands; good experience in carrying out the preparation is shown in the video
Determining the size and shape of the future reservoir at the dacha
The depth of the reservoir, according to experts, should not be too great; for an artificial lake, a depth of up to two meters will be sufficient. The deepest part is usually made in 1/5 of the area of the entire reservoir.
When planning a pond, take into account the landscape of your dacha site. Designers advise doing it on a flat surface area, and if the topography of the dacha area is hilly, with slopes, in this case it is better to opt for a flowing stream or cascade.
You need to choose which version of the pond will fit most advantageously and interestingly into the landscape of your dacha site. Landscape designers offer a lot of design options decorative ponds, you just need to delve into the subtleties and nuances of various projects and choose the best one, optimally suited specifically for your dacha.
Varieties of shapes of water bodies
A reservoir can have clear geometric shore lines, especially if it is located on the territory near a mansion built in a strict aristocratic style, with alleys, paths, and flower beds of regular geometric shapes. In this option, a pond or lake will fit organically into general interior plot.
A small pond can be made round or oval, use moisture-loving plants to decorate it.
If you want to get closer to the natural landscape, the coastline is made in a winding or free-form shape so that it resembles as much as possible a natural body of water in a country house.

It is necessary to think in advance about the design style of the artificial lake so that it matches the style of the rest of the dacha, complementing it.
Before you begin work at your dacha, you also need to consider how you plan to use your future artificial pond. If you want to get a place for swimming, then it will not be possible to breed fish in it. The decorative pond cannot be used for swimming due to sanitary standards and hygiene requirements.
When choosing the size of a future reservoir, keep in mind that an artificial pond is the same biological system as a natural pond or lake, with an optimal ratio of animal and flora, with a water purification system, self-regulation of microorganisms.
It is easier to monitor and maintain the eco-balance in large artificial reservoirs; in small, as well as in small aquariums, maintaining the necessary balance is much more difficult. But making it yourself, both financially and in terms of labor costs, is much easier to make a small pond.

Shape of a pit for a pond at the dacha
It is clear that in order to make an artificial pond in the country, first of all, you need to dig a pit of appropriate shapes and sizes. The foundation pit for a pond has its own characteristics. In shape, it resembles a deep plate with wide edges, as can be seen in the photo.

Along the edges of the pit there should be a shallow coastal zone, then there should be a protrusion that prevents the overflow of water from the coastal zone into the swimming area, and vice versa. A recess is made in the center to the required size.

To maintain ecological balance, the water in the pond must circulate, otherwise it will quickly become clogged, silt up and lose its decorative and attractive appearance.
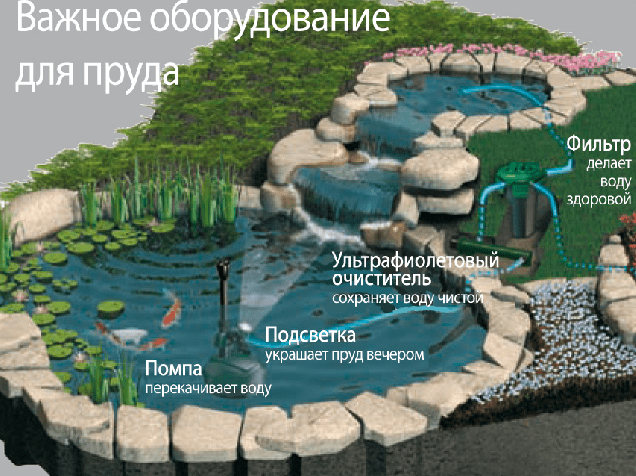
In a small pond at the dacha, to maintain cleanliness, a skimmer is installed, which allows you to clean surface layer water from contamination, and a UV sterilizer. To do this, drainage pipes are installed at the bottom of the reservoir, through which water is pumped into the filter and back to the swimming area, as in the photo.
Materials for waterproofing the bottom of a reservoir
There can be several options for making a waterproof bottom of a reservoir:
- Using a ready-made plastic mold. This choice of bottom greatly simplifies the procedure for making a reservoir for a summer residence, but it limits the possibilities for choosing the size, shape of the banks and the volume of the water space by the shape and dimensions of the selected container. Typically, such a container has a small volume of up to 4 m 3;
- The bottom of a reservoir at the dacha can be made of concrete, but this will be a rather labor-intensive procedure, and it will also require additional protection from frost to avoid cracking concrete base. In addition, if the need arises to remodel or dismantle the pond at the dacha, this will be quite problematic;
- One of the most budget options for the dacha there will be a pond bottom made of clay, but the process is quite labor-intensive. You will need to apply two layers of clay dough to the bottom of the reservoir bowl, and then strengthen the bottom with fine gravel, pressing it into the clay layer;
- The most optimal and most used method is to use a special film laid on the bottom of the pit.
Important! If the width of the film roll does not allow covering the entire bottom of the pit with one in one piece, it is necessary to weld the seams so that water cannot leak out of the reservoir.
When choosing film, keep in mind that cheaper options have a significantly shorter service life, deteriorate faster when exposed to frost and sun rays, video
Excavation work
Digging a pit under a body of water 20-30m2 or more with your own hands is not an easy task. It may be easier to use equipment in the form of a small excavator. If the amount of excavation work is insignificant, you may be able to do it yourself or hire several workers armed with shovels, video
The main thing is to correctly indicate the size and shape of the required pit.
We mark the boundaries of the future reservoir using a rope or hose; you can sprinkle the contours with sand so that they can be easily distinguished. Then, along the contour of the coastline, we dig a trench to approximately the depth of a bayonet, thus obtaining the first level of depth - the line of the swamp zone, up to 40 cm deep and 30-50 cm wide. Then we dig the next level inside with a gradual deepening towards the center of the pit, so that as a result It turned out to be a bowl, as in the photo.

The second level is made to a depth of 1 meter, the deepest third level is in the center of the pit.
Important! While digging a pit, check the level of the banks; they should be the same height.
Along the perimeter of the dug pit, another ditch is dug, up to 30 cm deep, so that the edges of the film can be laid and secured in it.
Film laying
Before laying the film, the bottom of the pit must be leveled, compacted, stones, tree roots, and debris must be removed. Then pour a layer of sand, 15-20 cm, carefully level and compact. After this, a layer of roofing felt or geotextile is laid, old linoleum can be used, and then the bottom is lined with film.
The edges of the film are secured with bricks or stones, and after that the reservoir is filled with water. Water is poured in several portions, if there are air bubbles under the film, they need to be removed during the process of filling the reservoir with water, take into account the experience of others in the video https://www.youtube.com/watch?v=JlxWYFNrkig. After this, the ends of the film are laid in the prepared ditch and secured with crushed stone or large stones.
Arrangement of a reservoir at the dacha with your own hands step by step
When you fill the pond at your dacha with water, measure how much water is required. This will be the capacity of your pond. In accordance with these data, it will be possible to select the required power pump, filters and other equipment for purifying water in a pond at the dacha. Usually you can purchase it as a kit and install it yourself according to the instructions.
Then you need to strengthen the edge so that the earth does not crumble into the reservoir, and design the shoreline in accordance with your project.
You can place a large stone on the bottom; it must be round shape so as not to damage the film and injure swimmers. You can also decorate the banks of a pond at your dacha with stones; it is better if large boulders alternate with smaller stones. In addition to stones, you can use driftwood in the design of a pond at your dacha, wooden structures, animal figurines and other options.
Moisture-loving plants with large leaves, such as bergenia, as well as ferns, lilies of the valley, and coniferous shrubs, are also suitable for decorating the banks of a reservoir in the country. In shallow water you can plant plants such as calamus, reeds, cattails, or water lilies as in the video
In the center of the garden pond there are water lilies and lotus. An interesting design solution would be to create a floating one in the center of the pond. flower arrangement, as in the photo.

Usually, plants in special containers or pots are used to decorate decorative ponds; they are conveniently removed while cleaning the bottom and changing the water.
Conclusion
Anyone can create a pond in their dacha; the main thing is to carefully follow the recommendations of experts. Of course, you will have to spend time and money, but as a result you will get a wonderful place to relax and will enjoy spending time at your dacha.
It's not difficult at all. It can be made in any size depending on the space on the site that you would like to allocate for it. Rules for arranging such an element landscape design will be approximately the same regardless of size. On a summer day, it’s endlessly pleasant to relax near a body of water you’ve created with your own hands and proudly show it off to guests. Any owner of a summer cottage can create a beautiful garden pond, equip the banks, populate it with bright fish. Everything will depend solely on your imagination.
How to determine the location for a pond
To make a pond on your own property functional and attractive in appearance, first try to determine a convenient location for it.
It would be ideal to start constructing a pond in a free area that is not under the scorching sun, but also not shaded by trees. If you think you have found a suitable area, pay attention to how it is lit. Poor lighting does not allow planted plants to develop calmly, and this negatively affects the appearance of the reservoir.
It is not very good to build a pond in a completely open area, where there will be real sunshine on hot days. Single-celled algae love light, they will grow more and more and cause water blooms. If you have a shallow pond, living creatures and plants will not feel comfortable in hot weather and may die. And the owners are unlikely to enjoy relaxing in the sun. It is better to choose an area to create a pond that is not surrounded by trees, next to which there is a building or a fence. Then at midday the pond will be in the shadow cast by them, and the sun's rays in the evening and morning are not so hot and will not damage the structure.
Do not try to place the pond close to trees. Their roots grow imperceptibly and after a while they can damage the bottom - tear the film or move the mold.
If you intend to decorate the pond at your dacha with your own hands, arrange lighting, filters, using a pump, also take into account the proximity of the source of electricity.
A pond at the dacha made from a special plastic mold
If you want to create at your dacha beautiful landscape with the addition of a reservoir, but there is no desire to tinker with proper arrangement bottom, you can purchase a ready-made form for it. They are cast in production conditions from fiberglass or plastic. Such a container can last at least 10-12 years; it has good resistance to temperature and sunlight. But when installing a plastic mold, you should perform all actions more carefully, otherwise there is a risk of damaging it. Cracks that appear on the surface cannot be effectively closed.
Fiberglass is a more expensive material, which is also used to make molds for a garden pond. It is extremely durable and can last for many years. When using this option, the service life of the reservoir will be twice or three times longer than in the previous case.
The first step to setting up your own mini-pond is choosing and purchasing a form for it. It will need to be built in the ground. To get a pit whose shape exactly matches the required one, transfer the contours of the future pond to the surface of the earth. It should be done this way. Place the purchased plastic bowl on the ground, then start sticking sticks around it, retreating from the outline by about 15-20 cm. Stretch a rope between the sticks. Then move the plastic base aside and dig a hole, being careful to follow the intended shape. The edges of the pit should be 30 cm higher than the height of the bowl. It is necessary to ensure that the location of the pit is horizontal. To do this, use a flat board or a building level.
Place a layer of sand at the bottom of the pit - this will be the basis of the pond. Place the mold in the prepared hole, fill with sand the free space remaining between the plastic and the edges of the pit. Then spray the sand layer with water from a hose to facilitate shrinkage.
Fill the mold with water. The banks can be decorated with stones. When starting to create a country pond with your own hands, you can view photos on the topic in advance to decide on its appearance. You can arrange beautiful stone banks, close in appearance to natural ones, and plant plants.
How to create a pond from film
You can build a pond at your dacha with your own hands from waterproof PVC film or butyl rubber. The option is convenient because the owners of the site choose the shape and size themselves. Polyvinyl chloride film is resistant to ultraviolet radiation, tolerates temperature fluctuations well, and does not lose color for a long time. It can last 10-15 years. Butyl rubber is somewhat stronger and more durable, but also more expensive. It should be used for reservoirs that are planned to be deep enough. It is worth buying the material with a small margin in order to thoroughly secure it at the edges.
The step-by-step construction of the reservoir will look like this:
- Creation of a pit. If you are going to plant plants in water, you can arrange shelves for them along the edges of the pit - ledges with a depth of 15 cm.
- When digging, try to carry out the work so that the walls of the pit do not crumble. If the soil on the site is clayey or black soil predominates, you can safely make them vertical. When working with sandy soils, the walls of the pit should be made inclined.
- After digging, remove roots, stones, and any large formations that may interfere with the work. The film should be protected from possible mechanical damage and ruptures. To do this, place a sand layer at the bottom or cover it with geotextiles.
- Lay the film over the sand layer and place stones along its edge to secure it. If ledges and steps were created during digging, do the same for them.
- In addition, you can dig a shallow groove with a width of 20-30 cm around the reservoir. This will allow the stones that fix the film to be flush with the ground surface. To enhance fixation, you can fill them with cement.
- When the container is completely ready, it’s time to fill it with water and plant the plants.
Equipment for a decorative pond from an old bathtub
You can make your own pond at your summer cottage out of anything. For example, if you have a bathtub that has fallen into disrepair, it can be used as the basis for a pond.
In this case, the pit is dug depending on the size of the bathtub - about 20 cm is added to them. When you lower the bathtub into the prepared pit, its edges should be lower than the surface of the soil. Dig a groove along the perimeter of the resulting hole - its height and width should be 30 cm. Place the bathtub in the pit and give it a strictly horizontal position, using a level to determine it. Fill the voids formed on the sides with soil or sand. At this stage, the base of the pond should look like this: a bathtub dug into a hole with a small groove surrounding the perimeter.
The next step is to mix the tile adhesive mixture with water, to which pigment is added. the desired shade. Glue should be applied to the inner surface of the pond blank. Don’t try to level it well - the sides of the bathtub should acquire a dark shade close to the natural color of the soil and a similar structure. Then cover the structure with film and leave it alone for one day - you need to wait until the glue has completely hardened.
Place a special metal mesh along the edges of the bathtub for fixation. Cut out fragments of the desired shape and lay them around the perimeter of the bathtub; it is necessary to cover the edges and internal surfaces to approximately half their depth. The bottom should remain open, and the walls of the container and its edges should be covered with mesh.
Now you should prepare a fastening solution from cement, water and sand. It is applied on top of the mesh, without particularly trying to level the surface. Additionally, stones are inserted into the thickness of the solution from time to time - this will help further strengthen the mesh and make the appearance of the pond more natural. The drain must be carefully cemented.
Where the mesh covers the edges of the bathtub, it is appropriate to place large stones. They will be able to emphasize the shape of the pond and give the banks a natural look. It is not necessary to maintain a geometrically strict rectangular shape - on the contrary, you can lay out the fragments along the edges in waves, in the form of steps, visually expanding the banks. Unevenness and hills that imitate natural relief look interesting. Here and there, instead of large stones, add handfuls of crushed stone. Give the pond a beautiful outline, focusing on your own taste.
Pour clay into the bottom of the bath, add water and knead the solution. Spread it on the sides, covering the cement, and fill the voids formed between the stones. This solution will dry quite quickly - after a few hours you will be able to pour water inside. Plant aquatic plants in the grooves around the pond. In a few days the water will become a little cloudy, the appearance will become natural, and it will be difficult to guess the true origin of the pond. You can read in more detail.
How to revive an artificial pond
When creating their own pond, many land owners dream of having fish in it or at least decorating it with vegetation. Then your home pond will turn into a real work of art. To choose a beautiful appearance for your building, you can watch a video on the topic.
When choosing plants for planting, remember that some of them can grow favorably only at a certain depth. If the water thickness is no more than 30 cm, you can plant yellow iris, marsh marigold, and heart-shaped pontederia. With a pond depth of 30-50 cm, you can choose common arrowhead, reed, and broadleaf cattail. Plant water lilies, lotuses, and water hyacinths in a pond more than half a meter deep.
You can put crucian carp, veiltails, and some varieties in your home pond. These fish are the most unpretentious and are able to live in the conditions of such a reservoir. But you should know that when introducing fish into a pond, you should: Without it, water will begin to deteriorate, and this will quickly affect decorative features, and the health of the fish will suffer if they swim in dirty, muddy water with an unpleasant odor.
To do it yourself on the site requires a lot of effort, but the result is worth it. You can create yourself a beautiful one, decorated in full accordance with your tastes. The contemplation of the water surface, which is bordered by tastefully selected plants, has a calming effect. Relaxing in the heat near a pond you made yourself is surprisingly pleasant.
In order for the pond to last longer, it should be emptied of water during the winter. The exception is reservoirs from plastic molds: if you empty them during the cold period in the spring, you can get a twisted, squashed shape.
Even a small artificial pond made of plastic makes the cottage very cozy. You can set up a recreation area next to the pond.
Advantages:
- reasonable cost of plastic mold;
- simple preparation for installation of the container;
- shore strengthening and installation of terraces are not required;
- quick installation and dismantling of the reservoir;
- the ability to choose the shape and size of the plastic bowl;
- high decorativeness of the element;
- easy care;
- environmental friendliness;
- You can breed fish in an artificial reservoir based on a hard plastic bowl;
- carrying out the work does not require special skills.
Rigid base shape:
- round;
- oval;
- rectangular;
- wrong.
The pond tank, made of high-pressure plastic, withstands operating loads well. With careful handling service life– up to 15 years.

There are no negative aspects of high-quality plastic. There are features that you need to know about before purchasing a bowl and installing the container.
Consider the nuances:
- There is no need to dismantle the artificial reservoir for the winter. Helps prevent water from freezing right choice frame containers. Minimum depth – 80 cm;
- Before buying a bowl, think about the shape and decor of the future reservoir. Select a rigid container strictly according to your plan;
- If necessary, you need to completely change the water.
Plastic pond container
In any construction supermarket you will find bowls made from durable material of various shapes and volumes. Some details:
- The frame is made of durable plastic. There are forms on sale made of fiberglass, which are even more durable and reliable;
- a plastic bowl for a pond has a minimum volume of 135 liters, a maximum volume of up to 2000 liters;
- high-density polyethylene withstands water pressure on the walls of the bowl;
- the material does not crack during optimal conditions operation;
- The walls are easy to clean from plaque.
Installing a plastic pond at your dacha with your own hands
How to properly install an artificial garden pond made of plastic with your own hands? Any owner can handle installing a decorative plastic pond in his dacha.
Some useful tips:
- consider the size of the area;
- think over the design of the decorative element;
- choose a time when the ground is soft enough and get to work.
Video about how to dig and how to properly install a plastic pond at your dacha with your own hands, step-by-step instructions.
Choosing a place
Many owners of large plots make the same mistake: they believe that choosing a suitable location is not worth racking their brains for. The result is that the pond is constantly covered with leaves from trees located in the immediate vicinity of the pond.
Incorrect placement of the bowl leads to the fact that the seating area is constantly in the shade. Another option: in the water you see the reflection of outbuildings instead of willows bending over the water.
Consider the advice of landscape designers:
- A garden pond made of plastic should not be installed near areas where a large number of deciduous or coniferous trees are planted;
- it is prohibited to install a rigid frame on slopes;
- the optimal place for arranging a pond of any size is a place covered with turf, located near bushes;
- do not place the container in the far corner of the garden;
- provide free access to the static reservoir from all sides;
- do not place the bowl next to old trees: their powerful root system will make it difficult to dig a pit. Roots can damage the plastic.
Choose the best combination of light and shadow. Then the plants near the pond and on its surface will receive sufficient lighting. Observe where the sun shines before 11 o'clock, and where shadow appears after 15 o'clock. Dig a pit there.
Photo of the design of a plastic pond at the dacha.


Choosing a plastic container
Useful tips:
- When purchasing, check the integrity of the structure. Do not drill into a bowl even with shallow cracks;
- want the pond container to remain in the ground all year round? Choose structures with a depth of 80 cm or more;
- Please note: the wall thickness is 3 mm, the bowl must be transported and placed carefully;
- check whether the bowl walls can be repaired. This characteristic is inherent in more durable fiberglass;
- A wide selection of shapes allows you to realize the most daring design ideas and select rigid containers of various configurations.
Plastic afraid of exposure to ultraviolet radiation. Be sure to protect the edges that protrude above the ground. You can decorate the adjacent area with artificial and natural stone.


How to dig in?
Prepare necessary tools, materials:
- building level;
- shovel;
- enough pegs for marking;
- plastic bowl;
- sand;
- decorative elements (tiles, various types stones, plants, pieces of brick and other materials).
Check again whether there is enough space around the future pond. Inattention to the markings of the site, haste can play a cruel joke. You don't want to dig a pit twice? Be responsible when choosing a location, taking measurements, and marking the site.
How to install a container for a decorative garden pond? Procedure when installing a pond:
- outline the outline of the future reservoir;
- turn the bowl over, trace the contours;
- dig a pit according to the markings;
- level the ground, check the bottom line for level. The surface must be strictly horizontal;
- Please note - the depth should be 40 cm greater than the height of the container;
- prepare " sand cushion»;
- Cover the bottom of the pit with sand. Layer – at least 20 cm;
- compact the layer well;
- pour water over the “sand cushion”;
- place the bowl, fill it with water;
- Fill the gaps between the walls and the ground with sand.
The plastic pond is almost ready. Wait a day and check if new gaps have formed due to the settled “cushion”. Add sand if necessary. All that remains is to decorate the edges, give beautiful view nearby territory.
Video about installing a garden plastic pond at the dacha.
Arrangement
Every owner can decorate the edges of a decorative plastic pond, even without skills. landscape design. If the reservoir is small, choose a simpler decor; do not pile up stones or plants, behind which the water surface will not be visible. The larger the area, the higher the flight of fancy. You can implement many interesting ideas.
In the photo, you can see examples of how to design a plastic pond in the country.


Registration
Listen to the advice of experts for designing an artificial plastic pond:
- select decorative elements that are in harmony with the overall design of the garden or summer cottage;
- use both natural and artificial materials;
- be sure to cover the protruding edges of the plastic bowl and protect them from exposure to UV rays;
- plant plants that prefer high humidity next to an artificial pond;
- place lanterns near the pond, floor lamps in the shape of a ball (moon). The reflections on the water create a romantic atmosphere;
- lay some garden paths, make the approach to the reservoir convenient;
- with a large area garden plot Place a recreation area near the pond. Install benches, a gazebo, and a fountain.
The area around the reservoir should not hide most of the water surface from view. Before planting plants, check what their maximum height, and whether they will close the pond in a year or two. The pond is the central feature on this piece of your site. Remember this.
Photo: finished design and arrangement of an artificial plastic pond, which you can repeat with your own hands..


Care
What is good about a plastic bowl? Maintaining a good condition of a static type artificial reservoir is not at all difficult.
What care is required for a plastic pond? The rules are simple:
- regularly remove fallen leaves and debris from the surface;
- During leaf fall, stretch a net over the pond. Then you can easily collect fallen leaves;
- Change the water completely as needed. This way you will prevent flowering, stagnation of water, and the spread of an unpleasant odor;
- After draining the water, it is advisable to clean the walls from plaque with a brush with a long handle and spray them with water from a hose.
Now you know that setting up a pond based on a ready-made rigid container is quite simple. Pick up suitable place, buy quality plastic container, install the bowl according to the rules.


