Any estate, be it country house or private house must be provided with water. Without life-giving moisture, no cultivated plants can grow, delight the eye with lush flowering, or fully bear fruit. Do-it-yourself water well, despite the seeming enormity of the process, is a very real possibility of extracting water, which can be done independently without the use of heavy drilling equipment. There are several drilling methods that are quite simple to implement and do not require the use of expensive equipment or significant effort.
Water can be produced by using different technologies. The main types of water wells used to extract life-giving moisture:
- Construction of a well, which, in the presence of a good spring, fills quickly and, being an excellent water storage device, can hold up to 2 cubic meters of water;
- A sand filter well, which is a pipe d=100 mm, immersed using an auger to a depth of 20-30 meters. A stainless mesh is attached to the recessed end of the pipe, which acts as a filter, being immersed in coarse sand. Well depth is 10-50 meters, service life is 5-15 years.
- A filterless artesian well used to extract water from layers of porous limestone rocks. The depth of the well is 20-100 meters, the service life is about 50 years.
The exact depth of the water well cannot be determined in advance. Approximately, this will be the same depth as a similar well drilled in neighboring areas, or a nearby well. Since deviations are possible due to uneven occurrence of soil layers, casing pipes should be purchased based on the parameters of the water supply sources already installed on the site, but taking into account minor adjustments.
The design of the water well is a kind of narrow well

The service life of wells directly depends on the intensity of use: the more often you use the structure, the longer it will last
Drilling a well manually
To perform the work, you need the drill itself, a drilling rig, a winch, rods and casing pipes. A drilling tower is necessary when digging a deep well; with the help of this design, the drill with rods is immersed and lifted.

The easiest way to drill a water well is rotary, which is done by rotating the drill
When drilling shallow wells, the drill string can be removed manually, without using a tower at all. Drill rods can be made of pipes; the products are connected using keys or threads. The lowest rod is additionally equipped with a drill.
Cutting bits are made of 3 mm sheet steel. When sharpening the edges of the attachments, it should be taken into account that when the drill mechanism rotates, they should cut into the soil clockwise.

Drilling technology, familiar to most owners of personal plots, is also applicable for constructing a water well
The tower is installed above the drilling site; its height should exceed the height of the drill rod in order to facilitate the removal of the rod when lifting. Then a guide recess for the drill is dug onto two bayonets of the shovel. The first turns of rotation of the drill can be completed by one person, but as the pipe sinks, additional assistance will be required. If the drill does not come out the first time, you should turn it counterclockwise and try again.
As the drill goes deeper, it becomes more difficult to rotate the pipe. Softening the soil with water will help make the work easier. As the drill moves downwards, every half a meter the drilling structure should be brought to the surface and freed from the soil. The drilling cycle is repeated again. At the stage when the tool handle is level with the ground, the structure is extended with an additional elbow.
Since lifting and cleaning the drill takes a significant part of the time, you should make the most of the design, capturing and extracting to the surface the maximum possible portion of the soil layer.

When working on loose soils, additional casing pipes should be installed in the well to prevent soil from falling off the walls of the hole and blocking the well.
Drilling continues until it enters the aquifer, which is easily determined by the condition of the soil being removed. Passing the aquifer, the drill dives even deeper until it reaches the next aquifer - the aquifer. Immersion to the level of the waterproof layer will ensure maximum water flow into the well. It is important to note that manual drilling is only applicable for diving to the first aquifer, the depth of which does not exceed 10-20 meters.
For pumping dirty water You can use a hand pump or a submersible pump. After two or three buckets of dirty water aquifer washed out and usually appears clean water. If this does not happen, the well should be deepened another 1-2 meters.
You can also use a manual drilling method based on the use conventional drill and hydraulic pumps:
Rope Impact Drilling Technology
The essence of this method of making a water well with your own hands is that the rock is broken using a driving glass - a heavy tool falling from the height of an equipped tower.
To carry out the work, you need a homemade drilling rig, as well as tools for using the shock-rope method and extracting soil from the well.
A well tower, which looks like an ordinary tripod, can be made of either steel pipes or ordinary wooden logs. The dimensions of the structure must be proportional to the dimensions of the downhole tool.
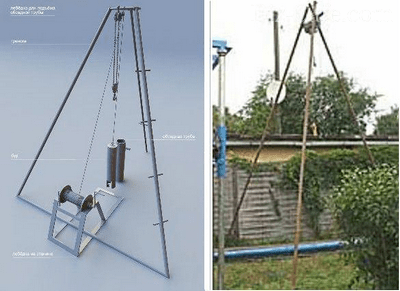
The optimal ratio is the height of the tower, which exceeds the length of the downhole glass by one and a half meters
The process consists of alternately lowering the driving nozzle, which breaks and captures the rock, and raising it to the surface with the captured blade of the drilling tool.
To equip a drilling rig you can use steel pipe, the end of which is equipped with a cutting device. Cutting edge resembling appearance half of the auger turn will be in direct contact with the bottom. Half a meter from the edge, a hole must be made in the steel pipe through which the extracted soil can be removed by emptying the drill bit. A cable is attached to the top of the glass, which will be used to lower the glass and remove its contents to the surface. The glass should be freed from the ground as the structure deepens every half meter.
Here is a video example of conducting exploration drilling in this way:
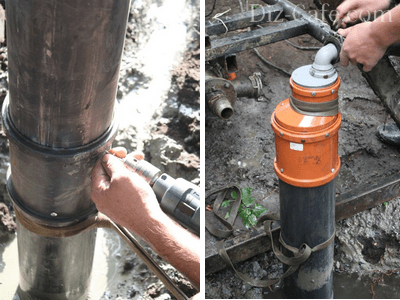
The nuances of installing casing pipes
A do-it-yourself water well dug requires additional casing, which can be made from either a solid asbestos-cement pipe or individual sections of asbestos pipes. When working with cuts, special attention is paid to equal pipe diameters in order to ensure subsequent unhindered immersion of the entire structure. Each pipe link is kept from slipping and secured with brackets, which are then hidden under stainless steel strips.
A do-it-yourself water well can also be “lined” with steel or plastic pipes
Pipe casing is required:
- to prevent walls from collapsing during drilling;
- to prevent clogging of the well during operation;
- for covering the upper aquifers with bad water.
A pipe with a filter made of a fine mesh that does not allow grains of sand to pass through is lowered to the bottom of the well and provides water filtration. The pipe, lowered to the required depth, is secured with a clamp. This will prevent spontaneous subsidence.
When properly constructing a water well, the above-ground part of the structure is covered with a caisson - a cap that protects the source from contamination.
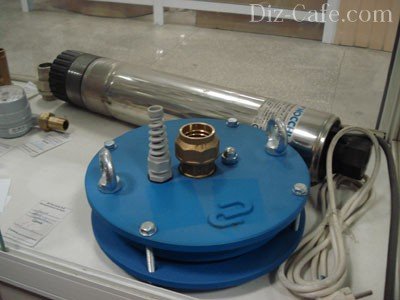
The head is a tank with a closing hatch with a hole diameter that allows easy access to the water intake well
Over time, the effect of a slight “squeezing” of the pipe from the soil may be observed. The natural process of spontaneous lifting of the pipe to the ground surface does not require additional measures for deepening.
The first thing the owner should do is suburban area, be it a rural farmstead or just a vegetable garden, ensure water supply. It would be good if a centralized water supply system was built, but, alas, it is not available in every area. In such a situation, there is only one thing left to do - extract water from underground. Contrary to popular belief, this event is not always extremely expensive, because the technology of drilling a well under water can easily be mastered by a self-taught person who is accustomed to doing everything on his own.
From 12 to 50 m
The middle depths are the kingdom of aquiferous sand. The water here is quite clean, but you won’t be able to get to it with just a shovel or a pointed pipe. Nevertheless, the desire to build a sand well on your own is quite feasible. You will need special equipment and deeper knowledge of the technology of drilling water wells with your own hands. It is sand wells that will be discussed further.

About drilling methods
Before you drill a water well with your own hands, you need to choose the type of drilling rig (there are three of them).
Shock-rope
A heavy load, called a chuck, as well as a special tool - a bailer - are suspended from the frame using a cable. From below, several strong triangular teeth are welded onto the cartridge, which weighs about 80 kg. By lifting it and dropping it, they loosen the soil, which is then removed with a bailer.
Before starting work, you need to make a shallow well using a garden drill. The chuck can be lifted manually, but it is better to use a rotary motor for this.

Applicable this method when working on light or clayey soil.
Auger
The working body of such an installation is similar to a garden auger, only very powerful. It is made from a 100 mm pipe onto which a couple of turns of a screw with a diameter of 200 mm are welded. To make one turn, a round sheet blank is used with a hole cut in its center with a diameter of just over 100 mm. A cut is made along the radius of the workpiece, then the edges at the site of this cut are moved apart in two opposite directions, perpendicular to the plane blanks.

As the drill sinks, the rod on which it is attached is increased. The tool is rotated manually using a long handle made from a pipe. Every 50 - 70 cm the drill will have to be removed, and since as it goes deeper it will have more and more weight, for this it will be necessary to install a tripod with a winch.
Rotary
For all its complexity this option is the most effective and versatile. Soil development is carried out using a drill bit attached to a constantly expanding pipe - a drill rod or column. Drill bits may have different design, the choice of which depends on the type of soil being overcome at the moment.
Rotary drilling combines rotational and impact effects on the rock. In addition, the design of the drill column allows water or clay solution to be pumped into the well, which erode the soil and significantly speed up the advancement of the tool.
Where to drill
Before starting any work, the hydrogeological situation should be clarified. Best Source information – owners of surrounding plots, especially if they already have wells or have once tried to build them.
The second way is how to properly make a water well, or rather, choose a place for it - search for hydrogeological maps your area, which may be stored in design organizations or relevant departments.
If it was not possible to obtain a clear idea of the presence and nature of aquifers, you will have to take the most expensive step - order exploratory drilling. However, before that you can try one of traditional methods , for example, dowsing, which, according to some evidence, can indicate with acceptable accuracy the presence or absence of water underground.
When choosing a place for a well, you should beware of neighborhoods in the form of septic tanks, cesspools, landfills or livestock farms. If they are still nearby, then they should be at a distance of no closer than 30 m. Of course, the well should be located closer to the house. Optimal distance is 3 m.
Equipment
To drill a well on a site with your own hands, you need to prepare the following elements:


Read about what characteristics and advantages it has in our separate article.
There is a website for comparison of wells and boreholes. All the pros and cons of these water intake sources.
Let's start drilling
Here are general instructions on how to build a well in your country house with your own hands:
- A square excavation is made in the ground with plan dimensions of 1.5 x 1.5 m and a depth of 1 to 2 m - the so-called pit. It is necessary to prevent loose surface soil from falling into the well. The inside of the pit is lined with plywood or boards, and a boardwalk is laid on top of it for ease of installation work.
- After installing the installation, two coaxial holes are cut out in the upper and lower decks of the pit, after which they begin drilling.
- The drill rod is rotated using a gear motor or manually. At the same time, a support is placed on the bar, and one of the workers strikes it with a hammer. Alternative option: The drill is winched and dropped in a similar manner to cable percussion drilling. If necessary, water or drilling fluid is supplied to the rod.
- In parallel with drilling, a casing pipe with a special shoe installed below is installed into the well. Like the drill rod, it is gradually built up.
- After quicksand (soil with high moisture), drilling accelerates (the aquifer has begun), and then slows down again. This means that the waterproof layer has been reached and drilling can be stopped.
- A filter column is lowered into the well, after which it begins to be washed with strong water pressure.
- Lowers into the well submersible pump, which they begin to pump out water until it becomes absolutely clean
At the final stage of equipping a well at the dacha with your own hands, all cavities are filled with a sand-crushed stone mixture, and a pipeline is laid in a trench to the house.
Common Mistakes
The lack of experience of self-taught drillers most often manifests itself in the following:
- The drill is lowered too deep, causing the casing to cross the aquifer. Solution: lift the casing pipe or insert a new, shorter one into it, after which the previously installed pipe should be removed.
- The casing pipe did not reach the required depth, as a result of which the soil below collapsed and the productivity of the well dropped sharply. Solution: remove the soil with a bailer, then immerse the pipe to the required depth.
- The pump was installed too low, as a result of which the well became clogged with sand.
In the latter case, you should remove the pump and, having selected the sand with a bailer, install it correctly. The correct position is determined as follows: the operating pump is gradually lowered until sand is found in the pumped water. After this, the pump is raised slightly until the water it supplies becomes clear. (usually the correct position of the pump is 1-2 m from the bottom).
How to drill a well under water with your own hands and with the help of what equipment you can watch in the video.
Add to bookmarks
Do-it-yourself water on site
The driven well is quite common today. Since there are fewer and fewer wells, and water is a vital product, it is better for private homes to have their own well or two. One well is usually installed inside the house, and the other outside, perhaps on the street near the bathhouse. Wells will provide constant water inside the house and for everything personal plot, as well as backup water supply. For such work, you will need knowledge of how to drive a well pipe correctly.
Before driving a pipe for a well, it is advisable to find out from nearby neighbors the depth of the water surface, take a closer look and become familiar with nearby wells.
A driving well is quite convenient in that its construction can be carried out almost in one day, of course, if all the necessary components are available. The cost of construction work is not very high, and the process itself is quite simple, so if the aquifer is good enough, then this is the best option for supplying water to a residential building. Before the main work, you can begin preparatory work already in the winter. Before driving a pipe for a well, it is advisable to find out from nearby neighbors the depth of the water surface, take a closer look and become familiar with nearby wells.
What is needed for a well
- First you need to purchase pipes that are about 15 m long. The most important part of a tube well is considered to be an intake - a filter, which is made of the same material. as well as the components of the entire structure;
The length of the intake is determined by the aquifer. If the vein for receiving water is good, then the intake can be 0.5 m long, and its longest length can be 1.5 m.
- The intake cone is made by a turner. It is either welded to the intake or placed on a thread. Numerous holes must be drilled along the entire length of the pipe, the diameter of which should be about 80-100 mm;
- holes are drilled in a staggered pattern. Then such a pipe is wrapped in mesh and soldered along the edge with tin solder. The intake mesh is a completely different matter. Good mesh can hold a small puddle of water on itself and at the same time prevent it from flowing freely and simply. Mesh made of non-ferrous metals is not suitable, since it is most likely to be subject to corrosion;
- Today, stainless steel self-tapping screws with large heads are increasingly used in construction work, which are even very suitable for attaching mesh to self-tapping screws. For fastening, you need to drill holes of a couple of millimeters along the entire length of the intake pipe.
Extension pipes are cut into pieces 0.5 and 1.5 m long, depending on the type of soil.
When the mesh is wrapped, it needs to be pressed with stainless steel tape using self-tapping screws along the entire length of the pipe, using a screwdriver for this, and then cut off. Wrapping the mesh with wire will not bring any benefit, because if the intake gets caught in the ground on something strong and resistant, the wire will not help and the mesh will break anyway.
- extension pipes are cut into pieces 0.5 and 1.5 m long, depending on the type of soil. If the soil is not very hard, but plastic and the pipes go into the ground easily, you can make them a little longer. The couplings for the connection are made only of steel; in order for them to hold tightly and not burst during operation, they are made into half a coupling. Couplings are most often installed on flax with paint.
We begin drilling a well
- Drilling the earth is carried out with an ordinary fishing drill, in which the handle is only altered in such a way that it is possible to attach extension legs to it and replace the brace with a T-shaped handle.
Drilling a well will require two people, since it will be necessary to remove the drill from the ground, and this work is quite difficult for one person.
Drilling the earth is carried out with an ordinary fishing drill.
If quicksand is discovered as a result of drilling, the work is stopped. A pre-prepared pipe with an intake is lowered into the well and a mallet is taken.
The beater has the appearance of an ordinary block of wood, which has hammered metal brackets on both sides in a vertical position. Pipe clogging can be done by one person, or by two. If the pipe is too high, then hammer it in using a stepladder.
The intake into the aquifer must be hammered with uniform blows on the pipe. Water is tested by pouring liquid into the well. If it does not linger, but immediately leaves, water can be obtained at the drilling site.
Pump connection and water analysis
A hand pump for pumping out water is connected to the intake using a rubber hose with clamps.
- Next, using a rubber hose with clamps, a hand pump is connected and the water is pumped out. By using hand pump lifting water from a well is quite easy and simple. If the water appears clean and tasty, without the formation of film and sediment, it means. it is of good quality.
To determine the quality and quality factor of water, it can be analyzed in a special laboratory. If you don’t like the quality, you can continue driving the pipe to a greater depth, checking from time to time whether there is an aquifer. It is possible to drive a well no deeper than 15 meters until it stops.
If the water surface is at a level below 9 m, then it cannot be pumped out. Of course, you can lower the pump a few meters by first digging a pit, or simply make a well and install water pumping station.
If water is not found or it is of poor quality, then the pipes are removed. If difficulties arise in lifting them, use a jack.
Preparing a well for operation
If the well is used only in the summer, it is advisable to remove the valve for the winter - then the water column will drop to the normal level and no freezing will occur.
If as a result you find good water, you can begin to prepare the well for operation. The height of the pipe is leveled above ground level for easy connection. Sometimes they change the last elbow to another of the required length or simply saw off the excess part and cut a thread on it. The thread is necessary to be able to install the valve and further connect the hose.
The valve is a rather complex device, so it can often break down or fail. To prevent this from happening, the valve is installed at the top in front of the pump. With its help, the pole is supported, and if something happens, it can be easily replaced. If the well is used only in the summer, it is advisable to remove the valve for the winter - then the water column will drop to the usual level and no freezing will occur. In the spring, the valve is put back in its original place and the water is raised.
If the well is used in winter, the valve can also be removed and put on during use, only then you need to make sure that water is not left in the pump. Next, you need to connect the water pumping station or electric pump through a pipe or hose. For this, a high-pressure hose is used, since there is a vacuum in this place and it can be flattened. Sometimes the installation of a driven well is done on the street, a pipe is connected to it, and it, in turn, is brought into the basement of the house where the water pumping station is installed.
Water pumping stations operate with a steady column and when the entire system is filled with water. Therefore, first, to raise the water, they use a manual vacuum pump. It is connected separately through a special valve, which is located in front of the water pumping station. When the water rises to the required level and the receiver is filled, the system will begin operating automatically. There will always be a column of liquid in the pipe.
Well and pipe cleaning
You can also clean the well using a special device called a bailer.
Often during long-term operation of a driving well, the water flow slows down significantly. This happens as a result of clogging and clogging of the collection grid. Then it is necessary to pull the pipes out of the well and clean them or replace them with new ones; you can simply change the collection grid or the collection as a whole.
There are times when the water in the well disappears completely. This happens sometimes for natural reasons, and sometimes for man-made ones. Then it is necessary to carry out deeper drilling and install a well with a casing pipe.
New technologies for driving wells
Today, quite interesting driving wells have appeared, such as disposable ones. For their arrangement, a metal-plastic pipe is used. To drive it into the ground, a composite rod is required, which is reusable.
The intake is similar to that of conventional driving wells, only a conical-shaped depression is made inside it, which is intended to support the driving rod. It is connected to the intake through a coupling from metal-plastic pipe elbow and lowered into the drilled well.
Inside the pipe there is a driving rod, which strongly rests against the recesses of the conical intake. An anvil is screwed onto a steel rod and the intake is hammered through this rod. Having reached the aquifer, the rod is removed from the pipe and the pipe is connected to the pump.
A do-it-yourself well allows the owner of a private house, cottage or country cottage Always have water for household and household needs. , its improvement and care - the owner can take all this into his own hands. Simple instructions will tell you in detail how to do this. You just need to follow all the steps in the guide step by step and you will save a significant amount of money on the services of third-party specialists.
Installing a well with your own hands eliminates the need to account for every cubic meter of water consumed and pay bills. That is why prudent owners choose such a water supply system.
Preparing to drill a well yourself
Before you begin the process of constructing a well, you need to clarify how deep the water lies. The easiest option is to talk to the owners of neighboring plots that are already equipped with individual wells. If this is not possible, you will have to call a team to drill a “test” well or explore everything yourself.
Construction of a well requires a number of tools and equipment. You won't be able to get by with a simple pick and shovel. In order to penetrate the earth to great depths, special equipment is needed. For example, artesian springs are created using powerful drilling rigs. A more modest source can be made using an ordinary tripod and winch.

Thanks to the winch, the drilling tool will be raised and lowered. The drilling tool itself includes the following components:
- Boer. In most cases, a simple coil is used.
- Drilling column.
- Drill rods.
- Core pipe.
Additionally for independent device wells you will need the following:
- Caisson.
- Shovels.
- Water hoses/pipes.
- Casing pipe.
- Pump.
- Filter.
- Valves.
Step-by-step instructions for installing a small well for irrigation
If you are starting to construct a well solely to obtain water for irrigation, special effort no need to apply. A modest source can be made using the simplest drill. The main thing is that the first aquifer lies at a depth of no more than 3 m. Otherwise, more effort will have to be made. This will be discussed in more detail in the next section of the instructions.

To increase the length of the drill, use pipes of small diameter. You can get by with reinforcing bars. To overcome denser soil layers, hang some additional weight on the drill handles. This will make it easier for you or your workers. Remember that you cannot drink water from such a depth, because... it does not undergo natural purification and can only be used for watering plants and other household tasks.
First you need to take an ax, weld or otherwise attach it to a metal rod and cut out all the roots that are in the path of your auger. After drilling to about 2 m, you will see wet sand. At this stage, you will have to take out the drill with the adhering earth approximately every 10-15 cm. Otherwise, the installation may simply not withstand the weight of the soil and break.
When sand of a bluish-grayish hue begins to be visible, you can consider that the work is almost completed - the aquifer is already very close. When water appears, the drill can be removed, because... eroded soil will not stay on the blades. At this stage, you insert the casing pipe and can use such an improvised source to water your plantings. Water from a well can be lifted using electric pump or a regular hand-held speaker. Choose at your discretion and according to your available budget.
Do-it-yourself well for drinking water

If the aquifer lies at a depth of about 10 m, the previous method cannot be used. But there is another effective and fairly simple technique. It will suit you in such a situation.
First, arm yourself with a shovel and dig a hole about 1.5 m deep. Your goal is to get rid of the loose, loose top layer of soil. A pit with an area of about 1 m² will be sufficient. For greater convenience, it is recommended to cover the walls of the pit with boards.
Take a steel pipe and make teeth on one side of it, like a hacksaw. The teeth must be bent in different directions. On the other side of the pipe you need to make a thread, thanks to which it can be connected to other sections of pipes using a coupling. Take the clamp and attach the handles to the pipe. They will allow you to comfortably hold the pipe vertically on required height. On all other pipes, the corresponding threads are prepared on both sides. The length should be approximately 3 m.
Next you need to take a 200 liter or larger drum, a water pump and a hose. The latter should be of such length that you can lower it from the prepared barrel into the middle of the pipe almost to the ground. Use a pipe with a diameter of 12 cm. In the future, it will serve as a casing pipe. Doing all this work exclusively with your own hands is very difficult and time consuming, so it is better to immediately enlist additional help.

Commit rotational movements pipe in different directions, trying to deepen it to the maximum possible distance. Turn on the pump. Under the pressure of water, the ground at the base will be washed away. The wet earth, under its own weight and your rotational efforts, will sink to ever greater depths.
The barrel can be filled with the same water that will appear from the pipe. It is recommended to first filter it through a sieve. You can use other water. Consistently increase the length of the pipe by attaching new sections. This way you will get to the water layer pretty quickly. Remove the boards nailed at the very beginning and bury the hole, strengthening the pipe in the middle. Install a cover on top that will protect the well from various kinds garbage. To deliver water upward, use a pumping station or deep-well pump.
This is a fairly simple method that allows you to do it yourself without spending a lot of money and time on it and without buying expensive equipment. Sharpening, cutting, welding work– you don’t have to do all this.
Well construction using the shock-rope method
This well construction method is one of the most commonly used. You need to take medium-thick logs and make a drilling derrick out of them. The top of the tower should be directly above the future neck of your well.
Make a hole about 2 m deep and about 1.5 x 1.5 m in size. It is recommended to cover the walls with boards. They will prevent soil from crumbling and make work more convenient.
As a casing pipe, use a steel product with a wall thickness of 5 mm or more. It is important that the pipe does not have side seams. Weld a cone to the bottom circle. Select a cone whose diameter is 4-5 cm larger than the diameter of the pipe itself.
Roll a thread on the top of the pipe to further connect this section with other pipes using a coupling. Install the pipe vertically into the hole using a plumb line and secure it so that it does not wobble, but is not tightly secured. Lower the bailer, tied with a strong hemp rope, into the pipe. It should have a thickness of 2 cm. You can use a steel cable with a diameter of 1 cm. After this, proceed directly to punching the source.

Everything is done extremely simply: you raise the bailer about 1 m and let it fall freely. The earth will be packed into the middle. It needs to be shaken out periodically. To do this, lift the pipe up using a winch. The heavier the bailer, the faster you will get to the water. Most often, a product weighing within 50 kg is used. The length of the bailer should not exceed 2 m.
Make sure that the bailer is not filled with earth more than 2/3 of its length. If there is more land, such a load may create inconvenience and difficulties at the stage of further penetration of the source. If hard rock gets in your way, replace the bailer with a chisel bit and destroy the obstacle.
After the water appears, the bailer can be removed. Bleed it to a clean state using deep well pump. After this, you need to take a filter and insert it into the casing to prevent sand from getting into the well.
Using these instructions, you can make a water well with an average depth of 40 m, which is more than enough for the vast majority of cases.
At this depth, the water undergoes natural purification, becoming tasty and soft. It can be used for any household and household needs. If the water level on your site is more than 40 m, you will have to turn to the services of third-party specialists, because... It is impossible to make such a source yourself without the proper skills and powerful equipment.
Regardless of whether you have made a miniature watering source or a full-fledged artesian well, you will have to take care of your “brainchild”. Basic care comes down to timely cleaning work.
As soon as you notice a deterioration or change in water pressure is not better side If impurities appear in the form of silt or sand, immediately begin cleaning. Ignoring this procedure will lead to the fact that in the near future your well will become much less efficient. Pull a little more and it will become so clogged that it will be easier to dig a new source than to clean out the old one.
Use a water or air compressor to bleed. It will get rid of silt and sand. If these methods are ineffective or low, you can use cleaning methods using a short circuit or acid. But it’s better not to even think about them without having the appropriate skills. This is very dangerous both for the well itself and for the person servicing it. If the source cannot be cleared using a compressor, call appropriate specialists. Good luck!
Water on summer cottage or in a private home - a necessary resource that is impossible to do without. However, organizing a public water supply is often impractical. Due to the remoteness of land holdings from each other, centralized water supply is an expensive proposition. It is easier and cheaper to use an individual water source. True, you first need to organize it. Own well will provide its owner with confidence that the economic needs of the site and housing will be met. At the same time, the owners will not have to pay for water supply, counting every cubic meter of water spent. Digging a well is difficult and expensive, but drilling a well yourself is possible if you are familiar with the drilling technology and the type of well construction.
Types of wells and their features
Before drilling, the site area must be examined, determining the level of occurrence groundwater. The amount of work that will need to be done to make the well water-bearing will depend on this parameter. The type of well is chosen taking into account the depth of the water-containing formation.
If water is found at a depth of 3-12 m, choose the “” type. At a depth of up to 50 m, a sand well is used, and an artesian well, if the water lies in the ground at least 200 m. Almost every summer resident can do the first two types manually, but an artesian well will require a drilling rig and professional drillers.

Drilling a sand well by hand
This type of source involves pumping water from a depth of up to 50 m. A sand well is called this because it “gives water” from a water-containing sandy layer of soil, the depth of which is usually just fifty meters. This depth does not guarantee the purity of the water, so it is recommended to periodically check the contents of the well at the sanitation station for the presence of organic and chemical compounds.
To organize a sand well, a classic scheme with a pump is used. And to purify water from suspended matter and debris, use a filter installed at depth. The filter needs to be cleaned regularly. The service life of a sand well is about 15 years.
Organization of the “Abyssinian well” well
This is the simplest needle hole to make. It is shallow, so you need to carefully choose a place for it.
There should be no septic tanks, garbage heaps, cesspools or sewage pits nearby. Due to the shallow depth, harmful substances can seep into the source, polluting it.
If the ground does not contain pebbles or other hard rocks, drilling a well can be done in the area around the house or directly in the basement of the house. The well in the basement is convenient to use even in cold weather. A home well is equipped with a manual dispenser and a pump so that water can be used regardless of the availability of electricity.

Drilling an artesian well
Provided that there are already wells of this type in neighboring areas, there is a high probability of water occurring in a limestone formation in this area. In other cases, drillers are ordered to test a well to determine the depth of water. An artesian well can provide water to several areas at once. Often drilling is ordered together in order to save money and get the desired result.
The choice of well type depends on the type of soil and the planned amount of water consumed. Abyssinian well and a sand well will provide a low flow rate. And if the flow rate is 10 cubic meters per hour or more, you will need to install an artesian well. It is better to drill any well away from potential pollutants and close to the house so that there are no problems with laying the water supply.

Drilling equipment and tools
When drilling artesian wells, professionals use drilling rigs. For smaller wells, a regular tripod with a winch is suitable. It will lower and raise the drilling tool, consisting of a core pipe, drill rods, a drill column, and a drill.
Special equipment, without which it is problematic to make a well, is a drilling tool that will help you go deeper into the ground (auger), a tripod and a winch. To drill a well with your own hands, you will need a metal auger. An ice screw can be used as an auger, which is used for winter fishing. The main thing is that the drill is made of high-strength steel. This is the most cheap option drilling a well. In addition to the tripod, you will need pipes of different diameters (water pipes, hoses, casing), valves, caisson, filters, and a pump for the well.

Drilling work: stages
1. First you need to dig a hole or pit, the dimensions of which are 150 by 150 cm. To prevent the recess from crumbling, its walls are lined with plywood, boards, and pieces of chipboard. Another option is to dig a trunk with a diameter of 15-20 cm and a depth of 1 m with an ordinary drill. This is done so that the pipe is more stable in a vertical position.
2. A strong metal or wooden tripod (called a drilling derrick) is placed directly above the recess, securing a winch at the junction of its supports. Towers made of logs are more common. A drill string with one and a half meter (if drilling independently) rods hangs on a tripod. The rods are threaded together into one pipe and secured with a clamp. This design is used for lifting and lowering equipment.
The pump is selected in advance in order to determine the diameter of the future well and core pipe. The pump must pass freely into the pipe. This is why the difference between the pump diameter and internal diameter pipes must be at least 5 mm.
Lowering and lifting drilling equipment is the drilling of a well. The rod is rotated while simultaneously hitting it from above with a chisel. It is much more convenient for two people to do this: the first one turns the gas wrench, and the second one hits the bar from above, breaking through the rock. Using a winch simplifies the process: it makes lifting and lowering equipment into the well much easier. The rod is marked during drilling. Markings will be required for orientation. The markings help determine when it is time to pull out the rod and clean the drill. It is usually recommended to do this approximately every half meter.
3. To make it easier to overcome different layers of soil, special drills are used.
- spiral drill (otherwise, coil) - for clay soils;
- drill bit for loosening hard soils;
- drill spoons for sandy soil;
- The bailer helps lift the soil to the surface.
4. It is easier to go through the sand layer with a spoon drill, adding water while drilling. If the soil is hard, use a chisel. Drill bits come in cross and flat types. In any case, their purpose is to help loosen hard rocks. Impact method overcome quicksand sands.
For clayey soil, you will need a coil, a bailer and a spoon. Coils or spiral drills work well clay soils, since they have a design similar to a spiral, and the pitch of the spiral is equal to the diameter of the drill. The size of the lower base of the drill is from 45 to 85 mm, the blade is from 258-290 mm. Pebble layers containing gravel are pierced, alternating between a bailer and a bit, with casing pipes. Sometimes you can't do without pouring water into the hole. This can significantly simplify the task of drilling a well. The option of drilling a well using a pump is also worth considering.

Soil drilling process
5. If the rock delivered to the surface has become important, then the aquifer is already close. You need to go a little deeper to cross the aquifer. Drilling will suddenly become noticeably easier, but you cannot stop. You need to find a waterproof layer with a drill.
Well construction and pumping
Once the required depth has been achieved, the next stage begins - arrangement. A filter column consisting of a pipe, a settling tank and a filter is lowered into the finished well. You can make it yourself from a filtration mesh, perforation and casing pipe, or use a ready-made, store-bought sand filter for a submersible pump.

To strengthen the pipe, the space behind it is filled with crushed stone of a 5-mm fraction or coarse sand. The backfill must be above the filter level. Filter - essential element any well. The main function of the filter is protection from sand and large impurities. In parallel with backfilling, water is pumped into a pipe with a sealed upper end. This manipulation helps to flush the annulus and filter. After washing, a natural barrier is formed for large impurities. Zhelonization of the well with a bailer attachment or screw pump means that water is pumped out of a fresh well until the water becomes clean and clear. This stage is called buildup. For it, electric power is most often used. centrifugal pump. The advantage of this mechanism is that it can pump high-density liquid media. Ordinary household pump This is also acceptable, but it will require more effort and time. If there are problems with the power supply, it is possible to use a hand pump.

After pumping, the pump is lowered to a depth on a safety rope (see picture above). They connect to it water pipe or hose with a diameter of 25 or 50 mm. The choice of diameter depends on the capabilities of the well - the amount of water that can be pumped out of the well in a certain period of time.
If applicable metal pipe, the pump is not fixed. Instead, a waterproof cable coming from the pump is attached to the pipe.

Well pump. Peculiarities
To select a pump of the correct power, you must take into account such parameters as:
- well flow rate, indicators of its depth;
- casing diameter;
- distance of the well from the house.
The required pump power directly depends on these parameters. For shallow depths (up to 9 m), a self-priming surface pump, in other cases a submersible well pump will do a good job.
After the pump is immersed, a pipe is brought out into the wellhead, equipped with a caisson, welded to its head. A valve is installed on it, which will open the way for water to the top and regulate the flow. If the water intake rate is excessive, the low-productivity well will quickly dry up, and the pump, running idle, will fail. Pipes are connected to the caisson, which will serve as a water supply to the room. They require waterproofed and insulated trenches. You can read about how to choose a pump for a well, and about how to choose a pump for a well.
Well operation
Wells of all types need timely cleaning. Signs that an aquifer well requires service may include: jerks in the water outlet, the presence of air jams, impurities (silt, sand). If you miss the moment of maintenance, the productivity of the well may no longer be restored. To restore normal functions, the well is purged with water or air compressor. More radical cleaning methods include acid or electricity. However, these methods are risky and are best left to specialists.
Tips for those who make a well themselves
Before starting work, it would be a good idea to ask your neighbors what the water level is in your area. If there are wells nearby, take a look there.
Water level above 5 m – good news, because the only drilling tool you need is a garden auger.
A small-sized drilling rig or mechanical drilling device - “handbrake”, can be rented. This way you will be able to use convenient equipment and not pay a lot of money for it.
You cannot lower the water pipe into the well all the way to the bottom. It should not reach the deepest point by about half a meter. This way the water will go up better.
The pipe leading into the well must have ventilation holes on the surface, otherwise, without air access, the water will quickly become musty. It is convenient to equip the pipe with a hinged cover so that there is constant access to the well.
The most convenient way to equip a well is a solid plastic pipe.
After the well is operational, be sure to submit your water for examination. Water is recognized as drinking water if its transparency is at least 30 cm, the nitrate content is no more than 10 mg/l, there are less than 10 E. coli in 1 liter, and the maximum rating of smell and taste is 3 points.

Disadvantages and advantages of manual well drilling
Advantages: low cost; no need for bulky special equipment to enter the site; due to the relatively shallow depth, homemade wells pumps faster, takes less time; If there is no electricity, water can be obtained using a hand suction pump.
Main disadvantage self-drilling- limited depth, shortage of specialists who can help maintain a homemade well. Thus, after reading this article, we hope that you will not have any questions about how to drill a well with your own hands.