To entertain and keep the kids occupied personal plot, while parents are busy with their “adult” affairs, you can install a swing, a sandbox and a slide. Wooden slide design for home or a dacha is quite simple and does not require expensive materials. Today we'll talk about how to make a slide for children with your own hands.

DIY slide for children: drawing
To calculate the amount of material required, first of all, prepare a design diagram of the structure. You can draw the layout yourself or use it as a basis finished drawing from any source, adjusting the dimensions to your requirements.
When independently developing a layout take into account the following nuances:
- child's age: for children from 1.5 to 4 years old, the height of the slide should be no more than 1.5 m; from 4 to 11 years – from 2 to 4 m;
- the optimal length of the slide can be calculated using the formula: “height of the slide x 2”;
- The angle of inclination of the slide should be within 40-55 degrees;
- the height of steps and handrails is calculated depending on the height of children;
- It is necessary to provide protective sides, the height of which at the launch site should be at least 60 cm, and at the descent - about 20 cm.
How to draw it yourself diagram? You can create your own drawing based on these photo:


Do-it-yourself wooden slide for children: manufacturing stages
Preparatory stage
First of all, based on the drawing, it is purchased required quantity main material - boards, bars; auxiliary materials - self-tapping screws, wood varnish, paint. It is also necessary to prepare tools - a saw, a hammer, a screwdriver, a drill, a tape measure, a level, a plane.
IMPORTANT! Special attention it is necessary to pay attention to the wood - it must be dry, without visible defects. It is preferable to use wood coniferous trees. It is advisable to use self-tapping screws, bolts, and screws as fasteners, as nails may come out during operation and cause injury. .
Preparation of materials
- First of all, sawing all wood parts, according to the drawing.
- Then everything wooden parts must be freed from knots and nicks and sand thoroughly to remove all defects.
- To avoid rotting, the bottom of the support pillars is processed resin, mastic for waterproofing, shale or anthracene oil, oily antiseptic.
Site and foundation preparation
The place where the slide will be installed must be carefully leveled, and the positions of the support pillars must be marked with a tape measure.
If you decide to put the slide not at home, but on summer cottage, follow following instructions. Using a garden auger dig holes about 60 cm deep, which will make the entire structure more resistant to weather conditions - freezing of the soil during severe frosts and soaking it during periods of rain.
In the resulting wells insert the pillars, leveling them using a level and filling them with concrete.
IMPORTANT! Z the descent should be quite soft - covered with sand, or artificial grass, a rubber mat to avoid injury when completing the descent.
Assembling a wooden structure
- in installed supports cut grooves. Their width should correspond to the width of the board that will make up the frame, and their depth should be about 2-3 cm;
- a board is inserted into the grooves and the stand is tightened using self-tapping screws;
- at the upper ends of the support pillars, transverse bars are screwed on both sides, which will serve as the railings of the launch pad;
- two bars are screwed to the supports, to which the stairs and descent will be attached;
- on top of these bars the floor of the launch pad is laid. Small gaps (2-3 mm) should be left between the boards to ensure the flow of rainwater and melted snow;
- ladder being installed: the edges of two boards are cut at an angle of 45 degrees, they are screwed to the cross beam of the launch platform. These boards are fixed to each other using steps. The optimal step between steps is 25-35 cm. Next, balusters are installed to which the railings are attached;
- descent is being installed: the edges of two boards are cut at an angle of 45 degrees, they are screwed to the transverse beam of the landing platform opposite the stairs. These boards are fixed to each other using several cross beams secured with self-tapping screws. Plywood or long boards are laid on top of the cross beams, which will serve as the descent.
Final stage
After assembling the slide, you must carefully inspect all fasteners and check that all the caps are recessed into the wood.
Sand all uneven surfaces, treat all wooden parts with an antiseptic and open them with varnish or paint. DIY summer slide for children ready! By the same principle, you can not only make a wooden slide for children in the apartment, but also on any street area .
IMPORTANT! Every spring, before using the slide, it is necessary to check all wooden components for the presence of chips, burrs, cracks that could have occurred during winter period. If damage is found, sand it, cover it with an antiseptic and varnish or paint it.
Clearly see step-by-step assembly Children's slide can be seen on video.
In the courtyard of a private house or in a country house, the best entertainment for a child is a children's slide. The playground with a slide is suitable for children from 2 to 7 years old and older. Implementing such a design is not difficult, knowing how to make a children's slide with your own hands, how to ensure safety and what to pay attention to during manufacture. The simplest, fastest and inexpensive option for the dacha - a wooden slide, the construction of which will be discussed in this article in the form step by step instructions for beginners without construction experience.
DIY children's slide
Types of children's slides
The location of the slide (in the house or on the street) will determine its dimensions and material of manufacture. From this position, two types are distinguished:
Indoor slide for a child in a house/apartment
As a rule, it is small in size and installed in a child’s bedroom. Any materials (chipboard, plywood, laminate) are suitable for production, since negative influence environment. A do-it-yourself indoor slide for children is made according to the same principle as an outdoor one, but in a more compact size.


There are such slides in the courtyard of almost every high-rise building. Residents of the private sector have to take care of their installation themselves.


Types of slides depending on the material of manufacture
There are ready-made slides on sale made from different materials (the most popular is plastic), for self-made usually wood or metal is used. Nevertheless, brief overview will give an idea of the advantages of this or that material for the slide. The list is in order of ease of installation and duration of operation:
Inflatable slide
 Made from PVC (laminated PVC fabric). Suitable for little ones.
Easy to assemble (inflated manually or with an electric pump), compact, has short term services.
Plastic slide
 Designed for children 3-5 years old. Plastic allows you to make slopes of various shapes: pipe, spiral, wave.
A PVC slide takes up little space, is easy to clean, safe, and has a sliding surface. You can go down the slide at any time of the year; the plastic slope has a high heat capacity (it does not overheat in summer and does not cool in winter). Making a plastic slide with your own hands is quite simple - connect the parts according to the instructions.
The main disadvantage is the fragility of the plastic (inherent in cheap Chinese-made models).
Metal slide
 Reliable, durable, with proper care it can be ridden by two or three generations. It is possible to make the slope (descent) of different heights and different lengths.
The disadvantage is the high thermal conductivity of the metal (it’s very cold to go down in winter, and very hot in summer). In addition, the metal slide needs maintenance, and the steel slope is susceptible to corrosion.
Wooden slide
 Wood is a natural and affordable material.
The wooden slide is environmentally friendly, lightweight, comfortable, suitable for installation in any place and use in any weather.
However, wooden slides require constant protection (wood is susceptible to rotting and deformation).
A wooden children's slide for a dacha is the most popular and simplest option for making your own, due to the availability of wood, maintainability and the ability to complete the work without the involvement of specialists (welding work, use welding machine etc.).
How to make a children's slide out of wood with your own hands
1. Design
3D projects, drawings, slide diagrams allow you to get a holistic view of the configuration and dimensions future design, and will also significantly facilitate the manufacture of parts.
Development of a slide project for children (what to pay attention to):
- child's age. The baby will need a flat, low slide. So that he himself or with the help of adults can go down it. Older children will be more interested in the presence of turns or bends on the descent;
- height. Allows you to select the required height of the stairs (the taller the child, the greater the distance between the steps should be) and the steepness of the flight. In addition, determine the installation location of the handrails;
Note. For small children, it is necessary to install a flat staircase; for older ones, a vertical one is acceptable.
- slide dimensions. Dimensions are needed to calculate the width of the slope (descent) and the height of the enclosing sides;
- installation location. It is necessary to leave free space in front of the slide for a safe descent;
- the angle of inclination of the stairs and slope so that they are safe for ascent and descent;
- the wishes of the child and your own abilities.
A drawing of a simple wooden slide is shown in the figure.


2. Material for children's slide made of wood
 As an example, we provide a list of lumber for a wooden slide with a slope length of 3000 mm and an upper platform size of 500x500 mm.
Material prepared for the website www.site
| No. | Material | Purpose | Quantity |
| 1 | wooden beam 100*100*1500 mm. | For supports | 4 pcs. |
| 2 | wooden beam 20*40*500 mm. | To strengthen the upper platform (stiffening ribs) | 2 pcs. |
| 3 | wooden beam 30*30*500 mm. | For fencing the upper platform | 2 pcs. |
| 4 | wooden beam 30*30*1500 mm. | For railings | 2 pcs. if necessary |
| 5 | board 20*100*500 | For connecting supports from below (giving structural strength) | 4 pcs. |
| 6 | board 25*100*500 | To cover the floor of the upper platform | 5 pcs. |
| 7 | board 25*100*300 | For arranging steps | 6-8 pcs. (depending on the child's height) |
| 8 | floorboard, 3,000 mm or moisture-resistant plywood, at least 20 mm thick. or factory plastic slope | For the ramp device | 2 pcs. The number of pieces and their length depends on the specified length of the slope and its width |
| 9 | board 25*100*3 000 | For installation of ramp guards (+ stiffener) | 2 pcs. |
| 10 | screws, anchors | For fastening | Use galvanized hardware to avoid corrosion. It is better not to use nails |
| 11 | lumber for arranging stairs: board or timber | For stringer/stringer of stairs | 2 pcs. |
Advice. Under the upper platform you can make a box for storing sports equipment or toys.
The tools that will come in handy are a tape measure, a hammer, a level, a drill, a plane, a saw.
3. Preparing material for a children's slide
Please note that only well-dried wood is used in this work; this will reduce the likelihood of deformations. All lumber must be processed (planed) with an electric planer to eliminate nicks and knots. And also sand and chamfer (round) to eliminate all possible wood defects.
Treat the bottom of the support pillars with any material that will prevent rotting (waterproofing mastic, waste machine oil, resin, etc.).
4. Preparing a place under the slide for children
Level the area allocated for the hill and mark the location of the supports. In our case, this is a square of 500x500 mm. In the corners of the square, use a drill to deepen holes of 500-600 mm. Pour crushed stone-sand mixture down. The pillow will serve additional protection support posts.
Note. If you plan to develop a complex playground, more free space should be provided.
5. Installation of supports for a children's slide
 Supports are installed in the prepared places (No. 1 from the table with the list of materials) and securely fixed with concrete.
To make the structure stronger, its bottom is “tied”. To do this, grooves are made in the racks (with a chisel or a router) 20 mm deep. The supports are connected to each other using a planed board (No. 5), inserted into the prepared grooves. It is better to fasten with self-tapping screws or self-tapping screws.
Note. Installation of the slide is possible without digging in; in this case, guy ropes are provided.
6. Installation of the floor (top flooring) for a children's slide
The work uses elements No. 2 and No. 6. The timber is laid out parallel to each other, and boards prepared for the floor are attached to it.
Advice. A gap of 5-7 mm should be left between the boards to allow water to drain.
7. Making a ramp (slide) for a children's slide
If there is a plastic slope, it is simply installed and secured to the existing structure. When making a ramp with your own hands, elements No. 8 and No. 9 are used. The floorboards are fastened together, and enclosing edges are installed along them.
The place where the ramp is attached to the floor of the upper platform can be made in two versions:
- by forming the desired angle (usually 45°) and attaching to the base;
- by sawing the grooves, as shown in the photo.
 Please note that the bottom of the slope is also sawn at an angle to ensure its stability when going down the hill.
The main rule here is that the boards that make up the slope are carefully polished after the shield is formed - this will eliminate the smallest imperfections of the boards and prevent the appearance of splinters and abrasions in the child.
After construction, the slope is painted.
What to make a ramp for a children's slide?
Summarizing the user experience, we can highlight the most popular materials for the release device:
- plastic sheet. Has best characteristics slip, but is prone to cracking, and also makes the structure expensive;
- galvanized steel sheet with a thickness of at least 0.5 mm;
- thin plywood;
- linoleum;
- wax polish applied to wood;
- On the contrary, it is not recommended to lay laminate, because it deforms under load and under the influence of moisture.
 Laid on top of durable wooden flooring, these materials make the slide for the children's slide more slippery, which means the descent will be faster.
 A drawing of a children's slide slope is shown in the diagram.
 An older child will be interested in a slide that has a spiral slope rather than a straight one. In this case, you need to approach the design of the gutter more carefully, and its additional coverage is mandatory.
Advice. Any unevenness of the slope, sharp corners, metal parts can cause injury, so the places where the screws are attached are ground, and the slope is painted or varnished.
8. Making a ladder for a children's slide
 A mandatory element of a children's wooden slide is a staircase consisting of at least several steps.
Structurally, the staircase can be made on a bowstring or on a stringer. An example is shown in the diagram.
Note. Round steps can be made from available materials, for example, from cuttings of garden tools (shovels).
9. Fencing the stairs and the floor above the landing
Guardrails for the stairs and upper landing depend on the height of the slide, the age of the child and other factors.
Despite its apparent simplicity, a wooden children's slide requires compliance with certain rules during construction:
- flexible plywood can be used to make a rotary ramp;
- each element of the ladder must be securely fastened;
- It is advisable to paint the finished wooden slide not with ordinary oil paint, but with acrylic paint, or even better with high-quality varnish. In any case, the most exploited surface is the slope. The decorative coating is applied in several layers with mandatory drying of each layer;
- Over time, the coating on the ramp will wear off and will therefore require maintenance. Users advise that each time before painting, sand the surface, eliminate possible deformations of the board, fill the cracks with putty, and only then cover with a new layer of paint.
Safety when using children's slides
- the slope should rest against the mat (or sand mound) - this will ensure a soft landing;
- A wooden slide needs periodic inspection for cracked joints or deformed boards. Especially relevant after winter;
- It is better to install a wooden slide in the shade, in a place that is clearly visible from the window;
- there should be no thorny bushes near the installation site, poisonous plants(Datura, foxglove) or allergenic plants. Honey flowers are also not best neighborhood– they will attract bees;
- there should be enough space for several children to be near the slide;
- electrical cables, pipes, hoses should also be located away from the slide.
Conclusion
A short guide will help you make a wooden slide with your own hands. In the future, it can be supplemented with other elements of the play complex: swings, sandbox, sports equipment.
In the yard country house or on the garden plot of the dacha, the best entertainment for children will be playground with a slide. You can make a children's slide with your own hands. The main thing is to know what materials and tools you will need, and to draw up a competent project plan. After all, there are many combinations: with a steep and sloping descent, with carved decorations, additional play areas, etc. Such entertainment will appeal to children aged from two to eight years.
Types of children's slides
Construction and children's stores offer a wide range of ready-made outdoor and indoor slides for children. Small structures are suitable for installation inside the house, if the height of the ceilings of the home allows this. But bulky slopes are more suitable for the street. Each model has its own design features, and also differs in materials of manufacture:

The latter option is best suited for self-production and installation on a summer cottage or in the courtyard of a private house, due to the availability of the material, the possibility quick repair or replacing broken parts. In order to repair or install a wooden slide with your own hands, you do not need to call specialists, use welding, etc.

A set of necessary tools
To make a wooden slide for children in the country with your own hands, you will need a fairly large set professional tool. Some tools are sure to be found in every man’s garage or attic; something will have to be purchased or borrowed, for example, from a friend or neighbor. To make a children's slide out of wood You will need the following tools:

Armed necessary tool, you can start designing a future entertainment area and purchasing materials for making a ramp.
Creating a Project
Nowadays you can find a lot of ready-made drawings, diagrams, and 3D projects on the Internet, so you don’t have to “reinvent the wheel” yourself. Volumetric models with detailed instructions installation and list necessary materials will help you create designs for children of all ages. They may differ in the material for the descent, the type of stairs, supporting structures, height, etc. When developing a project for a children's slide made of wood The following factors should be taken into account:


In addition, the dimensions of the structure are taken into account, which will help to correctly calculate the width of the ramp and the angle of inclination of the trigger element. When making a wooden slide at the dacha with your own hands, you should take into account the child’s opinion and his wishes.
Materials required for construction
Of course, the dimensions and quantity of materials that will be used to create supports, stiffeners, railings, upper railings, steps and other elements directly depend on the dimensions of the homemade wooden slide for children. These details are specified when choosing a project play area. To understand what materials may be needed, as well as what the installation and construction process will be, we took as an example a children's slide project with a slope of 3 meters and an upper platform of 50*50 cm.
List of building materials:

Additional building elements for fastening are galvanized screws and anchors. If you need to improve the string of the stairs, then you should stock up on additional lumber.
Construction stages
The process of building a durable slide for children can be divided into several stages. This includes preparation (of materials and installation location), installation of playground supports, flooring, production of a ramp, stairs and safety structures. All these steps are important, poorly executed installation work, can reduce the operational life of the entire structure, as well as reduce the safety of use.
Preparing materials and space for the slide
First of all, you need to take care of the quality of the wood. It must be well dried, this will help to avoid deformation of the bars when using the slide.

Then follows the stage of lumber processing electric plane, which will allow you to quickly get rid of wood knots and nicks. After this, you will need to sand the wood and round the chamfers. The lower part of the beams is treated with a moisture-resistant material that prevents the wood from rotting, for example, resin or waterproofing mastic.
After this, you can begin to prepare a place for a children's wooden slide. Land plot will need to be well leveled, and then mark the areas where the supporting elements will be installed. The depth of the holes in the corners of the square should be at least half a meter. The lower part of the recesses is covered with crushed stone and sand.
Installation of supports and floor
The support beams are securely installed in the prepared location and then concreted. The structure can be strengthened using a “bundle”. To do this, small cuts-grooves of 2 cm are made in the racks, and a planed board is inserted into them, connecting the supporting elements to each other. Large screws or self-tapping screws are used as fastenings.

After the supports are installed, it is time to begin installing the floor of the top deck of the slide. Wooden blocks stiffeners are laid parallel to each other, then laying follows floor boards. It is worth taking care in advance to ensure that there is no accumulation of rainwater, for this purpose a small gap (5-7 millimeters) is left between the boards.
Making the escapement
If a factory-made plastic ramp is used in the construction of a slide for children, then its installation will not take much time; you just need to screw it to the finished structure. When using lumber, the floorboards are fastened together, and wooden railings are mounted along them.
The floor of the upper platform is attached to the slope in several ways: by forming an acute angle ( optimal inclination equal to 45 o) or cutting out grooves. Important point , this is stripping the wood that forms the descent; it must be perfectly smooth. After sanding, the surface of the slope is coated with varnish or special paint.
To make a ramp, you can choose other materials, for example, slippery plastic sheet, galvanized steel, durable plywood, thick linoleum. Any of this material is applied to a wooden slide, which improves the sliding process as a child slides down the slide. To reduce the risk of injury to the children's slide, any irregularities and places where screws are attached are sanded and coated with special paints.
Installation of stairs and railings
 The landing of a wooden slide built with your own hands must consist of at least several steps. The type of construction is selected individually; the ladder can be installed on a stringer or bowstring. How younger child, for which yard entertainment is being made, the smaller the march of steps should be. After this, you can begin attaching the fences, the size and height of which directly depends on the dimensions of the structure and the age of the children.
After installing a children's wooden slide, it is recommended to take care of the safety of the children who will ride on it. It is necessary to arrange the landing zone by decorating this place with a sand mound or a soft sports mat. You need to take care in advance to clear the space of thorny bushes, stones, pipes, etc. Periodically checking the structure for dry boards, especially after winter, will help avoid unwanted childhood injuries. This slide goes well with other play elements made with my own hands, for example, benches and sandboxes.
On your suburban area There’s a lot of space, but there’s not much for the kids to do? This is not the point. If not a playground, then at first DIY slide for a child must be built. And this is within the power of any dad who can hold an instrument in his hands in the slightest degree.
What kind of slide should a child have?
First of all, a do-it-yourself slide for a child should be safe. Take care of the stability of the structure. Several children can climb the slide at once, and the structure needs to support their weight without shaking.
No sharp corners, protruding fasteners, rough edges, or gaps that could cause injury - this should be taken very seriously. The surface of the descent should be especially smooth.
Be sure to provide curbs along the edges of the gutter, a parapet at the top, and a railing on the stairs.
Think about where the child will land after sliding down the slide - it is better if it is sand, a lawn, densely overgrown with grass; you can even put mats on the kids to make them feel comfortable and safe.
Which material is preferable to use? First of all, harmless to the child, high-quality wood is best. We will consider the option of a design made of wooden building materials, and the slope can be finished with plastic or metal coating.
Slide for a child - stages of construction
So, the task for dad or grandfather is clear - a do-it-yourself slide for a child. Where to start? First of all, decide on the location for the structure and its design, select materials and tools.
The place where the slide will be located should be clearly visible so that you can always see how your children ride and play.

It’s good if during hot hours a shadow falls on the hill from nearby trees. The structure should not be located near outbuildings or a garage.
Installation of supports
In order for a homemade slide for a child to be reliable, it is important to install stable supports.
Level the downhill area, make markings in the form of a square or rectangle. Using a garden drill, make indentations (optimally from 40 to 60 centimeters). Before installing the support bars, lubricate their ends with mastic. Concrete the installation site.

Using a level, level the supports and fasten them at an average height of 1.3-1.5 meters using cross beams, which you tighten anchor bolts.
Making the escapement
Make a slope from the cross beams, the bottom of which must be driven into the ground and secured with metal brackets. The width of the slope is from 60 to 80 centimeters, and the angle of inclination is 55º.
Seal it with boards, build sides on the side, the height of which should be at least 30 centimeters. The finished frame of the ramp can be sanded and painted. And if you want a different coating, then sheets of plastic, galvanized steel, plywood, or linoleum will do.

The slope will be more slippery, and a slide made with your own hands will delight your child.
Construction of the stairs
In order for the staircase to be reliable, it is important to build the stringers correctly. A cross beam or 50mm edged board is suitable for this.
Secure the folded boards together using self-tapping screws. Using hand saw, make cuts for the steps according to the marks. Insert and secure the steps of the stairs, tighten the stringers with anchor bolts and locknuts.

The angle of inclination of the stairs depends on the age of the child. Older children are not afraid of steeper climbs. But in any case, railings on the stairs are required.
Mounting the upper platform
The top flooring is made of timber (the so-called stiffeners), which should be laid out parallel to each other and attached to the frame of the structure, and boards should be laid on top. You should leave a gap of 5 mm between them to allow water to drain when it rains.
Be sure to make a parapet on the top platform from slats and cover it with plywood. Adjust the height of the fence depending on the height of the child.
Each structural element must be securely fastened so that a do-it-yourself slide for a child is safe and durable.
In this video, the author will share his experience of building a children's slide with his own hands:
Setting up a playground is impossible without a slide. But you need to choose the design very carefully and take into account all the nuances. This means safety, comfort, and ease of making it yourself.

Species
Speaking about the types of children's slides, we must first distinguish two types: garden and located in the house. Most often, home structures are placed in the bedroom. They can be made from randomly selected materials, even plywood or particle boards. This is unacceptable on the street - the adverse meteorological influences there are too strong. But the basic approaches to design remain unchanged.


The difference may be due to the materials used to make the slide. For it they use:
- tree;
- metal.
- ease of assembly;
- minimum occupied territory;
- possibility of obtaining various forms;
- convenience and safety;
- seasonal versatility.

Plastic allows you to make slopes in the form of a spiral, pipe or wave. The excellent heat capacity of the plastic slope allows it not to overheat in the summer, and also maintain a comfortable temperature in the winter. The work is very simple, you just need to assemble the parts in accordance with the instructions. However, plastic is fragile, especially when it comes to cheap ones. Chinese samples. It doesn't last long enough.

Often on site nearby apartment buildings you can see metal slides. They are very durable and serve long time. Even with active use, the attraction will work enough for several generations to use it. You can make a structure with different heights and with unequal lengths of descent.
However, before choosing such a structure for your yard, you need to take into account its weaknesses.

Metal conducts heat too well. In hot weather, it gets very hot, and when cold weather sets in, the skaters easily freeze. This can lead to bad health consequences, even if they are not noticed in the heat of the game. You also need to remember that metal requires maintenance. And if the ramp is made of steel, it may corrode.

Wood is attractive for many reasons. It is safe in environmental and sanitary terms. Wooden structures are relatively lightweight and can be placed in any location. Weather conditions do not prevent their use. But we must understand that even the most best wood may become deformed due to dampness and temperature changes.

Special treatment is carried out for protection. However, it complicates and increases the cost of the construction process. In addition, it is necessary to carefully select impregnation compositions, since not all of them are safe enough. But a wooden slide can be easily repaired with your own hands. And during the construction stage you will not need to use a welding machine.

The large area occupied by the slide (especially together with the descent) requires a more thoughtful approach to organizing this element of the playground. You cannot limit yourself to choosing the right material. Often the slide is complemented by a house. Not only does it provide another place to play, but it also provides shelter from the rain during the summer months. It is also worth mentioning that the types of slides differ both in the presence of the house and in the size of the structure.

Drawings and dimensions
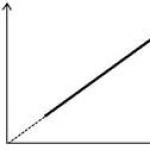
In order to properly build a slide for children on a summer cottage, it is necessary to draw up drawings and diagrams. If the profile of the slope found on the Internet does not suit the slope, you need to turn it clockwise (to increase) or counterclockwise (to reduce) the angle. The steeper the slope, the more enjoyable it will be for children. In addition, such a design will take less space, which is especially important in the country.
But when the slope of the slide is tilted by more than 40 degrees, careful calculations must be made so that the braking section does not turn out to be excessively long.

Typically profiles are drawn to the same scale, from bottom to top. At the same time, they try to ensure that the distances between the starting points coincide. After this, vertical secant lines are prepared, between which there should also be an identical distance. The angle of the slope is determined by how large the free space is.
If there is a wall, a pool or other dangerous places in the courtyard of the house near the slide, you need to plan to build the steepest possible slide.

When drawing up drawings, it is necessary to take into account not only the accessible territory, but also the age of the children. So, if the design is designed for a category of 3-7 years, you can make a playing surface at a height of over 2 m. But in this case you will have to make barriers from metal, the height of which will be at least 0.7 m. If children of any age can use the slide, the openings of the fences can be a maximum of 0.5 m. In this case, the height of free fall should be limited to 2 m.
When a fall from the upper platform is likely, it is necessary to provide for the laying out of an impact-absorbing coating during the design. They are often not indicated in the drawings support structures. And also there may be no other deepening elements. The form should be as simple as possible, since it is difficult to build a structure with a sophisticated configuration. The drawing of a slide for the street should be made in such an orientation that the descent is not directed towards the roadway.

Design
IN early age Children's imagination does the main work itself. It is able to “colorize” a seemingly unremarkable element on the site, presenting it as a fairy-tale space. But it is quite appropriate for some adults to want to help the imagination, to push it in a strictly defined direction. And if it is difficult to diversify the slope, then the ascent can be presented much more interestingly than simple staircase. Excellent solutions this kind can be:
- slide in the form of a “tractor”;
- tree house;
- "locomotive".


How to do it yourself?
On the Internet you can easily find many schemes for arranging a children's slide. But you should seriously pay attention only to such drawings and drawings, which show the barriers in detail. Children of any age play with abandon and lose their sense of reality. Therefore, both fences and railings must be present. Special attention should be paid to the materials from which the slide as a whole and even its minor parts are constructed.

There are two main requirements: sanitary safety and minimal risk of fire. All wooden and metal structures must be sanded to minimize the risk of injury. When thinking about a future structure and constructing it, you need to exclude any slotted partitions and gaps. When playing, children do not watch where they put their fingers or even their heads. It is useful to imagine the slide through the eyes of a child, and then it will become clear where dangers may be hiding.
The step-by-step design of sports equipment begins with the preparation of the descent. It is made from boards that match in length and width. The wood is carefully sanded to ensure a safe descent. To connect the boards, bars are used, placed from below. The next step is to attach the side parts of the structure to the descent.
In order not to carefully calculate all the proportions, you can simply repeat standard sizes factory slides. It is 1.3 m in height at an inclination of 55 degrees. The boards of the side parts are selected and placed so that the ends are at the top of the site. They function as handrails that you can hold on to before descending. The sides are secured on both sides with self-tapping screws so that they hold onto the base of the descent.

Important: the side parts should be thoroughly processed. All sharp corners are cut off and even sanded with sandpaper. To spend less time and effort, you can simply take a grinder with grinding disc. Next you need to do the marking. At this point you will need a garden auger.


Recesses in the ground obtained with its help are needed for installing timber. Note: the bottom of this beam should be lubricated with mastic. Now the places where it was placed are being concreted. Only this solution ensures the reliability and stability of the structure. It is recommended to mix the mortar using M500 cement in standard proportions.
Grooves are cut in the upper part of the beams with a saw. They are needed to install the trim strips. The parts are connected using self-tapping screws. The slats solve two problems at once: they increase rigidity and ensure the safety of children. Now you need to attach a couple of wooden crossbars to the frame.
A ladder is attached to them on one side and a prepared descent on the other. When this work is completed, it is necessary to build a wooden floor. When making it, boards are laid, attaching them with self-tapping screws.

Important: boards cannot be placed closely. The gaps should be such that there is no risk of injury, but water can drain freely.
If you need maximum strength, joints wooden parts reinforced with steel corners. It is recommended to make the slide twice as long as it is tall. When choosing a site, you need to make sure that it does not end up in a lowland. When it rains for a long time, a “swamp” will form there. All wooden and plastic parts must be impregnated with fire retardants.


But the construction of a wooden slide can happen differently. An alternative scheme involves first removing all the soil and leveling the excavation. This is necessary if there is fertile land there - then it will not be empty and will be useful somewhere else. Next, the site is covered with sand and after a while, when it settles, the entire area is compacted. This time should not be wasted, you can:
- prepare wood;
- dry it;
- cut according to the drawing;
- sand;
- impregnate with protective components.
The steps, handrails, railings and boards that will be needed to build the “tunnel” are painted twice with enamel. They need to be sanded between paintings. On this preparatory stage ends. The time has come to build the foundation: reinforcement is placed in the holes prepared using a garden auger. It will certainly be verified according to the building level.
When the reinforcement is placed, it is immediately concreted, and the corners are welded on top. The pillars that will be placed at the base must be cut into certain places. These recesses will allow you to fix the timber at the corners with self-tapping screws. Next, the pillars are connected to each other using jibs. The staircase is made like this: stringers are attached, and then steps are placed on top of them.
But the ladder cannot be used normally if it is not supplemented with a launching pad. When this work is completed, it is necessary to prepare the base of the descent (it is made of timber). Installed steel curved profile for stingray. A plywood shield is placed on top of the base under the slope. A sheet of iron is nailed onto this shield.
The outer edges of the sheet are folded and secured to the profile. Otherwise, injuries are inevitable. Now you can cut gaps in the boards and wrap the edges of the sheet there. A boardwalk is being prepared under the ramp. The sides are covered with plywood. Now you can:
- put up the sides;
- complement the stairs with railings;
- build hipped roof, cover it on top with plywood.
- sheet of plastic;
- linoleum;
- galvanized steel 0.05 cm thick.
It is not advisable to use laminate for slopes. Under constant load or simply upon contact with water it is easily deformed. And here are some more recommendations:
- You can increase the protection of wood from moisture by polishing it with wax;
- for covering a wooden slide oil paint much worse acrylic compositions and varnish;
- you cannot place the slide near poisonous plants and honey plants;
- you must immediately ensure that there are no pipes or electrical appliances nearby;
- You cannot orient the slope towards the roadway, fence or main wall.

Beautiful examples
It would take a long time to list the rules for building slides and study the nuances. But it is much better to take the initiative and focus on ready-made design ideas. The photo below shows a simple light-colored slide built almost entirely from wood. Only the surface of the slope is lined with sheet iron. At the same time, the protective sides are completely wooden. Contrary to the fears of some people, this decision does not look sad at all.