In the modern pace of life, it is not always possible to keep the house clean. It will help in this matter modern technologies. The robot vacuum cleaner appeared more than 15 years ago. Its typical appearance resembles a large puck that moves around the room according to a given algorithm or randomly (until it hits something) and collects garbage. We invite you to study 2 step-by-step instructions to make a robot vacuum cleaner with your own hands.
Assembly materials
So, to assemble a robot vacuum cleaner you need to understand its components, let's go in order. It must move around the room on its own, so motors are needed, depending on the final design there should be from 2 to 4 of them, as well as the ability to switch the direction of rotation and speed, which means a board is needed to control the motors. If you are using DC motors, then you need a board with 4 transistors (H-bridge).
A homemade robot vacuum cleaner must detect collisions with walls and furniture. To do this, you need to provide obstacle sensors and limit switches on the “bumper”. You also need the working part itself – a vacuum cleaner. However, it must be designed to operate on low voltage direct current (for example, 12V).
In addition to the vacuum cleaner, you need a movable (rotating) brush that will clean the surface, lift the pile of the rug, and sweep away debris. For this you need one or two more motors.
A system that will manage all this. The simplest option on Arduino. Any of the boards is suitable for this task; the size is convenient to accommodate the Nano or Pro mini option.
Idea No. 1: robot vacuum cleaner made of cardboard
The base of the robot is made of thick cardboard. It is better to glue it in a couple of layers, and place the fibers perpendicularly. For its technical filling you need the following set of parts:
- Any Arduino board.
- A Breadboard or a simple breadboard, in principle, you can do without it, just solder everything.
- 2 ultrasonic distance sensors (range finder).
- Turbine from a vacuum cleaner.
- A small engine or cooler from a computer.
- Motors with gearboxes and wheels.
- Controller for motor.
- Wires for circuit connections.
- Batteries and charge controller.
The robot must be powered by 3 lithium batteries. The voltage of each of them is 3.7 V. A controller is needed to charge them. For example, like the one in the photo:

To control the robot drive motors, it is convenient to use a module based on the L298 chip. Circuit design is an H-bridge; you can assemble it yourself from individual components, but it will be safer to buy a ready-made board. With it, you can set the speed of the robot vacuum cleaner and change the direction of rotation.

To adjust the speed, a PWM signal is supplied to the ENA or ENB pin, and to set the direction of rotation, opposite signals are supplied to IN1 and IN2 for one motor and IN3, IN4 for another motor. Moreover, if we have a logical one on the IN1 pin, and a logical zero on the IN2 pin, the motor rotates in one direction, to change the direction you need to swap 1 with 0. It needs to be assembled with the Arduino according to this circuit (you can use any pins, this you indicate in the sketch).


Here's a view from the bottom. Two drive wheels with bevel gear and a swivel wheel:

Now you need to assemble a circuit that is mounted on the base. The diameter of the base should be about 30 cm so that both the electronics and the vacuum cleaner unit itself fit in there.

Instead of rangefinders, you can use an option with bumpers that are connected to limit switches. When colliding with an obstacle, the control system will give a signal to change the direction of movement.

You can make contact bumpers with your own hands; for this you need a thin but rigid wire, for example from a twisted pair. To do this, forms a contact pad on inside bumper made of foil, and secure the conductor as shown below. When the robot vacuum cleaner collides with furniture and walls, they will come into contact. All you have to do is adjust the distance from the wire to the foil to achieve the desired sensitivity and eliminate false positives. 5V is supplied to the foil, and the wire goes to the Arduino input, pulled to negative through a several kOhm resistor.

The device is powered by batteries; linear stabilizers such as l7805 can be used to power the control system. To adjust the rotation speed of the motors, a step-down converter, for example LM2596, is suitable.
The most difficult thing is to design and assemble a vacuum cleaner. Here is its approximate drawing:

We break off the original blades from the cooler and attach the turbine from the vacuum cleaner to its rotor. It is important to mount the turbine exactly in the center, otherwise you will get imbalance and vibration.

This is what the reverse side of the turbine mounted on the cooler rotor looks like. You can attach it with hot glue or superglue.

That's all step by step instructions on assembling a robot vacuum cleaner made from scrap materials. The algorithm of its operation is as follows: the robot vacuum cleaner moves forward until it encounters an obstacle. After a collision (or approach, if you use ultrasonic rangefinders), it stops, drives back a specified distance, turns at an arbitrary angle and moves on.
Idea No. 2: almost a factory robot
We bring to your attention no more complex project robot vacuum cleaner. Here is what it looks like when assembled:

The navigation system in it is assembled from a set of 6 IR obstacle sensors. In case none of them work, two contact sensors (limit switches) are provided. Motor control system based on the same driver with L298N chip. To assemble it you will need:
- Arduino board, the original used Pro-mini.
- USB-TTL adapter for flashing this Arduino model. If you use Arduino Nano, then it is not needed, because It has the ability to flash firmware via USB.
- Driver for L298N motors.
- Motors for wheels with gearbox.
- 6 IR sensors.
- Motors for the turbine (more powerful if possible).
- Vacuum cleaner turbine impeller.
- Motors for brushes can be anything.
- 2 collision sensors.
Collect all this according to this scheme:

To assemble the power circuit of the robot vacuum cleaner you need:
- 4 lithium batteries, suitable for 18650 type.
- 2 converters DC voltage(up and down).
- Controller for charging and discharging 2 batteries (search the Internet for 2s li-ion controller). The circuit uses the sequential connection of two parallel-connected cans, as a result, their output voltage is more than 7.4V, and a parallel chain is needed to increase the capacity and autonomy of operation.
Here is the power supply diagram for this robot:

In addition, you need plastic (PVC) or any other material for the robot body; you can print it on a 3D printer, if you have such an opportunity.
For the homemade product to work, you need firmware, here is an example of a chaotic cleaning algorithm, we took it from the network. Sketch download link: .
This article examined 2 designs of a robot vacuum cleaner that can be repeated and assembled with your own hands. Do automatic tool To clean the room, you can invest in a budget of 30 to 100 dollars. The most expensive parts are batteries, motors and Arduino boards. If you managed to collect homemade robot vacuum cleaner or you have come up with another design, send examples in the comments, we will be glad to have open communication!
Automated vacuum cleaner with autonomous source nutrition, of course, does not develop such as manual option. Practical tests have shown greater efficiency using a small brush in conjunction with a suction turbine. For cleaning corners The front part of the vacuum cleaner is equipped with 2 brushes, which, during operation, scoop up debris to the main one.
The robotic system can be powered from several batteries, the voltage at the terminals of which is 12 V (18 V), and its capacity is 7 Ah. Charging is carried out by direct contact or wirelessly. The use of the latter increases the cost of components.
Returning a robot to its charging location on its own is a difficult task that can be solved by installing a transmitting beacon.
Any automated model is assembled controller based(brain of the system). Therefore, you should study its programming language to enter the command algorithm. You should also take into account the intuitive nature of the command interface, which greatly simplifies the process. Both the microcontroller and the sensors used often have standardized connections, so soldering is rarely required.

Preparation for practical implementation of the project
Let's consider the application of the above principles based on the Arduino Mega 2560 platform. The creation process will consist of several stages:
- preparation of tools and materials;
- production of a housing with wheels and a compartment for garbage, a dust collector and a turbine;
- installation of sensors and microcontroller, motors with gearboxes, batteries, brushes;
- making electrical connections;
- introducing a program into Arduino, determining sensor consistency;
- checking the performance of the robot vacuum cleaner and its ability to charge independently.
The idea is implemented using the following materials and tools:
- Arduino controller – 1 piece, with drivers;
- sheet of plywood (or thick cardboard) – 1 sq.m.;
- wheels – 3 pcs;
- wire with a cross-section of no more than 0.75 mm2 (twisted pair is suitable) - about 2 m;
- power supply – 4 18 V batteries, charge indicator for them, charger;
- infrared sensors – 4 pcs., contact sensors – 2 pcs.;
- electric motors: for the turbine – 1 piece, rotating the brush – 1 piece, 2 motors with a gearbox provide movement;
- polyvinyl chloride body – 1 piece;
- glue – 1 pack, screws – 10 pcs, tape – 1 pc, set of magnets;
- a set of screwdrivers and drills, pliers, a stationery knife, pencil, ruler, screwdriver, jigsaw.
Assembling a robot vacuum cleaner
Having prepared everything you need, you can begin assembly. It consists of going through the stages described above.

An important point in the work is the return of the bumper to its original position after hitting an obstacle, that is, its sufficient elasticity.
All parts are secured to the connectors available for these purposes with self-tapping screws or glue or tape. The result obtained is shown in the photograph:

Just as the appetite awakens while eating, so the desire to create grows with the number of completed projects. And consistent use of learned technologies increases interest and quality. This story began with the fact that I assembled a 3D printer 3D MC3 Master v1.1 and made movable ears with a reaction to sound.
But then I wanted to not only create something entertaining, but also useful. Therefore, I started working on creating my own robot vacuum cleaner and I urge the entire Habra community to connect and help somewhere with advice, and somewhere with logic and experience.
Well, since I already have a 3D printer, I will print as many parts as possible myself. And I successfully found the Arduino Mega 2560 controller and actuators on the MASTER KIT website. But we will return to the hardware later, but first we need to understand the logic of the movement and actions of the vacuum cleaner robot.
The rules for creating robotic vacuum cleaners were established empirically (not mine):
1. The robot must be round shape, low cylinder.
2. The wheels must be of a diameter so that it can turn around on the spot.
3. Steering wheel does not need a motor
4. The main thing is that the robot can collect garbage inside itself
5. You can’t do without a contact bumper; it must cover at least half of the robot’s perimeter
6. The center of gravity of the robot should be close to the wheels, ideally coincide with them - for better traction.
7. The robot must be charged from the charging station without removing the batteries
8. The garbage container should be easily removable.
Movement algorithm
There are two main ways to move robot vacuum cleaners and so far neither method has proven completely superior. The first is to move in an unwinding spiral. The second method is to move in a zigzag pattern. 

This does not take into account the construction of a map of the room from images, and all movement occurs solely based on sensor readings. Next, what needs to be taken into account is overcoming and avoiding obstacles. For this, it is best to use bumpers and contact sensors. Because if there is a thin chair leg along the route, then the rays of several sensors may pass by. When colliding with a large bumper, the controller understands which side the obstacle is on and goes around it.
Cleaning
If a conventional vacuum cleaner takes its toll due to a powerful pump and high suction power, then the same power can be achieved with a small vacuum cleaner with autonomous power supply is not possible. Experience has shown that the combination of a small brush and a suction turbine is most effective. In addition, since the device is a washer, in order to pick up debris from the corners, two rotating brushes are placed in the front part, throwing debris towards the main large brush.
Driving force
The best movement speed will be 25-35 cm per second. It's not too fast to get everything together and not too slow for the battery to last in any meaningful space. The most commonly used are spring-loaded gearboxes with motors. This is done in order to stop the movement if the vacuum cleaner falls, hangs or is lifted. I believe that it would be correct to use stepper motors, since this will allow you to set the speed of movement programmatically, without using gearboxes that take power. The transmission to the wheels will be direct or belt. The vacuum cleaner will have only 5 motors: 2 for the wheels, one for the main brush, one for the two rotating brushes on the sides, one for the suction turbine.
Nutrition
It is planned to power the entire system from a gel battery with a voltage of 12V and a capacity of 7 Ah. That is, a standard battery from a UPS. It has the advantage of having enough capacity to get the job done, it's cheap and readily available, and it's weighty enough to hold the vacuum cleaner to the floor. There are two main charging methods: induction and direct contact. Despite all the advantages of direct contact, I decided to play in favor of wireless charging: partly because it is safer (and I have curious cats), partly because I don’t want to deal with the problem of oxidized or loose contacts later. Luckily I found a great wireless kit charger for 12 Volt PW-WL-12. A current of 350 mA will charge the battery when fully discharged in 10 hours, which is a bit much, and the battery cannot be drained like that. Therefore, I decided to get two of these chargers and install them on the bottom and top of the case, providing a double charge current of 700 mA.
Sensors
In order for the robot to be able to navigate in space, not fall down steps and not run into walls, it is required feedback. This will be implemented with a large number of sensors. For example, infrared distance sensors will not allow you to get close to the wall and scratch it. If there is a small object on the way that does not fall into the field of view of the sensors, contact sensors in the bumpers are triggered. In addition, infrared sensors on the bottom edge will prevent the robot from falling if there is empty space under the leading edge. Also, a couple of sensors will need to be placed on wheels so that when lifted off the floor, the device stops working.
The following sensors will be used: IR - for measuring distance, contact - for bumpers and wheels.
Return to base
One of the most difficult tasks that all robot creators try to achieve is returning to their own charging base. And it’s good when the room is strictly square or rectangular. In this case, it is enough to install the base in a corner or move it to the wall, and the mechanism for returning to the base becomes extremely simple: walk along the wall with one side until the robot hits the base. But as soon as you add furniture or have several openings to other rooms, the task immediately becomes more complicated. I decided to use a radio beacon to determine the distance to the base. As you move away, the signal fades out, and as you get closer, it becomes louder. My method of searching for a base will be based on this.
Programming and soldering
I initially did not want to do soldering and self-assembly controller straps. Since the Arduino platform already has a lot of standard shields for connecting sensors and actuators, I will use them and try to make the project as simple and easy to repeat as possible. Only sensor contacts will be soldered if they do not have standard connection wires. I will program in the standard version for Arduino, since it is: 1 - simple, 2 - easy to repeat. Even I, who was familiar with the basics of programming, was able to cope with learning the language and program the controller to automate the heating and ventilation system. Therefore, the calculation is precisely on ease of repetition and execution.
Stages
All work on the robot vacuum cleaner will be divided into several stages:
1. Creating a housing, chassis, dust collection unit and creating a normal dust collector with a turbine
2. Distribution of sensors along the body contour and coordination of their operation
3. Programming the simplest movement and cleaning functions
4. Avoiding obstacles and logic of movement when cleaning
5. Search for base and the right approach to it for full charging
Standard and follower
As in any experiment, there must be an experimental group and a reference group to compare the results obtained. It was decided to take as a standard
Cleaning is a troublesome task and can sometimes take a lot of time, but everyone wants their apartment or house to be clean, well-groomed and tidy. There are often situations when you just tidy up all the rooms, vacuum, put everything in its place, but then after a couple of hours the first crumbs, dust and other debris appear on the floor, and you don’t always want to repeat this procedure again. It was for such an occasion that the world was presented robot vacuum cleaner.
Robot, fully automatic, copes well with small debris that so often gets boring. However, the cost of the device is sometimes insultingly high, but this is not a problem at all, a do-it-yourself robot vacuum cleaner, copes well with assigned tasks.
Basic requirements for creation
- The vacuum cleaner created should be cylindrical in shape and not very tall (it needs to fit under bedside tables, tables, etc.).
- Select the wheel diameter taking into account the possibility of self-rotation.
- The wheel responsible for “steering” does not have a motor.
- The contact bumper is a very important component; you cannot do without it; it is also necessary to take into account that it must occupy at least half the perimeter of the entire robot.
- For a robot, ideal grip can be achieved if the center of gravity coincides with the wheels.
- The maximum practicality of the garbage disposal, it should be removed in one motion.
Basic movement algorithms:
will do its job perfectly, only with the correct movement algorithm. The main algorithms (those that have shown maximum efficiency) only two: movement in a spiral, increasing from the center of the room to its edges, or zigzag movements from one side of the room to the other.The ideal trajectory of these movements is built in ideal conditions without taking into account obstacles. Therefore, for each room you should choose one of the presented movement options.


Do-it-yourself robot vacuum cleaner - quality cleaning
Robot made with my own hands, of course, cannot be compared with a full-fledged vacuum cleaner in terms of cleaning quality, however, such a device copes well with small and annoying debris, especially if you additionally equip the vacuum cleaner with brushes and special attachments that can suck up dirt from corners and other hard-to-reach places.
The power of such a unit
The robot adjusts itself, the speed and power of the motor depends on you. The optimal speed of such a unit is in the range of 25-30 cm/sec; it is not too high, but not too slow for collecting garbage and the battery is enough for a large area of work.
For work, it is best to use stepper motors; they will not “take away” excess power from the motors and charge from the battery; with such motors, the transmission of torque can be direct or through special belts.
Sensors
Any robot vacuum cleaner is equipped with different sensors and also does not deviate from these dogmas. Such a device must have an infrared sensor; it will prevent the robot from scratching the walls or falling down the stairs, even if for some reason they do not work; then there are always sensors on the bumper that stop the device a few centimeters from the obstacle. Next, there are sensors for stopping work, they are installed on the wheels, so when lifting the robot will turn off automatically. More complex models can use return to base sensors to recharge the battery.


This article is about how I assemble my robot vacuum cleaner. There are a lot of photos and videos here for those who are also passionate about this idea.
December 19, 2014. I began to be interested in robotic vacuum cleaners five years ago in 2009, probably after meeting the Roboforum. All these years there have been attempts to start something, but nothing has been done. A couple of months ago, I actively read articles about a robot vacuum cleaner and finally decided that I would buy a Karcher RC 4.000. Time passed, my wife often began to clean the kitchen and hallway, this began to irritate me, the thought of a robot grew stronger. I again spent a couple of evenings in pictures and forums about robotic vacuum cleaners. Finally I decided that I would make a robot myself!
The goal is to create a robot vacuum cleaner no worse than an industrially manufactured one and get rid of the layer of dust and small debris in the house. In the process of studying the design of robots, it turned out that they are very noisy, about 60 dB, while a stationary household vacuum cleaner makes noise about 80 dB. My homemade robot should work as quietly as possible, its dimensions should not exceed the dimensions of factory robots, and it should clean quickly and efficiently.
The first step was to resolve the issue with the suction turbine. I already had experience building turbines, but they all worked poorly. For the garage, I made a homemade vacuum cleaner from a turbine from an old Rocket vacuum cleaner. The robot needs a small turbine, so I started my search all over again. Quite by accident I found messages from the user Vovan on the Roboforum, he shared a drawing of his turbine. Without much thought, I redrawn the drawing and glued my turbine together.
I cut out the turbine and glued it from thick cardboard using super glue in 20 minutes. The first tests were successful!


December 20, 2014. I bought a body peeling today :) in general, I only need a transparent jar with a screw cap, I gave the contents to my wife. I also bought a clothes brush with hard bristles, took it apart, and tomorrow I will make a brush out of it for my robot.

In AutoCAD I made sketches of the arrangement of elements in the body. I settled on the size of the basin with a diameter of 25 cm and a height of about 9 cm. It is not yet clear whether all the elements will fit, there is really little space, but I don’t want to make the body anymore. I set the framework for myself :)
Yesterday on the Internet I wrote down the dimensions of factory robotic vacuum cleaners:
diameter * height (cm)
36 * 9
32 * 8
32 * 10
30 * 5
22 * 8
I decided to make my own vacuum cleaner with cyclone filter, so you can’t make the height small, it’s determined by the garbage collection can, but you can win in diameter. Of course, thanks to Dyson for the cyclone, I have been reviewing his inventions for a long time and even made a garage vacuum cleaner based on the cyclone principle. My filter will be simple, without any cones and crazy suction power, it will do for the first time.
December 21, 2014. I sawed off a 15 cm round cutting from a floor brush in the garage and made a round brush from it. The diameter turned out to be about 70 mm. The size is unrealistically large and the bristles are very hard, I don’t know how it will behave, but I’ll probably have to either redo or make the vacuum cleaner heavier, because the bristles will throw it up. I simply inserted the bristles into the holes without glue, and it turned out securely. The entire structure was secured to a pin with a diameter of 6 mm and two bearings at the edges.
I found two wheels in the garage, believe it or not, from a vacuum cleaner! The same handheld vacuum cleaner in which there was nothing electric, only 4 wheels and two brushes driven by these wheels. The wheels have been waiting in the wings for about 15 years :)

Now I’ll make another drawing in AutoCAD for several parts, tomorrow I’ll cut everything out of plywood and try to assemble something based on it.
December 22, 2014. I really want to make a robot vacuum cleaner with my own hands and finish it before the New Year 2015. Last night on YouTube I watched again several videos about robot vacuum cleaners and in particular two videos about Dyson 360 Eye and Fluffy:
After the first video with the Dyson robot, I realized that by making my robot with a diameter of 25 cm and a brush 15 cm long, I would leave dirty places along the baseboard 5 cm wide. After the second video, my brain completely rebooted and thought about making a brush in front of the robot?! I don’t know what I’ll do next, the tests will show.
So today I bought a new dustpan and two brushes with softer bristles. I bought the scoop because of the elastic band that is glued to the edge; it is perfect for my design.

I changed the geometry of the body a little based on new thoughts and a new brush. The size of the robot is still 25 cm, but now it is half a circle and half a square. The width of the brush is 21 cm, the diameter is about 6 cm. I cut out the base from 8 mm plywood, attached the wheels and the brush, tomorrow I’ll make a gearbox and try to sweep something up :)

December 23, 2014. I screwed the gear to the brush and attached the gearbox next to it, used an elastic band for money as a belt, and screwed the motor with a screw for testing. Below is a video test at 6 and 9 volts.
Most likely I will redo the brush again, the bristles are too short and too hard. The pile must be without gaps, because streaks of dirt remain. Overall it turned out spectacular :)
I wondered if I had enough space for three motors in the housing. Two motors will spin two wheels and one brush. Plus, gearboxes will take up a lot of space. I came up with the idea of replacing the gear reducers with a worm gear, maybe I’ll do a couple of tests.

The suction turbine was coated twice with a layer epoxy resin, became like plastic. The cardboard no longer bends and if water gets in everything will be fine. I didn't have to center it, it spins perfectly. Meanwhile, I prepare the base for the garbage can. I made a fine filter from the neck and cap of a kefir bottle. I used a disposable vacuum cleaner bag as a filter fabric. While everything is sticking, in a couple of days I’ll screw it onto the base and test everything again.

While working on the robot, the idea of getting a 3D printer constantly comes to mind. With a three-dimensional printer it would be much easier to create the parts I need and with high accuracy. When you drill into plywood with a drill, the drill may lead away or the inclination is not exactly 90 degrees, here about high precision one can only dream. In addition, parts made of plywood are very bulky; everything would be neat on a 3D printer.
December 24, 2014. In the morning I tested the turbine and a garbage can, and in the afternoon I repeated the experiment with more high voltage. The results are not impressive. I had to unscrew the fine filter for now, because through it the power drops significantly. The garbage in the can spins very effectively, but in reality there is not enough suction power.
High voltage turbine test.
At these moments there was a desire to give up on everything, why did I even take on this. Nowadays it’s very easy to drop everything and forget - it’s the easiest way.
In the evening I took a brushless motor and began to glue a new turbine for it according to the same drawings.
December 25, 2014. I glued the second turbine for the brushless motor, I wanted to test it, it turned out that the motor rotates in the wrong direction. Tomorrow I'll go to the garage to resolder the wires, but for now I'll put everything aside.
December 26, 2014. I re-soldered the wires between the controller and the motor, and got rotation in the desired direction. The turbine started working, but a couple of tests on the knee turned out to be sad again. Maybe I’ll even redesign the turbine by adding a little taper, but more on that later.

The last two days I spent very little time on development, I’ll try to allocate 4-5 hours tomorrow.
December 27, 2014. I decided to try to assemble a worm gear for the chassis of a robot vacuum cleaner. In the photos earlier I showed that you can make a worm from a nail and a piece of copper wire. The problem turned out to be in the process of soldering the wire to the nail. My soldering iron is not very powerful, so I additionally heated the nail for gas burner. However, it was not possible to solder the wire properly, so I took a round piece of wood and wound the wire on it, and covered the turns with super glue. The worm turned out to be quite tolerable. Despite the ovality of the wooden base and, in general, the entire plywood block, the mechanism worked normally, but damn it very slowly.


It would be nice to get ready-made plastic worm gears, but for now let's put that aside.
Regarding the future energy consumption of my robot. Now there is a problem with the turbine, it doesn’t want to suck properly even with the fine filter removed. If you use a regular brushed motor for the turbine and power it with a voltage of 12 volts, then it will consume about 0.6 amperes. If you use a brushless motor, it will consume about one amp. Plus, two commutator motors will be used to move the robot and another one will be used for the brush, each will consume about 0.3 amperes. Electronics will also consume something. In total, the robot will “eat” approximately 1.6 to 2 amperes, in peaks probably up to 2.5 amperes. I don’t know if this is a lot or not, it seems like industrial robots consume three or more amperes.
Again I watched a bunch of videos and photos for the query “the operating principle of a robot vacuum cleaner.” I found a cool photo of a turbine from a regular household vacuum cleaner. I read on some forum that the longer the turbine blades, the greater the vacuum it can create due to centrifugal force.

December 28, 2014. Today I glued two more turbines, they differ only in thickness. I made the blades as long as possible. In the photo below is the first thin (5mm blade height) turbine, it is very quiet in operation, but it doesn’t suck at all :)

The second turbine is thicker (15mm blade height).

Once again in the garage I tried to drag the brush across the floor, the motor often shuts down under the load, the bristles still turned out to be very stiff, and it wouldn’t hurt to reduce the diameter of the brush. Tomorrow, no matter the weather, I’m going to buy a brush with the softest bristles, I’ll also go to a toy store and look for cars with worm gear for the robot chassis.
In the garage I tested a new turbine with a voltage of 12 volts, I thought that 9 blades might not be enough. At home I glued together the third turbine of the day with long blades and a quantity of 15 pieces, I attach a photo:

Another day has ended. I won’t have time to make a vacuum cleaner as planned before the new year, but I want to believe that everything will be fine :)
December 29, 2014 Went to the toy store today looking for a worm gear. On the way, I remembered my daughter’s toy - a horse. My daughter didn’t really like this horse and, in general, I don’t really like it either :) But it has two whole worms and 4+4 gears inside it.


I still looked into a toy store, then into a second one and bought a topsy-turvy car there. I bought the car not so much for the mechanism, but for its wheels; they climb on any surface. There was no worm gear inside the machine. Wheels are quite possible I use for homemade robot, but for now I gave the car to my daughter - she is delighted :)


During the day the idea came to mind to make a robotic electric broom, i.e. the design is the same as now, only there is no turbine, the garbage is simply collected in the compartment. When I was looking for a new brush with softer bristles in the store (I never bought it), I accidentally saw this:
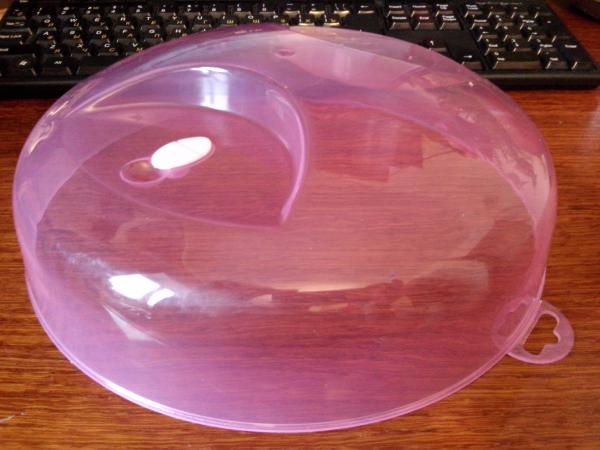
Of course, I immediately bought this cover. This is a ready-made robot body, transparent in a modern way and even without unnecessary elements. But in fact this is a "Cover for microwave oven"(diameter 24.5 cm), I don’t know what to cover it with and why, but the robot should turn out beautiful :) But more on that in another article.
In the evening I broke the conic, took out the gears and screwed it to my robot, it turned out great! The mechanism takes up minimal space and is strong enough to move the platform. I haven't collected everything yet, so photos will come later. In the meantime, I’m hatching an idea on how to make a new brush, reduce its diameter to 3-4 cm and replace the gearbox with gears with a worm gear.
By the way, note that the worm can be removed from other toys. So we had a broken elephant lying around, but in principle this is not important, the main thing is the mechanism, which is the same in many toys (cars, tanks and others), see photos:


Oh yes, I forgot to write about the new turbine, it turned out to be noticeably more productive than all the others. For better passage I also added a cone to the middle of the turbine.
January 05, 2015. Despite new year holidays All the previous days I tried to somehow make progress in my work. I read a lot of information about 3D printers; if I had such a printer in my arsenal, I would have printed most of the parts a long time ago. While in my head I’m making plans for the future on how to assemble a 3D printer with my own hands.
Today I made a new brush. I took a wooden stick with a diameter of 10 mm and drilled holes in a spiral. I inserted bristles into the holes and sealed them on the back side with a wood burner.

I assembled the chassis, haven't tested it yet, the glue is drying. I also put the new brush in place, it turned out to be a lot of jambs, I couldn’t do without them, after all, this is my first robot. By the way, I abandoned the rectangular back and made a base for a round body. My decision is connected with rethinking the movement of the robot, if you imagine that the robot is moving along the wall and rests against something, then in order to turn it will have to make a maneuver with a backward movement, because its square butt will slide onto the wall.

I spent a lot of time looking for a solution for the robot's "vision". The mechanical bumper doesn’t really suit me; it spoils the external one, even though it is the simplest obstacle detection scheme. I stopped at infrared sensor. It is not yet possible to assemble the sensor due to the lack of infrared phototransistors.
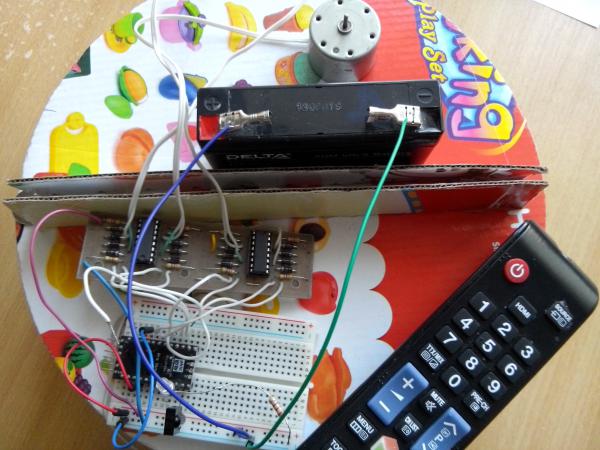
January 07, 2015. Yesterday, until one o'clock in the morning, I was assembling a robot to at least somehow test it, play around with it :) An Arduino Pro Mini board + a motorshield on L293E chips with wiring is used as the “brain” (I used this board in my first project for controlling motors online via the Internet). Control is carried out from the TV remote control. Short video:
The design looks liquid, in fact it is, almost all the mechanisms can barely breathe. Today I realized how difficult it is to make a seemingly simple robot. At the moment I have problems in almost all nodes, I need global rework almost everything.
The wheel drive on a worm gear turned out to be just right in terms of speed, but its execution leaves much to be desired. Part of the drive is placed in a compartment where there will be air movement with debris; this will not work for a long time. I wanted to drill holes on the wheels that would serve as an additional motion sensor. On one side of the wheel there will be an IR LED, on the other there will be an IR phototransistor. This circuit will pulsate when the robot moves; if there are no pulses, it means the robot has bumped into something and is not moving.
For proximity sensors, I bought IR LEDs and IR phototransistors, but after testing such an IR bumper, it became clear that the idea was bad. The sensor reacts to sunlight, but does not see black objects at all. The design has the right to life, but in simpler homemade products. For those who are interested, I share the diagram:

If you bring your hand close to the sensor, then breadboard The LED lights up.

I also tried the ultrasonic sensor. It measures distance perfectly, but only using the “head-on” method; if the plane of the object is at an angle, then the readings are distorted. In general, even with such a sensor, the robot’s bumper will not work normally.

For control from the remote control, a TSOP IR receiver is used, I don’t know what marking it is, in principle, you can use any one you come across. You can control it from any remote control, even from mobile phone, but before that you need to find out the codes of the buttons pressed on the remote control. In the sketch simple circuit, which sends the button code to the port monitor when pressed on the remote. Connection example and sketch below:

As for the sweeping brush, it turned out great, its width is almost 21 cm, with a body of 25 cm. There are some nuances: the fibers are not restored if you crush them. The drive mechanism is not covered by anything; it will wind the hair in 3 minutes of operation and stop. The brush is not removable. The motor is very weak, but the number of revolutions is very suitable, it sweeps the table very effectively.


Now this robot vacuum cleaner will be disassembled and rethought. Most likely, the diameter of the body will increase by 3 cm. Initially, I thought of making the wheels on an independent suspension so that they would hide if someone suddenly stepped on the robot. I will still drive the wheels using gears instead of a worm. You need to look for a different bristle for the brush, one that is more elastic and will hold its shape. Apparently the bumper will have to be made mechanical. Lots of questions about the suction turbine.
Despite all the shortcomings, my wife liked the robot, and my daughter was absolutely delighted :)
To be continued. I won’t write about the robot so often anymore, but I will try to publish photo and video reports at least once a month.
March 2015. I bought an electric broom.
The robot vacuum cleaner is still in the project!


