There is a way, and more than one, to preserve flowers almost in their original form. We are talking about preserving flowers in glycerin, gelatin and, of course, salt. What kind of canning can do without salt! The latter method is only suitable for compositions in closed vessels and does not involve removing the flower from the solution.
Let me note right away that flowers in gelatin and glycerin remain just as flexible and only change color slightly. They become more faded. If you want a truly magical result, don't wait. And as soon as you receive a bouquet as a gift, select a few flowers for canning. The only “but” is that foliage that is too young cannot be preserved with glycerin.
It is better to take dense, not too young flowers. Oddly enough, too young foliage cannot be preserved with glycerin. It is better to remove excess leaves immediately. Carefully examine the flower you decided to preserve. If you see damaged petals and leaves on it, then it is better not to use such a flower. The stem must be cut obliquely, remove the skin or bark (if it is a twig of lilac or apple tree, for example) approximately 7 cm from the bottom and split it. This is necessary so that the solution penetrates better into the flower.
Glycerin is diluted with water in the ratio: 1 part glycerin to 2 parts hot water. The resulting liquid is poured into a jar, vase, or any other beautiful vessel to a height of approximately 20 cm and placed in a cool, dark place. Penetrating into the leaves, glycerin absorbs their liquid and replaces the moisture evaporating from the leaves and stems with glycerin. The liquid level must be maintained, therefore, as it dries, the solution must be added. This only applies to open containers.
In closed vessels, the level remains virtually unchanged. It takes from two weeks to two months to completely soak, depending on the size and thickness of the stems. But the result obtained is worthy of admiration! For this reason, it is worth being patient and waiting. Plants preserved in this way retain their elasticity and flexibility and do not require special care, they can be wiped with a damp cloth to remove dust.

It takes from two weeks to two months for complete saturation, but the result is certainly amazing!
You can also preserve individual leaves. It takes much less time from 2 to 3 weeks. But you also need to take into account some features. Fern leaves, for example, release milky sap after cutting, which can clog moisture-conducting channels in the stem. In this case, the end of the stem should be held over the flame until it darkens.
Glycerin only guarantees us the preservation of the flower’s shape. But you can “conjure” the color yourself.
In order to give plants the required color, you need to feed the plants with artificial water-soluble dyes, adding them to a glycerin solution. You can use brilliant green, acrylic, oil, silver, colored transparent varnishes, now craft stores provide us large assortment similar products.
It happens that plants were unsuccessfully preserved and white oxidized spots formed on them, which spoil the appearance of our plants. You can correct the situation by bleaching the plants for a couple of days in the following solution:
1. Water 500g.
2. Denatured alcohol 160g.
3. Acetone 160g.
4. Oxalic acid 50g.
5. Acetic acid 99% -10g.
6. Sodium bisulfate 120g.
Flowers in decorative bottles.
The beauty of these decorative bottles is difficult to put into words. And even a photograph cannot fully convey to you their brightness and tenderness.
To create a composition you need transparent bottle beautiful shape. It must be washed well and disinfected with boiling water. Plants can be planted immediately by splitting the stem and filled with a solution of glycerin and water in a 1:2 ratio. For better effect Before putting the plants in the bottle, you can put them in such a solution for several days so that they are saturated with it. Then you put the flowers in the bottle, carefully straighten them with chopsticks, carefully fill them with the solution and seal the neck hermetically. The neck can be additionally decorated with twine, ribbon or filled with sealing wax
Fresh roses or petals, dahlias, lilies, chrysanthemums, etc. are well suited for decorating bottles. At the same time, you can put shells, beads strung on a thread, small figurines, and beautiful buttons in the bottle. Fresh flowers can be replaced with artificial ones.
Another reliable preservative is a strong solution of gelatin with sugar, approximately 1/1. You can also use a very strong saline solution.
Flowers cannot be placed tightly in a bottle or jar; they should hang inside the container. The compositions inside the bottle can be different, but sometimes one flower is enough.
Method with salt.
It is necessary to cut off the rose buds that are ready to bloom so that the flowers have a stem left. Table salt is heated in a cast iron frying pan until it turns into a very fine dry powder. Afterwards, you need to take a tin box and pour a layer of already calcined salt onto the bottom. The buds need to be placed on the salt, but in such a way that they do not touch each other under any circumstances. The buds are filled to the top with salt, after which the box must be hermetically sealed. When fresh flowers are needed, the roses should be removed from the box, carefully cleaned of salt, slightly trimmed the stem and placed in water. They will come to life and bloom. You can do it another way: pour in cardboard box calcined salt, put the flowers there, cover them with the same salt, then close the lid, put the box in a plastic bag and put it in a cool place. In this case, when fresh flowers are needed, you need to take the plants out of the box and put them in a bath or bucket of water for 2 hours. warm water for two hours.
You just want to catch the bright colors of autumn and hold on to them longer. Leaves are simply a miracle of shades that should be used to decorate an apartment as part of color therapy. 🙂 But how often, having brought home some beautiful leaf, we notice that it quickly loses color and shape, and it is useless to use it in decoration.
Today the most successful ways, get water, soda, books :))
Water and bouquets

The easiest way to preserve leaves longer is to pick them directly from the branches. Not to say that on the branches autumn leaves hold very tightly, but still this is a great chance to keep the bouquet in original form. Before placing the arrangement in a vase, trim the branches sharp knife and split slightly. You can add a few tablespoons of glycerin or a teaspoon of sugar and an aspirin tablet to the water. Periodically sprinkling the leaves with water from a spray bottle will help the bouquet retain its fresh charm.
Skeletonization and decoration


A skeleton in decoration is a somewhat strange combination, unless we are talking about leaves and flowers. This technique allows you to make things so delicate that you can’t believe they are of natural origin.
You need to prepare a soda solution (about 3 tablespoons per 1 liter of water) and carefully place the leaves in the solution. Boil them over low heat for an hour to two, until the leaves darken, periodically adding baking soda. Then we lay the leaves on paper and hit them with the bristles of a toothbrush. The leaf pulp falls off and a cute skeleton remains. 😉 Then the sheet needs to be dried, you can paint it or leave the resulting natural shades.
Some florists prefer the dry skeletonization method: you can peel the pulp from the leaf without first soaking it. In this case, it is better to use a natural bristle brush, and the stiffer the bristles, the better.
To prevent the sheet from being too brittle after cleaning, you can spray it with hairspray.
Acrylic varnish and garlands


Simple and stylish garlands greatly decorate the veranda and the house, but only if the leaves remain in their original form, without losing their shape and color. Special floral sprays or acrylic varnish, which is also sold in spray - in construction stores.
Leaves sprinkled with this varnish look shiny and fresh, are protected from damage and do not fade. The varnish is intended for wooden furniture, plastic, glass, but it will also protect leaves perfectly :)
You can also use a special floral varnish for the leaves to make the flowers shine. Another remedy is the usual one. vegetable oil, which can be applied to the leaves with a silicone brush.
Drying in a book and vertical decoration


For that type of decor where smooth and clear lines are needed, the leaves can be dried using the old proven method. Place them between the pages of the book, and then move them to a new page every day. The moisture from the leaves will be completely absorbed in about a week; to strengthen it, you should dip them in a solution of water and PVA glue 4:1 and dry well. And then you can use the leaves in their original form, or paint them.
Pictures made from leaves sandwiched between two glasses look very stylish, and this decor lasts for a very long time, the colors do not fade.
From leaves preserved in this way, you can make a panel that looks like it was painted with oil paint.
6 simple steps
- Sanding the wooden base.
- Using a marker, draw a maple leaf on the board using a template.
- Glue the leaves, trying to maintain volume without applying glue to the entire surface of the leaf.
- After gluing, press each sheet with a press for half a minute.
- We adjust the leaves, trying to maintain their natural shape.
- Glue the twig to the base of our “leaf”.
Updated: April 20, 2019 by: Olga Fomina
Autumn time is rich in natural materials, from which you can make a lot of things with your children or decorate your home. In this small selection I will tell you what can be done with leaves, flowers, cones, etc., so that they retain their original appearance longer.
Leaves, flowers, fruits, berries
Collected autumn leaves can be preserved in 3 ways. In any case, they need to be washed well and laid out to dry easily.And then there are options: 1. Iron the leaves through paper or newspaper and put them in a book (under a press). You don’t have to iron the leaves, but after waiting for the water to dry, just put them in a book and wait a few weeks for them to dry. To speed up the process, the leaves can be covered with paper, which should be changed periodically so that the leaves give up their moisture faster. The leaves become slightly darker after drying. natural color. The leaves will dry out and become brittle. They can be used for appliqués, paintings, etc. Small dry leaves are convenient to use for decoupage of a lamp jar
2. Place the leaves in glycerin diluted in hot water in a ratio of 1:2. Cool the solution, place the leaves in it and let it sit for about a week. As the solution evaporates, it must be topped up, and if it darkens, replace it with a new one. The leaves are soft, elastic and shiny. In the same way, you can preserve small fruits and berries (rose hips, hawthorn, rowan, chokeberry, apples of paradise, etc.)
Also, in this way you can not only preserve flowers, but also make compositions from them in a bottle. To do this, place flowers in a container, pour glycerin solution in the same proportions and keep the flowers for 2-3 weeks. Then drain the darkened solution and fill the container with a new one. Seal the bottle, decorate and enjoy the beauty
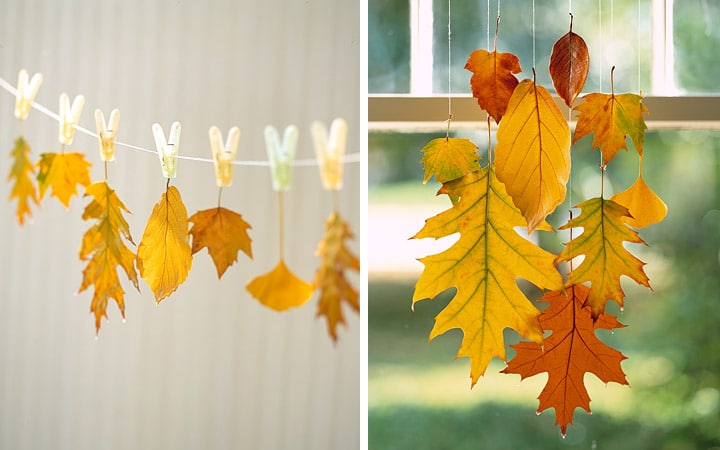
3 . Most quick way- Dip the leaves into melted wax. To do this, melt a candle in the oven or on the stove and dip a leaf into liquid wax, let it drip and put it on paper to harden. It is important here not to overheat the wax so that it does not burn (do not allow white bubbles to appear in the liquid wax), and you also need to remove the leaves from the wax quickly, otherwise the layer of wax will be very thick. The leaves turn out to be moderately soft, over time they harden a little, but still remain suitable for various craftsYou can make an autumn garland from such leaves
Or decoration for a room. Glue a piece of paper to one end of the thread or fishing line with a glue gun, and to the other end a paper clip straightened into a hook shape. Use a paper clip to hang leaves from a chandelier or curtains.
Using the same method, you can preserve flowers and fruits. In the photo on the left are waxed materials, on the right are not. All the berries and flowers are from the same harvest, that is, I picked them, on the same day I dipped some of them in wax, and left some in their natural form for comparison.
Hawthorn
Flowers
In this photo the roses in wax are on the right
Lay out all available items in front of your child. natural materials and let him make an autumn wreath for the door of his room. For the base of the wreath, you can take a ready-made base from the store, or rolled up from newspaper and tape, or simply cut out of thick cardboard. The most convenient way to glue is with a glue gun (with the help of an adult)
Cones
The cones are stored well as is, butto keep the lump exactly in closed, it needs to be dipped several times in thick transparent glue diluted in half with water. And also conescan be bleached. To do this, they must be immersed in a solution of bleach or cleaning agent with bleach (the cheapest bleach and good remedy I found one for the toilet in Fix Price for 47 rubles). As the solution bleaches, it becomes darker due to the pigment escaping from the buds. Depending on the strength of the product, the pine cones bleach from several days to several months. If the intensity of whitening suits you. Then we take out the cones, wash them well in soapy water and dry them. After drying, the cones become lighter than when wet. The smell of chlorine is not particularly noticeable
You can make many beautiful crafts from bleached cones. Such light cones look very original, and at the same time “natural” in comparison with cones painted with white paint
Chestnuts
Chestnuts are possible keep them smooth and shiny if they are still fresh and covered with any transparent varnish. If you only have shriveled chestnuts, you need to soak them in cold water overnight or longer until they are straightened out. Then they need to be removed from the water and left in a cool place until completely dry.
Skeletonization of leaves
This year, my daughter and I very thoroughly, like squirrels, stocked up on autumn leaves, and all kinds of nuts, acorns, and pine cones. The older the child gets, the more interesting it is to make crafts from all this material - the daughter does more and more herself, and often we just do something nearby, the mother does hers, the child does hers. It is very pleasant to spend time like this. I already mentioned on FB that we made stamps out of fall leaves and apples - we were so into it! And this fall we did it for the first time “waxy” leaves - leaves preserved in stearin and wax. I had never tried this before and simply dried the leaves - in the open air, in sand, or soaked them in glycerin. I love floristry very much and am quite good at it. Now we have mastered a new technique that we are both delighted with. It is not at all complicated and gives a very effective result. Now not all the leaves have fallen off yet and you can also try to make wax autumn leaves that retain their shape and color for a long time.

I traditionally don’t take photographs of a detailed masterclass, but I can describe everything in words. Let there be just a lot of photos of the result.
So we need:
1. Fresh autumn leaves (ideally maple leaves with petioles);
2. Natural wax or stearin candles (I have the most ordinary white IKEA candles, you can use transparent candles or special kits for making candles. The final result depends on the type of wax - here everything can be found out experimentally.);
3. Baking paper or foil; (we will put leaves on it to dry);
4. The saucepan and container for the water bath are preferably wide, so that your largest leaves can easily fit in;
5. A wooden board or dish, tray, baking sheet, where the finished leaves will be temporarily stored and dried;
6.Stove, kitchen, free time and positive mood.
The process itself is as follows:
1. Melt the wax or stearin in a water bath. (Amount so that you can freely dip the leaf, approximately 1.5-2 cm from the bottom of the container.) As soon as the wax has melted, reduce the heat to a minimum to maintain heat.
2. Spread baking paper or foil near the stove - the leaves will dry on it so that they do not stick to the surface. The distance from the stove to the foil should be minimal; ideally, cover the edge of the stove with foil, otherwise you will have to spend a long time and tediously scraping off drops of wax or paraffin.
3. Take the leaf by the petiole with your hands and quickly dip it into stearin (wax). Make sure that it is completely submerged, but do not cook it in water for a long time; 6-10 seconds will be enough. Take it out and let the beads of wax drip directly over the pan. To do this, first hold it for 6 seconds with the tips down, then, if it is tight, turn it a little to completely cut off all the drops and so that no accumulated wax remains on the tips. Then quickly place the sheet face up on foil or baking paper. The sheet dries quickly - in about half a minute. Afterwards, you can immediately transfer it to the same baking sheet or dish where the leaves will finally dry out or wait their turn for use in crafts. But after a minute or two the leaves can already be used for work. Foil or baking paper must be periodically cleaned of wax drops, or a new one must be placed so that the drops do not stick to the leaves. When you put the sheet to dry, a small drop may remain on the tip and go beyond its aisles - after drying, this drop can be easily removed manually with a knife or fingers, but so as not to damage the entire coating of the sheet.
If a child participates in the process, then he must be at least 4.5-5 years old, and then he can dip the leaves into the wax himself, but only with a long petiole and after a thorough explanation by the mother of how hot the wax is. As soon as the child is tired, let him become a spectator. But in general, although this activity is interesting and fascinating, it is not for kids. My daughter made 6 leaves and then helped sort the finished leaves.
As a result of processing, the leaves become very beautiful: they retain their shape and color. It is impossible to make them absolutely even, since nothing can be placed on top when drying. So the natural curve will be preserved. But such a rich shade cannot be achieved by simple drying. White stearin causes the leaves to shine slightly, as if covered in frost or as candied, and yellow maple leaves become brighter, more saturated. It is not so easy to work with white stearin - when it hardens, it can show flaws in the work - accumulations of white on the hollows of the leaves. You need to very carefully remove stearin from the leaf - practicing to make precise movements. For stearin, you need to choose smooth leaves without dents. Variegated leaves with white spots are also good in stearin. Stearin can break off from the leaves if children's fingers pick at it. But he doesn’t get down on his own. The leaves turn out to be quite fragile - as if they were glass or frozen, but durable. It’s a pity that the photos don’t convey the delightful sensations that arise when you hold this “wax” sheet in your hand and rustle it! After paraffin we tried natural wax. With it, the leaves do not become hard, but remain soft and take on an almost matte appearance. Of course, you shouldn’t bend them - the coating will lose beautiful view. All red leaves are very good under wax - for example Maiden's grapes. But the yellow maple leaves are not as impressive as in stearin, and they curl slightly. In general: depending on what you dip the leaves in, you get very different results. Since you don’t know what exactly will happen, you feel a little like a sorceress.
We put some of the finished leaves in a beautiful dish to decorate the dining room, so we could sort through them and admire them. And the other part made decorations for the windows: they tied the leaves with a thin black thread and attached them above window frame. These leaves have not lost their leaves for two weeks now. appearance. Our garlands are good both in cloudy weather and in sunny weather. In the sun, of course, they shine incomparably - like stained glass. And they rustle slightly from the breeze... But in general, you can make anything from such “wax” leaves - a bouquet, a volumetric applique, an autumn tree, a mobile, a garland - it all depends on our imagination. And the technology itself is magnificent. My daughter and I are very pleased and will continue to experiment with it next year.

Material prepared for work.

Water bath. Irgi leaves are drying nearby. Only I can dip such tiny leaves in wax - it is dangerous for a child to do this. Nearby lies a knife, with which I remove droplets of wax from the foil.

This photo and one below: - leaves in stearin.


This photo and the one below: leaves in natural pure wax.


We liked the paraffin treatment better - that’s why we made more of these leaves.

Leaves in stearin. The most spectacular and beautiful. Although many people also like waxy ones, which feel like soft, thin skin to the touch.
Those in stearin are as if candied, or in frost. They feel hard and fragile to the touch.

I made a wreath for the wall from leaves treated with stearin. These are the leaves of the serviceberry.


For contrast, this is how maple leaves dry at home without any treatment. My daughter was impressed.
It’s true that we really like this bouquet: it’s stylish and beautiful. In general, every dried maple leaf, when curled, becomes like a sculpture.

This is our composition on the window. Here you can see exactly how the leaves were tied - with a black thread behind the petiole.


Our composition is made from leaves treated with stearin. It is good both in cloudy weather and in sunny weather.


It's on another window - in the nursery.


The shadows of the leaves on the window are especially beautiful with the curtains drawn. They also sometimes “walk” around the room depending on the time of day.


The child is delighted with our “eternal” magical leaves.

The time has come for autumn preparations. We are not talking about canning tomatoes or cucumbers now. Who has preschool and preschool children in the family? younger age, they will understand what we are talking about. Ahead academic year and time for regular crafts.
We will prepare autumn leaves.
There are many ways: you can press the leaves (remember school herbariums?), preserve them using wax paper, laminate them, use silica gel, and even dry them in the microwave.
In our opinion, the best way preserving leaves - with glycerin. Not the fastest, but the leaves remain soft to the touch, are stored for several years, and are suitable for crafts and room decoration.

You will need:
- Glycerin (available at any pharmacy, cheap)
- Containers or trays
- Autumn leaves
- Absorbent paper (napkins will do).
1. Select beautiful leaves. It is better that they are free of stains, bulges and not curled. Place them in a plastic container.
2. Mix 1 part glycerin and 2 parts water by volume.
3. Pour the mixture onto the leaves. To prevent the leaves from floating, you can press them down with something, for example, placing a smaller container on top.

4. Leave for 2-3 days. After that, check. If the leaves are still dry to the touch, leave for a couple more days. The leaves should be soft and elastic to the touch.