Most liquids in modern stores are sold in plastic bottles, which in skillful hands can turn into unique decorations for a garden or city yard. Flowers made from plastic bottles look beautiful and aesthetically pleasing at any time of the year. To make them, you need a simple set of tools, a little effort and imagination.
Necessary tools
To make plastic flowers for garden decoration, you need a basic and affordable set of materials and tools.
Main material
The main material for work is plastic containers. The variety of their shapes and sizes will allow you to create dozens of different colors. As stems for flowers made from plastic bottles, you can use wire of various thicknesses or wooden skewers, which are wrapped with plastic strips or electrical tape.
To create large volumetric compositions, you may need plastic tubes, wooden blocks and slats, and dry tree branches. You can fasten the flower parts together using glue or a stapler. In addition, wire, fishing line and screws are used as fastening elements.
Painting plastic parts
To paint plastic flowers, you can use enamel, acrylic paints and colored varnishes, as well as aerosols for painting cars. You can use regular paint brushes. But in this case the paint will lie in stripes, which will remain on the finished product.
A more even, streak-free color can be achieved by applying the paint with a foam sponge. The disadvantage of this method is the length of the process over time. To obtain a rich color, it is necessary to apply several layers of paint, each of which must dry completely.
The most even coloring is obtained when working with aerosol paints in cans. It is preferable to carry out this work outdoors, since the dye has a rather pungent, persistent odor.
Set of tools for work
To create flower arrangements from plastic containers, you do not need special tools. The equipment available in every home will be sufficient:
- scissors;
- pliers;
- awl;
- stationery knife;
- stapler;
- wax candle;
- glue;
- screwdriver or screwdriver.
Thanks to such a simple set of tools and skillful hands, you can decorate a plot or yard to your surprise.
Precautionary measures
 In order to make flower crafts, sharp tools are used, careless handling of which can lead to injury. Therefore, this work should be done by adults or children under their supervision.
When working with paint, you must equip yourself with basic protective equipment: rubber gloves (protecting the skin of your hands), a gauze mask or a special respirator (preventing particles of the dye from entering the respiratory tract).
To create some types of floral plastic decorations, you need to work with an open flame. To prevent the possibility of accidental burns, all parts must be held above the flame using tweezers. Plastic material should not be allowed to ignite as this may cause a fire.
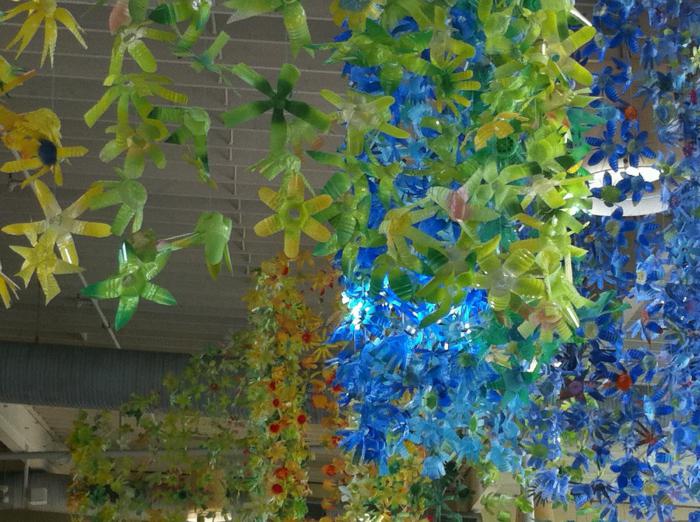
Garden floral wonders
Household or garden plots are an area where creative owners can bring their ideas and fantasies in the field of decoration to life. Beautiful flowers from plastic containers will make the area around the house brighter and more noticeable. So, you can make original decor for a fence, veranda or gazebo. Both compositions of small flowers and single bright buds of large sizes will look organic in the garden.
Decor for wooden surfaces
What do people pay attention to when approaching a private or garden house? Of course it's a fence. Flowers from bottles will help make it memorable and original. To make them you will need:
- bottles of the same size;
- scissors;
- acrylic paints;
- colored buttons;
- glue for plastic;
- screws and screwdriver.
The bottoms are cut off from plastic containers and given the shape of a flower. Transparent blanks can be painted.
The finished flowers are screwed to the wooden parts of the fence. The procedure for fixing crafts depends on the imagination of the master. You can close the screw caps using multi-colored buttons that are glued to the center of each flower.
You can decorate the fence with bright sunflowers. To create them you will need:
- two-liter bottles;
- yellow paint;
- green electrical tape;
- scissors;
- glue;
- metal or wooden rod.
To make sunflowers, it is better to use brown containers. The bottom is cut off from the bottle. The rest should be cut into large petals and painted yellow. When the paint has dried, you can begin assembling the product. Glue is applied to the workpiece from the inside and the brown core is glued.
Two holes are made in the base into which a rod is inserted. The unpainted part of the flower and the rod must be wrapped with electrical tape. Leaves can be made from a plastic folder, and also secured to the stem with electrical tape.
Flowers for a flower bed
It’s quite easy to create a bright, beautiful flowerbed in your garden that will delight owners and passers-by all year round. To do this you will need a lot of multi-colored plastic containers, imagination and some free time.
Garden daisies
Daisies for flower beds can be easily made from white plastic bottles, which are usually sold in dairy products. To create one chamomile you will need:
- three bottles;
- wooden sticks;
- green paint;
- scissors;
- glue.
 First, the sticks are coated with green paint and left to dry. Then blanks from bottles are prepared. The bottom and neck of two containers are cut off. The diameter of the upper hole should be slightly larger than the size of the neck of the third workpiece, from which only the bottom is cut off. The height of the parts differs by 1 cm. 8 petals are cut out of plastic.
Flower assembly begins with the formation of a bud. To do this, two more blanks are put on the neck of the first part. They can be fixed with glue. Then you need to bend the petals. A yellow or orange cap is screwed to this volumetric blank.
A hole is made in the center of the green lid and a prepared wooden stick is inserted. The edges of the lid are covered with glue and connected to the bud. Beautiful garden chamomile is ready!
Bright tulip
Unusual multi-colored tulips can be made in several ways. To create this flower you will need:
- plastic containers;
- paints;
- glue;
- scissors;
- wooden skewers;
- yellow details from chocolate eggs.
Work should begin by preparing the stems. Wooden sticks (skewers, Asian food sticks, fireplace matches without sulfur) are painted green. A dry stick is connected with glue to half of the yellow part.
Flowers can be made from both the bottom and top of the bottle. Pre-selected containers are made in different colors. To do this, they use the internal painting method: pour a little paint inside the bottle, close the lid and slowly turn it around its axis. After uniformly covering the entire inner surface of the container with paint, open the lid and wait for the workpiece to dry completely.
The painted container is cut into two parts and their edges are cut off in the form of sharp or rounded petals. A hole is made in the center of the buds and a prepared stem with a yellow core is inserted into it. To securely fix the stem, the edges of the hole are covered with glue.
Long, sharp leaves are cut out of a green bottle and attached to the stem with glue.
Unusual lilies
White or painted lilies will be a wonderful addition to the floral design of a city flowerbed or summer cottage. You can make this beautiful delicate flower from white or transparent plastic bottles. To work you also need:
- wire;
- acrylic paints;
- scissors;
- awl;
- glue;
- wax candle.
The top part of plastic containers is cut off and the lids are unscrewed. The necks are cut into 6 round petals. White bottles do not need painting.
Transparent ones can be painted white or pink. Two-color buds look very beautiful.
Two holes are made in the lids using an awl. A wire is inserted into them and its ends are twisted. The green bottle is cut into strips 5-6 wide, which are heated over a fire and wrapped around a wire.
The core of the lily is made from a strip of plastic cut into fringes. It is slightly heated over a flame and rolled into a roller. The resulting stamens fluff up and turn yellow.
After all the elements have completely dried, they begin to assemble the flower. The lid with the stem is screwed to the neck. The core with stamens is glued inside.
Decor for artificial ponds
Many garden plots have small artificial lakes. They are decorated with pebbles or figurines, or they can be decorated with plastic flowers.
Water lily
A delicate water lily that will please the eye can be made from an ordinary plastic bottle. To create a beautiful white three-dimensional flower you will need:
- white plastic bottles (4 pcs.);
- five-liter containers;
- acrylic paints;
- scissors;
- tweezers;
- glue;
- source of fire.
Creating a flower begins with preparing the painted parts. Cut a leaf from the bottom of a large container and paint it green.
The top of one of the white bottles is cut off and given the shape of a flower. Take the workpiece with tweezers and heat it a little over the fire so that the petals bend inward. Then the flower is painted. A strip is cut from the middle part of the container, cut into a fringe and rolled into a roll. Its end is sealed over a candle. The stamens are painted yellow with spray paint.
The top part is cut off from three white bottles and the neck is trimmed so that the elements can be placed on the yellow core. The plastic is cut into sharp petals, slightly bending them in the middle.
The petal blanks are placed on the base, fixing each with glue. After the glue has completely dried, the petals are slightly bent. The stamens are glued to the center. The flower is attached with glue to the leaf.
Glowing water pod
A simple flower in the form of a yellow capsule with candles in the center looks original. It is made from plastic bottles with a volume of 1.5 and 5 liters. Cut off the bottom of a one and a half liter container and cut out a flower with five petals from it. It is painted yellow on the outside. A sheet is cut from the bottom of a large bottle, the edges of which are heated and bent into low sides. The finished element is painted green.
The parts of the egg capsule are glued together with glue. Place a small candle in the flower, securing it with double-sided tape. The spark plug can be easily replaced as needed.
By creating crafts from plastic containers, you can not only decorate your garden or flowerbed in a beautiful and original way, but also help clean up the environment.
By involving children in this activity, you can develop their imagination and creative thinking, and develop a caring attitude towards the environment.
Recently, lawns and adjacent areas in the city have been decorated with plastic crafts. When the snow just melts and buds appear on the trees, flowers from plastic bottles are already adorning the lawns. We will consider a master class on field, indoor and garden plants from this material in the article.
Basic rules when working with plastic bottles
It is better for adults or older children to work with plastic under the supervision of a mentor. The fact is that in this creativity you have to work with sharp tools (scissors, awl, knife, cutter), aerosol paints, fire, which can lead to injuries if you are not careful.
The technique for making flowers is simple: draw a template and transfer it to a plastic base. Next, cut out the leaves, petals or finished flower. Poke a hole in the middle of the flower blanks with an awl or soldering iron and give them the shape of petals using fire. First, scorch the edges, then create a bend on the underside of the petal under the flame in much the same way as when creating flowers from satin ribbons. Use tweezers when performing this procedure.
You can make flowers from a plastic bottle from the top. In this case, a hole is pierced in the lid itself, which fixes the position of the stamens and pistils. The leaves are attached using fire or green tape. The stem can also be wrapped in melted plastic or electrical tape. To make the plants look like real ones, it is advisable to paint them with rain-resistant alkyd spray or acrylic paints.
Decorations for wicker fences and trees
Various fences for flower beds are woven from branches. Various flowers are attached to the interweaving of branches for beauty. Trees are also decorated with flowers and other plastic crafts using rope or wire, without deforming the trunks.
Let's look at how to make small five-petal flowers from plastic bottles. The master class is very simple.
- Draw a five-petal flower on paper.
- Use a marker to transfer this template onto the bottle.
- Cut out the blanks.
- Use your hands to bend the petals to the sides.
- Flame all the edges of the flower to make the cuts smooth.
- Then run the flame under the petals to give them a bend or angle.
- Try the blanks on each other.
- Determine the middle of the flowers and pierce with an awl in two places.
- Connect the blanks using a wire, onto which thread two or three beads.
- Twist the wire from the wrong side and cut off the excess ends.
- Now the flowers can be attached to the fence. If you don’t want to make holes, then the first blanks can be made from the top of the bottles, where the fastening goes through the lid.
Roses for outdoors and indoors
To make roses you need to draw templates of different sizes. The more elements, the more magnificent the flowers from a plastic bottle (the photo of roses confirms that multi-layering is created due to petals of different sizes).

Draw seven patterns of rectangles and squares on paper (these will be the elements for one rose). Within their borders, display a flower of four petals, the edges of which have a concave cut. Now transfer the rectangular and square blanks to the bottle. Cut them out using flower patterns.
Using an awl, make a hole in the middle of the rose. Now scorch all the flowers over the candle, lifting the petals up. Remember that melted plastic can cause severe burns, so use tweezers.
Forming roses
Wrap a thick wire with a plastic strip, which you melt over a flame. Leave one edge of the wire for the flowers and sepals (you will put them on in descending order). The middle of the rose can be decorated with a bead and secured with wire. Or cut a small circle from a bottle, cut it into strips, scorch it over a fire to form stamens, and attach it to the middle of the flower.
Next, cut out a template of leaves on a 3-petiole stem from the green bottle. Burn the workpiece over a candle. Twist the petioles of the leaves under the flame and attach the leaf to the base of the rose stem by wrapping the melted plastic edge around it. Using this pattern, make yourself a whole bouquet.
Flowers made from plastic bottles will be more realistic if they are tinted with paints. For example, veins or dark parts can be drawn in leaves; in the petals, enhance the color or add an additional shade. To simplify the work, you can wrap the stems with green electrical tape to match the color of the leaves.
Outlandish flowers from plastic bottles
The master class is a very interesting way to convey experience, as it shows how to make real flowers out of plastic.
- Cut off the top and cap from seven transparent plastic bottles.
- Cut 6 strips, form petals and singe them over the flame. In this case, first bend each petal. Then scorch along the edges and again go through the middle of the petal.

- Paint the blanks with red spray paints.
- Once the surface of the petals is dry, apply yellow paint to the middle of the flowers.
- In the lid of each flower, use an awl and scissors to make a hole of such a diameter that the pistil and stamens, which will be made of beads, can fit through.
- Paint it green (this will be the sepal).
- For the pistil, string a large bead onto a wire, which will be its stigma, and twist the ends of the wire. Only then dial 22 pcs. green beads.
- Make the stamens in the same way from glass beads and 19 pcs. blue beads
For one flower you need to collect the pistil and 6 stamens into a bouquet, wrap them with thread and insert them into the lid with glue.
Collecting flowers in a bouquet
Our flowers look like clivias, so look at their location on the stem in any photo. You need to make seven flowers from plastic bottles for one plant. While the stamens are drying, make 8 large leaves, four medium and four small oval leaves from a green bottle.

Treat each petal over the flame and straighten it a little. Make a hole at the base of the leaf and attach the wire. Now for the stem, take a meter thick wire or cable and begin to place the flowers in the desired position: one flower on top, then, after 20 centimeters, 3 flowers, and after the same distance - 3 flowers, which look in different directions, since their stems bent 90 degrees.
Then, after 10 centimeters, leaves are attached in 2-3 pieces, starting and ending with the smallest ones. That is, the arrangement will be as follows: two small, four rows of large leaves, two rows of medium and two small leaves. The stems are secured with green electrical tape. Such flowers can be installed in a flower bed.
Palm trees - interesting crafts from plastic bottles
Flowers are often made from transparent bottles, but what should you do with brown containers? Let's make a palm tree out of them! We will need brown and green bottles. For the palm tree trunk, dig a cable into the ground, which must withstand strong winds. Brown bottles will need to be cut with 8 pointed teeth on one edge. If you leave the bottom, then make a hole in it, but if you use the top of the bottle, then unscrew the cap.
You put tooth-shaped brown blanks on the cable, and spread the leaves to the sides with your hands or using a flame, creating the effect of tree bark. Once the palm tree has reached the desired length, attach the leaves that you make from green containers.

For foliage, the bottom of the bottles is cut off and long strips are cut to the top. Lids are not needed in this case. Next, leaves of the required length are put on the cable and attached to the trunk of the palm tree. The more branches you make, the more magnificent the tree will be, but then take a thick cable.
Yellow elegant flowers
Let's look at how to make elegant flowers from plastic bottles. The master class is as follows.
- Cut off the top and bottom of transparent bottles.
- Next, draw ordinary petals on them, similar to a rose: narrow at the base and with wide edges.
- You scorch each petal over a candle.

- From a transparent or green bottle, cut out individual leaves without petioles and sepals with 10 teeth, which you also melt over the flame.
- Paint the blanks with acrylic paints: the petals are yellow, the edges are red, the leaves and sepals are green.
- Make two holes in the leaves so that you can attach them to the stem.
- Now cut in half.
- Paint it green and the bottom.
- Make a cut in the middle to insert a petal, which you twist into a bud using fire.
- Insert the remaining petals with the tip, creating one or another tilt if necessary.
- Once the flower is collected, turn it over.
- Insert a kebab stick painted green into it.
- String a sepal and a leaf on it.
Create a whole bouquet using this pattern.
climbing flowers
Now let's look at the master class. Prepare plastic bottles (transparent flowers, green leaves) according to the standard scheme, cutting off the tops and bottoms. For leaves, cut the bottle in a spiral 10 centimeters wide. Draw leaves on a long branch on it, cut it out and melt it over a candle, twisting the petioles in some places.
Then you make templates of two colors with five petals: large and small. You also burn it with a candle and paint it with paints. Make holes in the middle of the flowers and connect the two templates with wire, taking several beads for the stamens.
The next step is to poke holes in the leaves in the right places on the vine and attach the prepared flowers, cutting off the excess ends and hiding the wire in the foliage. Next, combine all the curly branches into one bundle, fasten them and hang them on a nail or in a flowerpot.
As you can see, you can make a wide variety of flowers for the garden and home from plastic bottles. And naturalness and naturalness can be given to them with the help of paints.
Relevance
Products made from plastic bottles are very popular in everyday life and for decorating homes and gardens. Crafts made from plastic bottles amaze with their diversity. A plastic bottle is a second life, which will be much brighter, more varied than the previous one, and will be the main material when composing a bouquet. DIY crafts made from plastic bottles will decorate your garden plot, flower bed and will delight your eyes.
Plastic bottles for various drinks are mostly green or transparent. Products made from them are original, light and modern.
The work of making products from plastic bottles promotes the development of hand muscles, improves the eye, and consolidates labor skills and skills acquired when working with other materials. This is explained by the typical nature of work operations, characteristic of all types of labor.
The master class is designed for experienced and beginners.
Target: introduce teachers, educators, and parents to this type of creativity, as well as make a bouquet from plastic bottles and decorate the area with it.
Tasks:
Develop product design,
Draw attention to this type of arts and crafts.
The leading idea is to decorate the garden plot with flowers from plastic bottles, to give yourself and people joy and a good mood.
Plastic bottles are a wonderful material
Cheap and accessible: can be obtained at any time;
You can give it the desired shape by processing it over a candle;
Products can be painted with alkyd, acrylic aerosol paints.
Occupational Safety and Health
Dangers at work:
Hand injury from scissors, awl;
Painting the product;
You can get burned while working on a candle.
What you need to do before you start:
Place tools and materials in the designated place.
What to do while working:
Be attentive to your work;
Place the scissors on the right with closed blades and rings forward;
It is better for older people to cut plastic bottles, as difficulties arise, especially at the very beginning of the work (it is difficult to pierce a bottle). The material is cut across and along the bottle with scissors quite easily. The most difficult to process are the bottom and neck of the bottle; here you need to work especially carefully so as not to injure your hand;
Work over the candle carefully, do not burn yourself;
Work in a well-ventilated area.
Tools and materials
Green (5-6) and transparent (7) plastic bottles,
Scissors;
PVA glue;
Glue Master;
Acrylic, alkyd aerosol paints (white, blue, red);
Turquoise enamel;
Candle with a diameter of 2 cm;
Green electrical tape;
Wire of different diameters;
Large beads of two colors;
Oblong and round beads;
Thick threads (iris).
.jpg)
Lilies- wonderful, beautiful flowers,
They have been growing on earth for hundreds of years,
A symbol of power, tenderness, purity,
There is no ancient flower in the world.
In the old days, legends and myths were composed about them,
Songs and poems were dedicated to them,
In each country they were revered in their own way,
Lilies are flowers of hope and love.
No one knows where these flowers came from.
Maybe their deities sent us from heaven,
Lilies live successfully on earth,
They give people beauty and miracles of miracles... Lyubov Petrova.
Stages of composing a bouquet of flowers
Making the core
1. Make 7 pistils and 42 stamens from large seed beads.
To make a pestle, take a thin wire 20-25 cm long, string a green bead on it, bend the wire in half and string 22 large yellow beads on two ends.
To make stamens, take a thin wire 20-25 cm long, string an oblong bead onto it, bend the wire in half and string 19 blue (orange) beads on two ends.

2. To collect one flower, you need to take 1 pistil and 6 stamens. Attach the pestle with threads to the aluminum wire, lubricating the wire with PVA glue, and distribute the stamens evenly around it and fasten them with thread.

Making a flower
1. Take 7 transparent bottles and cut off the top of them.
2. Cut each part into 6 equal strips towards the neck. Cut out petals from each strip, cut off a corner from the middle of the upper part on the right side, then slightly rounding it off on the left.


3. Process each petal over a candle, giving the petals the desired shape. First, work between the petals, and then the edges of each petal, pressing the other petals with your fingers.


Many homestead owners create all sorts of products from plastic bottles to decorate their place. You can create real works of art by spending a minimum of money.
Not only decorative items are made from plastic, but even furniture. All you need is a knife, an awl and a little imagination.

In this article we will look in detail at how to make crafts from plastic bottles with your own hands.

Decorating the site
You won’t see any kind of homemade products on personal plots. There are flowers, animals, and trees. You can create beautiful sculptural compositions that will not only decorate the garden, but will also give you a great mood.
Let's look at a couple of instructions for beginners that will help you easily create crafts from plastic bottles. It will be a palm tree and a pig.

Bottle palm
To make a palm tree you need to create a frame. Its length should be equal to the height of the tree.

Take bottles of the same size, cut off their bottoms and place them on top of each other. Then the leaves are cut out. They are attached to the top of the created structure. When everything is ready, the palm tree is painted green.

Funny pig made from bottles
The pig will look great anywhere in the garden. To make it you will need:
- 5 liter bottle;
- four bottle necks for making legs;
- one top part from a bottle, which is cut into two parts to make ears;
- wire for tail;
- two beads for eyes;
- glue;
- pink paint.
The parts are connected and secured with glue. The finished product needs to be painted. You can use oil or spray paint. To prevent the piglet from being blown away by the wind, you need to pour sand into it.

In addition to its decorative function, the structure can serve as a flower bed. To do this, the top is cut off, filled with soil and flowers are planted.

Crafts made from plastic bottles for the garden can serve as flower beds, borders or paths. To make a path, bottles are inserted into the ground with their necks.

Both whole and cut plastic are used. It is important to fill the bottles with soil so that they do not become deformed when they are walked on.

Use of bottles on the farm
Bottles are used not only for decoration. These can be used to make a dustpan, washbasin, or pest trap.
Undoubtedly, everyone needs a container for storing some items. To make it, just cut off the neck.

The washbasin is also very easy to make with your own hands. The bottom of the bottle is cut off and holes are made through which the rope is threaded. The structure is hung in the desired place and water is poured. To wash your face, just unscrew the cap a little.

To make a trap, you need to cut the container in half. To catch insects, some kind of bait is placed at the bottom. For example, sugar syrup with yeast is suitable for this.

You will need hot water in which the sugar and yeast will dissolve. The cooled liquid must be poured into the trap. Not only flies and wasps, but also mosquitoes will flock to this delicacy.
Note!

Even a child can make a scoop. First you need to outline its shape and then cut it out.

Plastic can be used to make flower pots, greenhouses or containers for seedlings. Descriptions of such crafts made from plastic bottles can be found in large quantities on the Internet, but to create something unique, you need to show your imagination.

It is fashionable to build a self-watering device from plastic containers. To do this, cut the bottle, make holes on the sides and insert the hose into the neck. With the help of such a device, the plants will be perfectly hydrated.
For plants that do not like surface watering, make the following device. The bottom of plastic containers is not completely cut off. A trench is opened on the side of the plant where stones are placed. The bottle is buried upside down.

Then the required amount of water is poured to carry out irrigation. You can place the bottles upside down, but in this case you will need to make holes in the container.

Plastic containers are also used to heat plants. To do this, bottles are filled with warm water and placed around the plant.
Note!


For inspiration, you can look at various photos of crafts made from plastic bottles. You don’t need to put in a lot of effort to make an original decoration or useful item for your garden that will last for many years.

Photos of crafts made from plastic bottles


Note!


Plastic bottles are an inexpensive and accessible material from which you can make many unique and original things that can not only decorate your garden or yard, but also bring practical benefits. At the same time, you do not need to have plumbing or construction skills, nor do you need to buy expensive tools and equipment. The instructions below will help you implement the most unusual ideas.
Flowers from polymer containers
You can start the creative process of decorating your suburban area by making flowers from plastic bottles for the garden. This will not require much effort from you, and the result will exceed your wildest expectations. Once you get the hang of it, you can make more than just one flower, but an original and unusual flower bed that will delight the eyes of all the inhabitants of the dacha and its guests.

Before starting work, you need to prepare the following materials:
- The required number of polymer containers. Garden crafts made from plastic bottles of the same size and shape will not look very attractive, so it is advisable to diversify the raw materials. Remember, the larger the bottle, the larger the flower corollas will be.
- Acrylic paint. It is used for coloring plastic, therefore, before purchasing, you must check the instruction manual and make sure that the selected composition is suitable for application to a plastic surface.
Advice!
If your bottle garden is “grown” from already painted containers, you do not need to buy paint and apply it to the parts, which will speed up the manufacturing process and reduce its labor intensity.
Further work is carried out in the following sequence:
- Bottles need to have their necks cut off. There is no need to remove a large amount of plastic, just separate the cork itself and the hangers. The rest of the container will go to the petals and corolla.
- Using a garden knife or stationery scissors, cut petals of a suitable size and shape from the bottle. Do not separate them from the bottom of the bottle, since the latter will protrude from the middle of the bud to which the “stem” is attached.

- To give the petals a more natural shape, they can be rounded. A knife or metal rod heated with a blowtorch or gas burner will help with this. The first crafts made from plastic bottles for the garden are unlikely to be ideal, however, as you gain experience, your products will look better and better.

- You can also make a multi-layered flower. To do this, a second one, cut in a similar way, is attached to the first part using an awl and wire.
- The last stage is attaching the stem. The material for it will be a metal rod, a wooden stick, strong wire, and so on.
You can decorate the flower stem as follows:
- cut a ribbon from another container with which to wrap the stem, then secure it by melting both ends;
- wrap a green hemp rope around a rod or stick and glue it with PVA glue.

Note!
Crafts made from plastic bottles for the garden do not have to be large and tall.
Low small flowers also look attractive.
It is only necessary to organically fit them into the landscape.
Useful devices
Do-it-yourself garden crafts made from plastic bottles can bring not only aesthetic pleasure, but also perform many useful functions. The scope of their application is limited only by your imagination.
Solar water heater
If you have not yet installed an electric or gas heater in your country house, a solar collector will help ensure that the water in the shower is heated to a comfortable temperature.
Like other crafts made from plastic bottles for the garden, this device is made from polymer containers without the use of complex and expensive equipment. The price of hot water in this case will be zero, which, among other things, will help you save on utility bills.

So, to construct the collector you will need the following materials:
- plastic bottles with a capacity of 2 liters;
- empty milk cartons;
- polymer pipes with a diameter of 100 and 20 mm;
- accessories for plastic pipes (tees, angles and plugs);
- glue for joining plastic parts;
- matte black paint;
- sandpaper;
- duct tape;
- paint brush;
- wood hacksaw;
- mallet.
For ease of presentation, it is advisable to divide the manufacturing process itself into several stages:
- The bottom of plastic bottles is cut off, after which they are inserted into each other in pairs and glued together. It is necessary to ensure that the seam is sealed.
- The frame is assembled from pipes. Parts with a diameter of 100 mm are needed to form the frame, and smaller ones (20 mm) are suitable for connecting bottles together into a common network. Use fittings in the right places.
- The entire collector is mounted on a sheet of plywood, covered with black milk bags on top. The pipes are also painted the same color. This will help increase the heat-absorbing characteristics of the parts and increase the operating efficiency of the entire device.
- The finished structure must be installed on the roof of the house or its southern wall. The collector must be mounted at an angle to receive maximum ultraviolet rays.

According to the inventor, the collector panel, with an area of 1 sq. m. effectively heats enough water to wash one person.
Growing plants
What other DIY garden crafts made from plastic bottles can be useful? Naturally those that help in growing plants. We are talking about containers for seedlings, as well as devices that help water the lawn and garden in the summer.
Making both the first and second products is not particularly difficult. All you have to do is cut off the neck of the bottles and make holes for drainage or water dispersion.

If you paint a pot or diffuser with acrylic paints, you will get a garden decoration made from plastic bottles that will also carry a useful load.
Buildings and constructions
House
Immediately after purchasing a country plot of land, any summer resident wants to build a home there to shelter from bad weather, store tools and simply relax after hard work in the garden.
Therefore, when talking about what kind of garden crafts you can make from bottles with your own hands, it would be useful to mention the possibility of building a temporary (and perhaps permanent) residential house from them.
Before replacing traditional bricks or cinder block with polymer containers, check out the following tips:
- Bottles need to be filled with river sand. This will increase their strength and reduce the thermal conductivity coefficient.
- It is recommended to lay a reinforcing metal mesh between adjacent rows, which will further strengthen the finished structure.
- Cement mortar does not stick to plastic, therefore, many holes must be made in each bottle, which will allow the mounting mixture to interact with the sand located inside the container.
- During laying, it is advisable to secure the necks of the bottles with twine or wire until the solution completely hardens. This will prevent the wall being built from spreading.

Note!
The polymer from which the bottles are made loses its properties over time due to exposure to adverse environmental conditions.
Therefore, do not expect that your house will last more than 5-10 years.
Other elements of the building can be made from the material in question:
- Roof tiles. To do this, plastic bottles need to be heated in the sun so that the polymer softens a little, and then compressed using a steel or wooden sheet with a load placed on top.
- Slate. It's even easier to make. You need to remove the neck and bottom of the bottle, and then cut it lengthwise into two parts. The resulting elements can be fastened together using adhesives. You just need to carefully monitor the tightness, otherwise your roof will leak.
Gazebos and greenhouses
However, these are not all ideas for a garden made of plastic bottles. After all, this material can be used to construct a gazebo or greenhouse, replacing expensive polycarbonate or fragile glass. The polyvinyl chloride from which the containers are cast has similar consumer properties.
The work on making a gazebo is carried out as follows:
- Using wooden beams, metal corners or polymer pipes, you need to make the frame of the future structure.
- Using a drill, awl or a hot knitting needle, holes should be made in the bottom of each part. Then all the bottles are strung on a fishing line or twine, the length of which is slightly greater than the height or width of the frame.
- The resulting bunches are fixed both along and across the frame. The layers must be additionally tied together with wire to reduce the vibrations of the bottles in windy weather.
- You can create an attractive appearance using containers of various colors and sizes, creating a beautiful ornament from them.

A pergola and a greenhouse are built in the same way as a gazebo, so there is no need to describe this process in detail.
Parking space
Few motorists like it when their “iron friend” is standing under the scorching rays of the sun, rain or snow. Therefore, many people build carports using corrugated sheets or polycarbonate for this purpose.
However, a regular plastic bottle will work just fine. The resulting structure will not cost you much, and with some imagination you can make a canopy that will serve as one of the decorations of your summer cottage.
The work should be done like this:
- a hole is made in the bottom or cap of the bottle, after which a fishing line, twine or wire is fixed there;
- then the resulting blanks are attached to the frame, forming dense rows;
- to prevent the protective coating from being too mobile, the bottles can be additionally cross-linked;
- To protect the parts from sunlight, it is advisable to paint them with acrylic paint before installation.

Conclusion
Garden crafts from bottles are not only a way to save on the purchase of certain devices or decorations. With their help, you can show your creative inclinations and emphasize your individuality.
You can get even more ideas and ways to implement them by watching the video in this article.